The Flare Path: Black Sea Battlecast
Wargame & simulation blather

Phone switched off? Bladder empty? Puffed corn snacks to hand? I only ask because last time The Flare Path ran a Combat Mission battle commentary, I seem to recall you missed that amazing turn where I dropped a mortar bomb down the hatch of an unbuttoned King Tiger then wiped out an entire squad of Fallschirmjäger with a single ricocheting ATR round.
I can't promise jammy Tiger II kills or preposterous PTRD shots today (Combat Mission Black Sea imagines a contemporary conflict involving Ukraine, Russia and the US) but the combination of CM's hi-res ballistics and my tactical hamfistedness is sure to generate the odd “Gosh!” and “Well I never!”

Rather than shop-soil one of the campaign chunks or single scenarios in Battlefront's latest 3D dual-mode (real time or WeGo – it's up to you) wargame, I thought I'd try a Quick Battle this time out. Quick Battles feature customisable force mixes on player-selected prefabricated maps. I like the look of 'Tiny Going to Town', a diminutive oblong of urban Ukraine neatly divided into halves by a canyon-like sunken highway (hereafter referred to as 'The Trench'). The 30 minute/turn time limit should guarantee pacy proceedings and ensure we reach a conclusion before the RPS deadline goblin comes a-knocking.

Ah. Of course, the snag with choosing a 'tiny' battle is that I don't get many points to spend during the unit selection phase. With a mere 2500 in my war wallet I won't be able to afford Black Sea novelties like UAVs, precision artillery shells, and gunship air support. And as Going to Town is drier than a Noël Coward quip, you won't get to see the new amphibious AFVs in action either. Oh well, I can at least afford a Main Battle Tank with a natty Active Protection System fitted. If my lone M1A2 detects a sizeable incoming projectile, it will (fingers-crossed) attempt to neutralise it with an automatic flurry of buckshot.

That Abrams will be going into battle alongside a Bradley IFV, three infantry squads, and a small collection of HQ, spotter, MG and Javelin teams. My artillery support will be provided by two off-map 60mm mortars. It would have been nice to field a Stinger slinger just in case, but as my Russian enemy will be doing his purchasing with a budget as meagre as my own, I think it's pretty unlikely I'll be harassed by Hinds or MiGs today.

There's only one Victory Location on the map – a bridge slap-bang in the centre – and I'm gambling on the fact that I can reach it faster than my opponent. Hopefully, by the time he arrives, two of my infantry squads will be waiting for him in buildings on the 'red' (enemy) side of The Trench, and my M1A2 will be lurking in a low, semi-shielded position on the 'blue' (friendly) side. I'm sending my other infantry squad, the Bradley, and one of my two Javelin teams to cover the ramp on the right-hand side of the map in case there's any attempt to seize the bridge with a sly flanking manoeuvre.

00.10 Step lively, lads. It's vital we grab that overpass before the Russians show up.

02.00 If the enemy has rushed units towards the VL, then my vanguard – presently haring across the bridge in a ludicrous conga line – is presenting a perfect target right now. Spread out you idiots. Spread out!
03.00 Phew. Made it. While my squads get their breath back on the ground floors of their assigned buildings, I split off scout teams and send them scampering up stairs and through doors to check for approaching hostiles.

04.30 First blood to the Americans. The Bradley's 25mm chain gun fatally ventilates a Russian infantryman who's making for the right-hand side ramp.
05.05 It appears the unlucky Ivan wasn't alone. My idling IFV now sports a fetching layer of dust and gravel; the road just in front of it an alarming crater. The projectile looked like it emanated from one of the buildings opposite; some form of RPG no doubt. I wonder if I should plot a reverse move during the next orders phase or just area-fire the suspect buildings.
05.10 Gulp. One of my scout teams has heard the unmistakeable growl of an approaching MBT.
05.15 Blimey. There's a T-90 heading towards the bridge and I'm 45 seconds from an orders opportunity. In theory, my vanguard is reasonably well positioned and equipped to deal with it without additional orders.
In theory.

05.20 That wasn't in the script. Instead of spitting a 120mm sabot round at the Russian tank, my armoured lynchpin had decided to discharge smoke and reverse behind a nearby structure. How very helpful.

05.30 Thankfully, one of my two-man scout teams shows a little more pluck. An AT4 is shouldered, aimed and fired as the squat green giant, also unnerved by the unexpected confrontation, begins to backtrack.
05.35 A hit but no coconut. Annoyed but undamaged, the trundling Russian brute stops, turns its turret in the direction of the brave scout and fells him with an MG fusillade.
06.00 There's a rash of red contact icons visible from my bridgehead now. The left-hand scout team is busy exchanging small arms fire with troops approaching from that side of the map, and a sizeable contingent of Russian infantry appears to be approaching up the bridge road. Exasperated by my Abrams lack of valour, I 'hunt' it across the bridge. Get stuck in. That's an order!

06.10 The M1A2 arrives at its destination and immediately begins hosing the troops at the end of the bridge road. Meanwhile the T-90 just out of LOS in a side street to the right, notices the other scout team and sends them a hefty helping of brick-pulverizing, roof-raising HE. Ouch. Though the scout team were three floors above the squad of patient ambushers that spawned them, almost everyone in the building seems to have been wounded or incapacitated by the tank round.
07.00 With one of my M240 MG teams now pouring fire across The Trench in support of the bridgehead and a spotter team hurrying towards the same buildings with mortar missions in mind, I decide to have another bash at the T-90. Rather than risk a close range tank duel, I'll split off a two-man AT team from my right-hand rifle squad (still unscathed) and send them into the room where the gallant scout met his end.
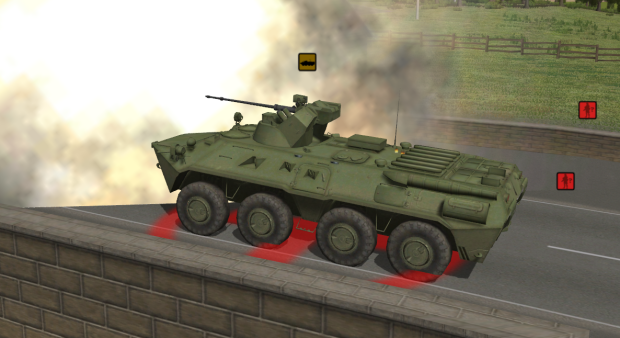
07.20 What's the Russian for 'KABOOM'? Seconds after an eight-wheel BTR-82 APC appears amongst the growing collection of corpses at the far end of the bridge road, my M1A2 spies and savages it. That's more like it.

08.25 Sneaking into position, the tank hunters find themselves gazing out at a scene busy with sprinting soldiery. An enemy infantry squad is in the process of infiltrating the block beside the bridge, and perhaps because I've failed to give my team an attention-focussing 'target armour' arc, they choose to engage the small fleshy targets rather than the large steel one. It looks like a SNAFU until the Russian tank, apparently spooked, begins reversing out of the side street into a yard with no LOS to the bridgehead. If it wants to cower there for the remainder of the battle that suits me just fine.

09.30 Sitting on the overpass like a peeved robo-troll, my Abrams is doing a fine job of breaking up enemy bridge assaults, but the crescent of red icons continues to close round the bridgehead.
10.00 That's not good. Helped by a smoke screen that's partially blinding the M1A2 and the M240s, pressure on the left side of the bridgehead (the side defended by shell-ravaged 2nd Squad) is increasing. If I had any reserves, I'd be committing them at this point. With so many scarlet icons clustered around the right-hand side ramp, I'm loathed to retask my Bradley and third rifle squad at the moment.
10.50 The smoke clears revealing a Russian squad artfully positioned behind a wall on the M1A2's ten o'clock. Despite a swift HE rebuke, one of the flankers manages to launch an RPG at the target on the bridge. Happily, the grenade falls short. I'd withdraw my MBT to safer ground, if the LOS from the bridge wasn't so bally good and the left side of the bridgehead wasn't in such imminent danger of being overrun.

11.00 Yep, there are Russians within the bridgehead now. It looks like it's all over for 2nd Squad.
11.40 Another RPG sails towards the M1A2. This one detonates against the bridge parapet. Phew.
11.50 Medic! My spotting team and MG team have both lost a man. There's an awful lot of small arms fire coming back across The Trench on the left-side of the map at the moment.
12.30 Talk about Close Quarters Battle. The last enemy infantry rush ended metres from the bridge in a hail of co-ax and M4A1 fire. All credit to my artificial adversary. He really wants this VL.
14.00 We're almost halfway through the allotted thirty turns, and somehow my thinly spread forces seem to be hanging on. If the foe brings his MBT back into play (the T-90 is still skulking in that yard) all bets are off, however.
15.00 I can hear the Bradley's chain gun chattering away in the distance. It sounds like the Russians are still trying to push infantry down the right side. Pity CM doesn't come with a more reactive AI. That's where I'd be sending my T-90 if I was him.

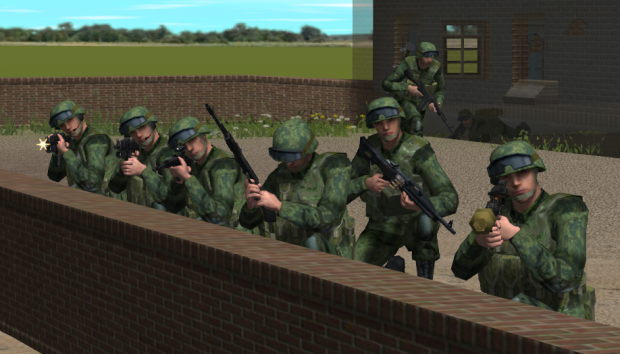
16.00 Well I never! I thought 2nd Squad were no more, but, incredibly, three of them are still kicking, still dishing out death with M4A1s and a 'Punisher' air burst grenade launcher.
16.30 The Ivans seem to be running out of steam. Why don't they do something with that T-90 before it's too late?
17.00 Was that the clatter of caterpillar tracks on cobbles?
19.00 I decide to 'hunt' my Bradley down the the right edge. Maybe I can catch a few infantry squads near the bridgehead with long-range enfilade fire.
20.40 A few hundred metres behind the advancing Bradley jogs one of my two Javelin teams, hungry for a chance to have a pop at that shy T-90. Like the mortar teams, they've been scandalously under-utilized so far.

22.10 Just as the Javelineers arrive on the far side of The Trench, the T-90 finally rediscovers its sense of duty. Speeding from its funk-hole with exhausts belching, it waggles its tail dismissively at my Bradley and makes for the bridge.
22.12 Obviously fancying its chances, the Bradley peppers the posterior of the speeding Russian giant.
22.15 The pair of armoured heavyweights are about to come face-to-face again. Is my MBT going to embarrass itself for a second time? More smoke grenades, more flustered reversing? To find out all I need to do is press the PLAY button.


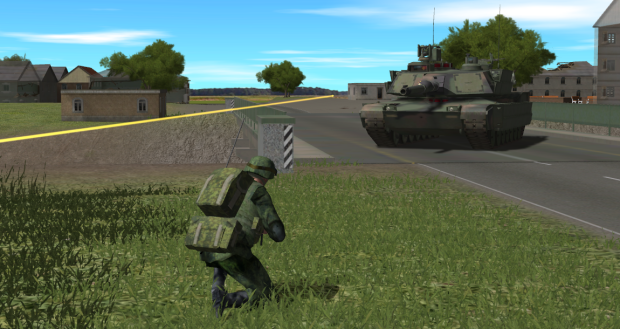
22.20 A split-second after the enemy machine rounds the corner, my M1A2 repays the 833 points I invested in it. Stunned Russian tankies spill from smoking hatches, only to be brutally cut down by assault rifles poking from nearby windows.

23.00 It's all over. Their touchstone torched and their ranks ravaged, the enemy has thrown in the towel.
Gosh, the AAR stats won't go down well in Moscow.

************************************
The Flare Path Foxer
On January 30 1959, a brand new ship specially designed to survive the rigours of the North Atlantic was disembowelled by an iceberg off Greenland. On January 30 2015, a brand new foxer specially designed to survive the rigours of Google Image Search was disembowelled by All is Well, Matchstick, AFKAMC, billy_bunter, mrpier, phlebas, jinglin_geordie and Artiforg off Greenland.

Theme: 'The Danish Titanic' - MS Hans Hedtoft
a. Dive to the Titanic shortcut
b. Aviatik Berg D.I
c. HANS device
d. Vladimir Vetrov (The ship was lost south of Greenland's Cape Farewell)
e. Ford Ka (a reference to the Hans Hedtoft's ID code 'OXKA')
f. Greenland stamp
g. Oxalate (a reference to the Hans Hedtoft's ID code 'OXKA')
h. Wellington's horse, Copenhagen (the ship had sailed from Copenhagen)
i. Sir Malcolm Campbell (USCGC Campbell responded to the distress call)
************************************

All answers in one thread, please.