Rock, Paper, Shotgunity, Post 12

I've realised that the relative complexity of the Shotgunity project might be distracting from a central idea I've wanted to get across in this series, namely that it's easy to make games with the Unity tools. To prove this point, today, together, we're going to make a clone of a giant in gaming ancestry, we're going to make Pong in a post. And not even an overly long post at that. Grab a copy of Unity and meet me after the cut.
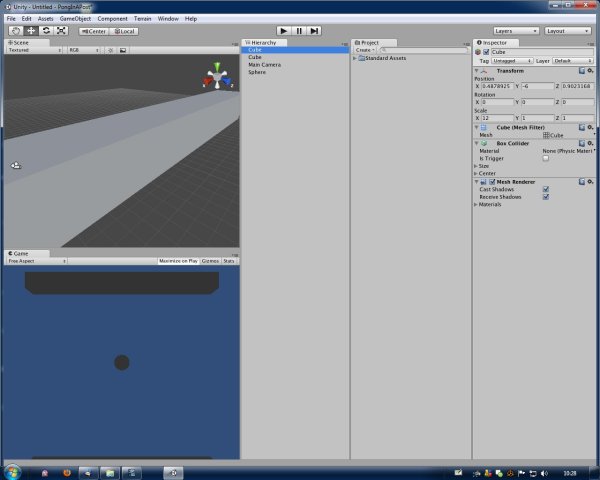
Once you've got Unity downloaded and installed create a new project. Name it PongInAPost. The default Unity interface is made of 5 windows or tabs: The Scene view, the Game view, the Hierarchy tab, the Project tab and the Inspector tab. They'll all be pretty empty at this point. In the main toolbar at the top of the screen go GameObject>Create Other>Sphere to create the ball for our pong game. Note the Inspector tab is now full of details for this object. In the Inspector tab make sure the X, Y and Z position values are all set to 0. The object itself, 'Sphere' is now listed in the Hierarchy tab. Above the Sphere object in this Hierarchy tab you'll see another object 'Main Camera'. Highlight (click on) this object in the Hierarchy tab and from the main toolbar again go GameObject>Move To View. In the Scene view you'll now see that the Sphere has a new icon in the middle that looks a bit like a camera with three axis arrows attached to it. Grab the Blue arrow with the mouse and push it back until you can see the Sphere appear in the Game window below When you move the camera with this axis arrow note that the Z position value changes in the Inspector tab. You can directly adjust this value in the Inspector tab to be more accurate. Change the Z value to about -10 and hit return. The sphere should now look pretty small in the Game window.
Now go the main toolbar and go GameObject>Create Other>Cube. This will create a new cube object in the same place as our Cube (unless you've deviated from instruction and moved the Scene view... Naughty!). Grab the green axis of this new cube and move it up a little. See the Y position value of the cube changes in the Inspector tab to match. In the Inspector tab, change this value to about 6.
There's a third way to adjust the transform values of object and that's using the icons at the top left of the Unity GUI. Cick the last one in this row of four (Scale the Highlighted Object) and - making sure the Cube object is still highlighted blue in the Hierarchy tab – hover the mouse anywhere over the Scene view and hit the 'f' key. This will focus the Scene view on the Cube object. Now grab the Red axis on the cube and pull it until the Cube has stretched out into a long bar (the X scale value in the Inspector tab should end up being about 12. Adjust the value directly in the Inspector tab if you prefer).

With the Cube object in the Hierarchy tab still highlighted hit crtl+d to duplicate the Cube and change the Y position value of the new duplicated cube to about -6. You should now have two long bars above and below the Sphere in the Game view. Duplicate a third cube (select one of the bars you have in the Hierarchy tab and hit ctrl+d) and move this third cube along it's Y position axis back near to the Sphere. Change it's X and Y Scale values in the Inspector tab to 1 and 2 respectively. You should now have a stumpy pong paddle near the Sphere. Adjust its X position value until it's at one side of playing area but still inside the top and bottom bars, i.e don;t move it beyond the end of the long bars (see screenshot).
Duplicate the paddle and move the new one over to the other side of the play area. We now have four objects called simply 'Cube' in the Hierarchy tab and this might get confusing so we can rename them by right clicking on the object in the Hierarchy tab and then Rename, just as you would in windows explorer. As with explorer you can also do two slow clicks on the object to rename it. Try this as we'll need to use this method in a minute. You can zoom the Scene view out with the mouse wheel a so you can see what objects you're highlighting. It's probably a good idea to save. Go File>Save Scene from the toolbar and call it whatever you like.

Now we'll make the paddle controls. Right click on a blank part of the Project tab and go Create>JavaScript. This will create a new script component called NewBehaviourScript in the Project tab. Rename this “Player1controls” using the slow click renaming method. In the Inspector tab you'll see an Edit button for this new script. Click it to open the script editor. Paste the following code into the new document, replacing any text that's there:
function Update () {
if (Input.GetKey ("q")) {
transform.Translate (0, 4 * Time.deltaTime,0);
}
if (Input.GetKey ("z")) {
transform.Translate (0, -4 * Time.deltaTime,0);
}
}
This code just checks to see if the Q and Z keys are pressed then moves whatever the script is attached to up or down accordingly. Save this script and return to the main Unity screen (i.e minimize the script editor...). Make another new script in the Project tab and name it “Player2Controls”. Add the SAME code to the new script but change the letters q and z to o and m or whatever letters you'd like to use for player 2 controls.

We're nearly there! Drag the Player1controls script from the Project tab onto one of the paddles, then drag Player2Controls onto the other. If you click the Play icon at the top center of the screen now you'll preview the game and see that the keys control the paddles.
Now let's give the ball some movement. Highlight the Sphere object in the Hierarchy tab and go Component>Physics>Rigidbody from the main toolbar. You'll see in the Inspector tab that this has added a Rigidbody component to the list of components. Uncheck the Use Gravity box you see there. Change the Mass value to 0.01. A little above the Rigidbody component in the Inspector tab you'll see a Sphere Collider component. Change the Material value to Bouncy by clicking the tiny arrow at the end of the value and selecting it from the drop down menu.

You should now see a small icon and the word Bouncy in the value part of the Material of the Sphere Collider component. Click this icon and you'll see a yellow box flash up in the Project tab to highlight this Bouncy material. Drag this material from the Project tab onto both of you paddles and the top and bottom bars to add bounciness to all your gameobjects (apart from the camera...).
We've got two more things to do. Add initial force to the ball and respawn it if goes beyond the edge of the play area. First we'll add force. Create a new Javascript in the Project tab and call it BallMover. Click edit in the Inspector tab and replace the text of this new script with:
function Start () {
rigidbody.freezeRotation = true;
yield WaitForSeconds (2);
rigidbody.AddForce (Random.Range(3, 5) , Random.Range(3, 5) ,0);
}
function Update () {
transform.position.z = 0;
}
Save it and drag this BallMover script from the Project tab onto the Sphere object in the Hierarchy tab. If you click Play now to preview the game you'll see the Sphere move in a random direction with random force (between a range). This is almost the game done, but we want to respawn the ball if it goes beyond the play area. So finally, from the main toolbar, go GameObject>Create Empty. Rename this new gameobject “OutOfBounds” in the Hierarchy tab. With the object highlighted go Component>Physics>Box Collider and in the Inspector tab tick the isTrigger box. Place this OutOfBounds object at the edge of the play area, and change the Y scale value in the Inspector tab to about 12 or whatever covers the whole side. Now create a new JavaScript in the Project tab and name it “RespawnBall”. Add the following code to the RespawnBall script replacing whatever's there:
function OnTriggerEnter (other : Collider) {
other.transform.position = Vector3(0, 0, 0);
}
Lastly, drag this RespawnBall script from the Project tab onto the OutOfBounds object in the Hierarchy tab then duplcate (ctrl+d) the OutOfBounds object and place the copy at the other end of the play area. Save and preview the game.

If it's all working as expected, go File>Build Settings... then click the Add Current button in the build window that pops up. Make sure WebPlayer is ticked and click Build. Call the build anything you like. Unity will then export and build the project and you'll end up with a webpage you can open in your browser and play your pong game.
There you go, Pong in a post. You can grab the Project Files for this super quick pong from here to check your version matches mine. Id like to see your versions and what improvements you can all make, so why not post yours in the Forum?
Now, I'd better stop procrastinating and get on with Shotgunity...