Hands On With Total War: Shogun 2
It's true, I've been playing a build of Shogun 2. That build includes the extensive tutorials - covering a slice of the campaign map, naval battles - and a historical manfight, the Battle Of Sekigahara. Find out how I got on below.
First impressions... what a lovely menu screen! I do like the blossoms.

From there we head out into the tutorials. The campaign tutorial delivers a slice of the main campaign map, starting you out on the south coast of Shikoku island, far from the Imperial capital of Kyoto, but just a stone's throw from enemy provinces. What's immediately rather fetching about this is the way that the territory is revealed from the “parchment” map of the distance. Moving your units about lifts the undulating hills and valleys from the fog of war, although the beautiful calligraphic area names remain. It's really lovely, although not exactly a huge leap onward from Empire's campaign map – it has much the same tech running things – yet the look and feel is considerably improved by little touches like the terrain reveal and the Medieval Japanese presentation. I like that the UI elements hide themselves away when not needed, or deselected. It's at the same time information-packed and minimal. It really is a pretty thing. But that's to be expected.

As in the other games, the campaign map is a work of multi-pronged management. Each province has a capital, which can be buffed up into various tiers of fortress, while the outlying land has farmlands (rice paddies) that can be improved with farming infrastructure, roads, and so on. The interface feels a little more artful than the one we had for Empire, and that's not just because one of the core tech-tree things is, well, The Arts. This is like a talent tree in an MMO or something, allowing you to unlock progressively more complicated specialisations as time passes. Remembering to come back to that over time looks like it might be annoying on the first pass, but it's an interesting element for customising your clan's development.

The other stuff that the tutorial gave a quick pass to is the tax system – pretty much as you'd expect it, but with a nice slider/map combo that shows exactly how cross people will be if you levy the underpants from their nether-regions. Then there's the management of the various individual generals, who can be commissioned to work on diffeent areas of your governance. Commission a chap for development and he gets bonuses in that area, related to where he is positioned, commission one for warfare and, well, he'll provide bonuses to stabbing people in the eye. There are also ships – which come out of your ports, obviously, and coastal trade points across the various islands, which bring in extra cash if you put non-combatant vessels in there. All familiar stuff.

I played out the little tutorial story as instructed, but rather rushed into the final battle. Unwilling to wait to build a large army, I sped across the island to assault the enemy capital. It was a siege, and I had thought that I'd sabotaged the gates of the fortress with my ninja (yes, the first agent you are given is the ninja, and he can both set back armies and sabotage fortresses, a potent bloke). Clearly I'd done it too early, however, because the gates were repaired when I conducted my attack. I am not sure what it is about sieges and Total War, but they just cannot run smoothly. While I did manage to burn down the gates on my second or third try, there was nevertheless the now-familiar jiggling of bodies under heavy missile fire before it really worked out. With access to the fortress forced, I rushed in and got stomped. I had about half the spear-dudes and Samurai that I actually needed to take the enemies down. Sigh.

I spent some time raising more armies and testing the straight battles vs the auto-resolves. The auto-resolves do seem to fall slightly against your favour, so folks who can't be arsed playing all the battles (that's me!) will probably scrape by without too much fuss.

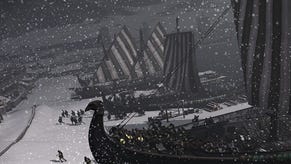
From here I decided it might be a good idea to take a look at the naval battles. This is immediately breathtaking – the coastal detail is even more impressive that the battles maps that I've seen, and the first thing in the tutorial is a lavish, burning ship, on fire in the bay. Being oar-driven means the ships are far more straightfoward to deploy and use than the sailships of Empire – it's as if Creative Assembly approach the ship problem the wrong way round, because this kind of naval warfare makes far more sense, given the constraints of a strategy interface.

The tutorial plays out a brief engagement between a bow ship and another vessel, and then sees you rescue and repair an allied ship. This is then followed by a large engagement which seems the deployment of bunes – larger vessels that have enough soldiers to board and engage enemy ships at close range. This is all very impressive. More impressive, perhaps, than the traditional battle maps I've seen so far. I'm definitely going to enjoy Shogun 2's naval combat in a way that I did not with Empire's sea ships.

So let's look at the battle map a bit more closely, and we can do that via the Battle of Sekigahara. This historical happening, which you can read about here (and is also more awesomely know as the Battle For The Sundered Realm) is one of the major military events of the period. At the start of the battle my forces were spread out across a valley, with a group of allies in the middle. The AI immediately engaged my far flank, and the results were pretty chaotic. It feels like Shogun 2's battles will be relatively fast paced, because the samurai vs cavalry conflict that ensued was brutal and swift, with bodies flying from the impact of charging horses against standing humans. I backed this group up as much as possible, but with my allies refusing to engage (a scripted event) they were forced to fight to the death.

Across the field, the bulk of my army was engaged by a smaller force, initially, and cavalry charge from my general and other horse units broke it. I then reformed further up the nearby hill. Tactics familiar throughout the Total War series immediately unfolded: my missile troops on high ground were able to decimate the approaching samurai, while my cavalry flanked. The AI tried to spread out to compensate for the fact that it was going to be surrounded, but it was too late – not least because the bulk of the units that came from the fight on the other side of the valley were exhausted. My footsoldiers held their ground on the hill, and the cavalry crashed into the enemy ranks. As Total War battles go, this was rocket-fuelled. Battle AI better? Hmm. INCONCLUSIVE EVIDENCE. I need to investigate further. Not obviously worse, anyway.

So, what do I think? Well, thank God it's medieval Japan. We're back to swords and arrows, which makes more sense to both my brain, and to the AI brain within the Total War games, than anything in Empire did. It does seem pacey on the battle map, but I suppose that this is what these games were built for and, despite my siege wobbles, the solidity of the overall process of fighting is clear. I'm not going to make any deeper judgements, of course, because problems are going to emerge on further scrutiny – they always do with a game this complex – but I'm feeling optimistic, quuietly excited. Shogun 2 is looking like a genuinely strong offering from one of the most interesting strategy studios in the world. I can't wait to get stuck into a grand campaign and see some of that much-vaunted multiplayer presentation in action. There's a lot more we need to see, but this taster has been delicious.


