Heavily Engaged: Close Combat 2

This week's battle broadcast comes to you from a picturesque Dutch city on the banks of the Rhine. It's September 1944, and a beleaguered force of British paratroopers, clinging by their fingernails to positions around Arnhem's strategically-vital road bridge, are about to participate in what could well turn out to be their final action. All that stands between the Red Berets and total annihilation is a couple of 6-pounder anti-tank guns, a flamethrower, two PIATs, a few dozen Stens and Lee-Enfield rifles, and one mediocre wargamer who has known and loved Close Combat 2: A Bridge Too Far for the best part of 14 years.
If my 40 men are to survive the coming onslaught, they're going to need to demonstrate as much discretion as valour. We start in nominal control of seven of the map's nine victory locations. If the German attack is as ferocious and tanky as I suspect it will be, the Brits have little chance of holding onto all of these. Rather than fight for every stuccoed villa and leafy square, I aim to draw the foe into the maze of streets and parks beyond the main north-south bridge road. The more claustrophobic the fighting, the better chance my lads have of ambushing armour and splintering infantry assaults.
Well, that's the theory.

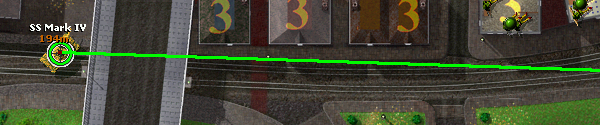
Like a pigeon driven from its roost by the rumble of passing Panzers, the deployment cursor stirs and begins circling Arnhem's trim boulevards. I'm looking for promising positions to place my pair of 6-pounders. As CC2's AT artillery can't be pushed or towed, if I choose poorly, I risk squandering two of my most precious assets. Eventually I settle on a spot next to the tramlines on the right edge of the arena. A gun set-up here should be able to engage any vehicles using the bridge underpass. The second gun is plonked higher up, at the end of a side street near the river bank. Fingers-crossed it may get to hurl a few shells into the sides of distracted AFVs before being overrun or KOed.
The rest of the Paras are bundled into buildings well away from the threatening black 'L' that is the Axis deployment area. The sprinkling of green 'hide' dots indicate that most won't show themselves until the enemy is very close. British bayonets and submachineguns should be kept busy today.

The first sights and sounds of the battle don't inspire confidence. The German deployment veil lifts to reveal a Jagdpanther lurking behind a row of houses on the far left of the map, and a swarm of SS Schutzen (riflemen) and Sturmgrenadiers (assault troops) already moving across the bridge road towards one of my abandoned VLs. Worse, in the gaps between CC2's atmospheric dog barks and birdsong melodies, there's the unmistakeable sound of a mortar clearing its throat. As my 60mm bomb tosser is currently hiding, the report must emanate from an enemy weapon.
Yes, a Granatwerfer is targeting the 6-pdr near the tramline. Has the gun really been spotted so soon, or has one of CC2's small bugs crawled out of the woodwork? There's no way of telling. The important thing is to get some counter-battery fire organised before the German bombs do damage.

Too late. As my mortar begins lobbing thunderbolts at its counterpart, a cry goes up from the 6-pdr crew. Corporal Webb, the gun commander, has been fatally hit. Bloodspattered and bewildered, Lowell, the gunner that was crouching beside him, begins to panic. I shake my head in dismay. Barely a minute in, and I'm horribly close to losing one of my lynchpins.
But maybe there's still time for the shaken 6-pdr to make its mark. On the left side of the underpass a Panzer IV has just trundled into view. A lime-green LOS line and targeting reticle indicate my gun has the chance of a kill. Come on lads. Nail him for Corporal Webb.
But it's not to be. The shell strikes brick rather than steel (a consequence of Lowell's panic?). Before a second AP round can be sent on its way, the Pz IV disappears between two buildings. It seems the medium tank wasn't alone though. Further down the road, a previously unseen Panther pivots nonchalantly onto the tramline. Within seconds, Private Mustard (automatically substituting for the rattled Lowell) has the big cat in his telescope and is tugging his fire lanyard. Damn. Another miss. Come on chaps, pull your puttees u..
Suddenly, the crew of the little 6-pdr are hidden by a starfish of grey smoke. When the smoke clears, none of the sprites are moving. That damned Granatwerfer has just made a hard task, a near-impossible one.

No time for self-pity though. While I was distracted by the Panzers, SS infantry have swept past the uncontested Public Works VL at the centre-bottom of the map, and are now a few jackbooted strides from my hidden infantry in the Lower Park. Before I can order a withdrawal, a two-man PIAT team crouching in one of the houses on the edge of the tramline finds itself in desperate close-quarters combat with a Sturmgrenadier squad four times its size. A Schmeisser burst incapacitates one of the Brits, then the unholy detonation of a hurled demolition charge, eliminates the second. Good God, this is turning into a rout.

Cometh the hour, cometh the man. A paratrooper called Walker may have just turned the tide, or at least checked its progress. Seconds after steamrollering the PIAT team, one of the Sturmgrenadiers barges into the building occupied by my solitary flamethrower operator. After a few tense moments of melee, the German is dead, his killer directing a four-shot salvo of blazing napalm at the plentiful targets outside. In seconds, most of the grenadiers are either kaput or fleeing. Walker is a true inspiration.
And in the game.

Above and below this scene of smoky slaughter there are other pleasing signs that the Paras aren't going to sell their Dutch foothold cheaply. SS Schutzen crossing the triangle of turf between road and tramline run into a flurry of small-arms fire from hidden recon and PIAT teams. Near the bottom of the map, a three-man Aufklarer (scout) team find themselves advancing through a building occupied by one of my rifle squads. The intruders are eliminated but it's a costly victory. Sergeant Riley, the defending CO, is killed, the rest of the squad left either wounded or close to breaking.
Yes, it seems Riley's men have had their fill. In dribs and drabs they slink back towards the safety of the righthand map edge. The scarily thin Lower Park defence line now consists of Walker and his fire-spitter, and a nearby squad of rifleman under the control of a Sergeant called McLaughlin. Can they hold on? It looks like I'm about to find out.

Undeterred by the charred corpses of the Sturmgrenadiers, an SS MG team is attempting to infiltrate along a similar route. It pays dearly for its lack of imagination. Flame and bullets finish two of the three machinegunners. The third goes to ground and begins spraying MG42 fire in the direction of his tormentors. Keep your head down Walker. If one of those lead bees stings you, you'll go up like a Roman candle.

It looks like the Panther is finally heading in my direction. It's crossed the bridge road and is rolling slowly down the tramlines towards the intersection covered by the remaining 6-pdr AT gun. That's it you dumb brute. Keep coming.
In the sixty seconds that separated this paragraph from the last one, five Red Berets have lost their lives. I've just witnessed one of CC2's trademark acts of heroism. Sadly for me, the hero in question was wearing an SS smock. McLaughlin's entire squad has just been culled by one MP-40 toting, stick-grenade hurling loon. It seems there was one survivor from that Sturmgrenadier barbecue. A soldat called Lang had slipped away unnoticed. After grabbing a VL close to where my 6-pdr perished (The State Archive building) the lone avenger returned to take on McLaughlin's men. I watched him enter the crowded building, heard the frantic sounds of close-quarters battle fully expecting the defenders to quickly overwhelm the intruder. But somehow Lang stayed on his feet. Somehow he scythed his way through five elite paratroopers. Walker is now the only British presence on the lower half of the map, and somewhere very close to him, is a blood-badged SS killing machine with a crazed glint in his eye.

In a side street close to the roiling Rhine, a weary British gun crew allow themselves a wry grin and some mutual backslapping. That Panther finally reached the intersection, and the boys on the 6-pdr keyholed it with a single shot. Frost would be proud of them. I know I am.
A few seconds after taking the surrender of two of the Panther's crew, the recon team on the corner of the intersection, find themselves under withering MG fire from across the tramlines. After listening to a plaintive "We're under heavy fire!", I decide to order a withdrawal. Annoyingly, one of the team chooses to cower rather than retreat.
Another friendly unit snuffed out. Soon after the recon team's hasty departure, three SS MGers assaulted their semi-vacated position. The cowerer paid for his funk with his life. His two comrades died after returning to the building in an attempt to save him. It takes an assault by one of my two remaining infantry squads to neutralise the squatters.
During the last few minutes the only foes my troops have spotted have been stragglers: broken Schutzen or retreating crewmen. Have we weathered the worst of the infantry assault? Assuming we have, what about the two(?) remaining Panzers. Where the hell is that Jagdpanther and Pz IV? Perhaps some cautious scouting is in order.
While I'm figuring out who to send forward, one half of the remaining PIAT team decides to remove himself from consideration by legging it. I send the now ammo-less mortar team after him in the hope of steadying his nerve, but it's no use. The bugger exits taking with him one of my force's only mobile AT weapons.
Moments after the deserter quits the field, the Pz IV shows itself. It seems to have slipped past the intersection without drawing a shot from the 6-pdr. Unfortunate. Perhaps the closest Allied unit - the marvellous Mr Walker - could cook its goose with his trusty fire lance. I send him scampering over to have a bash. He arrives in a nearby building just as the tank starts moving back towards the underpass.

No luck. The flamethrower spews one accurate but ineffective feather of fire before the tank moves out of range. Walker then proceeds to use up the dregs of his napalm tank on a lone approaching Schutzen. When the scorched Panzer begins pounding the walls of his position, I hurriedly pull my talisman back into cover. I'd hate to lose him now.
Its curiosity revived by Walker's attack(?), the Pz IV chugs soundlessly (one of CC2's oddest flaws is its totally silent tanks) back towards the intersection. A split second before it enters the 6-pdr's pencil-thin field of fire, I paint it with a red targeting dot. Nothing to do now but watch and pray.

The SS war machine looks like it's going to scurry right past the intersection, but at the last minute seems to catch sight of the gun shield at the end of the street to its left. Braking abruptly it slews its thicker front armour towards the threat, and adjusts its turret in readiness for a shot. The years melt away. It is 1997 again. Wide-eyed and trembly, I am playing CC2 for the first time.
A shell screams low over the cobbles. 5cm of Krupp steel fails to halt its progress. Just off-screen, my grubby-faced gunners punch the air in triumph. Amazingly, another Nazi dragon is dead.
Of course, the Jagdpanther, the King of the Dragons, is still out there somewhere. I order my two remaining infantry squads (one rifle, one Bren) to head left in the hope of spotting it. Spot it they do. The turretless leviathan is just beyond the bridge road, making towards the river through a network of alleys. For a few moments it looks like my 6-pdr gunners may get the chance of a snap shot, but the target stops metres away from the fire lane. What's it up to? Could it be bogged?
After watching the motionless monster for several minutes, I weigh up my options. The eagle eyes and steady nerve of the 6-pdr crew can't help me on this one, neither can the magma-less Walker. And that yellow-bellied bastard with the PIAT is probably in Brussels by now. Things seem desperate - a stalemate inevitable - until I notice the rifle squad's green AT indicator. It seems some of my infantry have thought to bring Gammon bombs. If they can get close enough to use them, those little stockingette bags of BOOM might just save my bacon/gammon.

Cripes. I think the word for that is 'fiasco'. While assaulting the Jagdpanther, my gallant Gammon bombers were caught in a vicious grenade shower. (I'd forgotten that CC2 modelled the fiendish Nahverteidigungswaffe). Only one escaped with his life.
Without mobile AT capability, I think my best bet now is to attempt to grab the remaining Victory Locations and force some sort of result. Maybe if the Jagdpanther sees VL flags flipping, he'll move those crucial few metres into my 6-pdr's line-of-fire.
These SS types don't know when they're beaten. While making for a VL, the British mortar team blundered into a separated Schutzen. By the time my Bren squad had dashed over to provide support two of the mortar men sprites were daubed with crimson. Sorry Buckere. Sorry Jagger. I should have been more careful.

Aha! The Jagdpanther is on the move. My VL-seizing antics seem to have done the trick.
It's retaken the Bridge Access VL and is looking it might trundle down to the Lower Park. My 6-pdr might get a shot at that hat-trick after-all.
Right now, the realism-hungry game critic part of my brain is tutting at the Jagdpanther for straying so close to the carcasses of its dead cousins (Surely it should suspect a threat?) while the gamer part wills it to continue on its perilous path. A few more metres and my sharpshooting gunner will have a fat slab of Panzer under his crosshairs. He'll have the chance to cement a famous victory.
In my mind's eye I can see the raised arm of the gun commander (the aptly named Sergeant Hunter) sweep downwards. I can see the little artillery piece buck as the shell leaves its muzzle. What follows requires no visualisation. A cloud of oily black smoke plumes from the target. Stunned crew flop from hatches. Someone - I suppose it has to be me - mutters under his breath:
"Got the bastard! Got 'im!"

A short time later, the victory screen interjects. It appears the Germans lost 42 soldiers during their failed assault, as well as that trio of tanks. British losses? 24 Paras and one AT gun. More than half their strength.
As usual, the 'Details' section of the debrief makes riveting reading. Predictably, Walker was my most lethal warrior (5 kills + an immeasurable impact on enemy morale) and the shiniest gongs - a Military Cross and a Distinguished Service Cross - went to the loader and gunner of that supremely effective 6-pdr. Listed in the survivors on the German page, is Sturmgrenadier-extraordinaire Lang. The '4' in his bravery column,and '3' in his cowardice column suggests he may have hidden after single-handedly wiping-out McLaughlin's squad. For Walker's sake, I'm rather glad about that.