Heavily Engaged: Panzer General 2
Three of PC wargaming's most succulent fruit reached ripeness in the same fortnight in autumn 1997. Having featured Sid Meier's Gettysburg! and Close Combat 2 in the last two Heavily Engageds, it only seems right that the subject of this week's rumble reportage is the third of the trio. Beyond the jump is a world of hard-won hexagons, coveted core units, and tight timetables. Ready a salute, you are about to enter the command tent of Panzer General 2.

Actually, strictly speaking, it's not Panzer General 2 that will be powering this AAR. Because SSI's charmer is a little temperamental on modern machines, and I'm a bit WW2ed-out after last week's Arnhem marathon, I'll be using Open General - Luis Guzman's clever rewrite - and the refreshingly Sherman-less Kaiser General II mod (included in the free Open General installer) for the coming hostilities. A particular campaign called 'The Last Crusade' has caught my eye. It begins on the banks of the Suez Canal in the Spring of 1915.
While the armies of the Entente and Central Powers were busy stalemating each other in the shell-ploughed fields of France and Belgium, in the Middle East, WWI remained a fluid affair. On 3rd Feb 1915, the Indian troops defending the Suez Canal got a first-hand taste of that fluidity, when 25,000 Turkish troops tramped out of the shimmering Sinai and attacked them. My task today is stopping those Turks. I've got eighteen turns in which to smash their offensive and re-establish Allied supply lines. Positions on the Canal must be held, and Bir Murra and Kataib-El-Khail, two Victory Locations in the desert to the east, recaptured.

Before the bullet-slinging begins, there's a chance to participate in one of PG2's most distinctive and rewarding rituals. Using a small fund of Prestige Points (usually the reward for campaign victories) I get to buy my first core units. Assuming they survive the Suez scrap, these chaps will be carried through to the next episode of the campaign, their growing experience a boon and the seed from which a characterful leader unit may eventually germinate.
The battle briefing has hinted that cavalry will be especially useful, so after a spot of stubble stroking, I've decided to spend my 1000 PPs on blue-chip British engineering, Indian panache, and grumpy, humpy, ungulates.

These three units will (hopefully) lead the glorious counter-thrust that takes Bir Murra and Kataib-El-Khail. However, there's the little matter of an amphibious assault to deal with first.

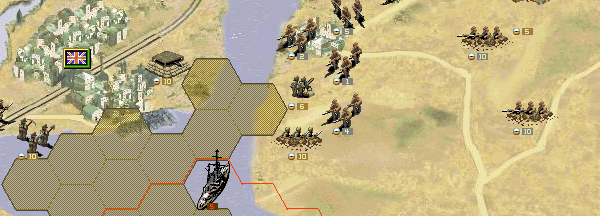
TURN 1. The scarab-rolled sun rises to reveal enemy troop transports already crossing the Canal in the south. Concentrated fire from my pair of artillery batteries barely scratches this ominous flotilla. As HMS Clio, a nearby Royal Navy gunboat, is still a turn or two away, it looks like the Punjabi battalion defending Toussoum are in for a warm morning.
In the key central port and railway junction of Ismailia, I hurry my three core units down to the quay for embarkation. The sooner I get them over to the eastern bank, the sooner they can use their impressive mobility to devastating effect.
Up north at El Kantara all is quiet until HMS Swiftsure, steaming south on a scouting sortie, spots two Turkish infantry units and gives them a teeth-rattling taste of her 10-inch guns.

TURN 1 (Enemy phase). After a preliminary artillery bombardment (the foe has arty in the hills to the east of my southern VLs) Turkish transports spill infantry onto the papyrus-fringed shore near Toussoum. The Punjabis defending the settlement respond with commendable ferocity, inflicting three times as many casualties as they sustain. I hope their countrymen up at El Kantara are made of similarly stern stuff. A large attacking force of camel-riding Bedouins and Turkish regulars (Nizamiye) has just emerged from the dunes that lap that northern outpost.

TURN 2. Along with Swiftsure and those doughty Indians, history has granted me another potential battle-turner in the shape of a squadron of Farman Longhorn biplanes. Last turn I ordered these rickety machines eastward. They've just crossed the Canal near Ismailia and rained death on the heads of the Nizamiye approaching the ferry post. Actually, the bombs didn't cause that much damage. From now on, I think I'll use my air power (nicknamed Horus with the help of PG2's renaming button) primarily for scouting.
At Toussoum the Turkish beachhead remains encouragingly compact. Pounded by the 19th Lancashire and 5th Egyptian batteries, and peppered by the entrenched Punjabis, the assaulters are still corralled in a couple of hexes.

Without the protective moat of the Canal, the defence of El Kantara in the North could prove much tougher. Swiftsure's far-reaching guns and the combined efforts of MG nests and entrenched riflemen ravage the ranks of the advancing Ottomans, but there's still a lot of hostile combat power converging on that VL.
TURN 2 (Enemy phase). One of the mauled enemy units at Toussoum attempts to break-out of the beachhead and assault the guns of the 5th Battery. It fails, perishing in the process. The other less-damaged unit lunges desperately at Toussoum and suffers a fate almost as catastrophic. Terrain and support fire are vitally important in PG2, and, in this particular situation, I enjoy a significant advantage in both.
TURN 3. Reinforcements! Two fresh Indian battalions (the 27th Punjabis and the 128th Pioneers) have appeared in the desert west of Serapeum. I chivvy then towards the rapidly disintegrating Turkish beachhead. Even if the two remaining Turk transports disgorge their cargoes this turn, I'm confident the strengthened southern defences will cope.

On the other side of the canal, my newly arrived trio of core units are already causing problems for Pasha's men. A cavalry unit dispatched to intercept them, retreats in a sirocco of Vickers fire. It's not all good news in this neck-of-the-woods however. Snooping eastward, Horus stumbles on an MG unit and gets thoroughly riddled. While most of the Turkish units pose no threat to my Edwardian A-10, the Schwarzlose detachments are definitely worth avoiding.
TURN 3 (Enemy phase). Turkish guns in the hills near Serapeum trade fire with Clio, the little British gunboat in the channel below. More Nizamiye hit the corpse-strewn foreshore at Toussoum and are vigorously thinned-out by the red-hot Lee-Enfields of the Punjabis. The attack is taking its toll though. The number on the defenders' khaki strength panel now reads 6 rather than 10.
At El Kantara and the little ferry post opposite Ismailia, it's a similar story. With careful target selection and odds consideration (hovering the cursor over an enemy gives a rough numeric guide to combat results) Turkish forces are being severely mauled, but defender numbers are also shrinking. In another wargame I might abandon an exposed VL; in this one I know I must hold them all to secure victory.

TURN 4. Three cheers for the senior service! HMS Ocean, a hulking Canopus class dreadnought, has appeared in the Great Bitter Lake. I move her north toward the rumble of battle. She should arrive in good time to support the assault on Bir Murra. While my three core units race across the sand towards Kataib-El-Khail, I plan to attack this closer Turkish VL with forces from the Toussoum area. The first of those forces - the 2nd Rajaputs - are already boarding barges in Serapeum's port.
Thanks to Horus I now have a pretty clear picture of Bir Murra's defences. Entrenched infantry and snipers sentinel its approaches and Muhendis (heavily armed pioneers) occupy the village itself.
TURN 4 (Enemy phase). Hmm. A setback. Indians manning one of the two trench networks at El Kantara have thrown in the towel. The artillery supported assaults of the Nizamiye and their Bedouin allies were just too much for them. I hope that's not a sign of things to come.

TURN 5. Residents of Ismailia looking east across the water at this moment, could be forgiven for thinking General Stone is a donkey leading lions. The pair of units defending the ferry post are heavily outnumbered and making little impact on their attackers. Unnerved by the rapidly deteriorating situation, I move Swiftsure south, and push my Pioneers into Ismailia just in case. Whitehall will have my guts for garters if I let one of the Canal's key transport nodes fall without a fight.
There's a more encouraging sight on the eastern edge of the map. Horus has arrived over Kataib-El-Khail, the most distant of the Turkish VLs. Pasha's tented HQ is clearly visible and appears to be very lightly defended. If my cavalry can avoid interception, their bold sally may reap rich rewards
TURN 5 (Enemy phase). The entrenched Indians at the ferry post weather another assault, but the gaps on their fire-steps are now numerous and wide. Over two-thirds of the unit is either dead or severely wounded.
TURN 6. Many ANZAC soldiers heading for the Western Front or the Dardanelles underwent training in the relatively safe surroundings of Egypt. That might explain why a bunch of New Zealanders has just shown up as reinforcements on the eastern edge of Ismailia. Good to see you, lads. You could be just the lifeline those ferry post defenders need. Off to the quayside with you.

As Horus, her scouting duties complete, bimbles eastwards to lend a hand at the ferry post, my Bengal lancers storm into Kataib-El-Khail. In the ensuing pandemonium, the HQ's defences are ripped to shreds. Another turn and another charge, and the VL should be mine.

While my Bikaner camel riders are a stone's throw from their busy Bengali comrades, my squadron of Rolls-Royces are trailing miles behind after getting entangled in a couple of skirmishes near the Canal . Rather than push the ACs eastward pointlessly, I decide to send them towards a hex full of Turkish sharpshooters near Bir Murra. En-route the vehicles blunder into the perimeter of an enemy howitzer battery. One mouse click, a burst of Vickers tympani, and the surprised enemy promptly surrenders. Splendid work chaps.
TURN 6 (Enemy Phase). The ferry post trenches now throng with weary Ottoman troops. As I suspected, the original tenants didn't have the strength to resist another attack.
TURN 7. HMS Ocean welcomes the new occupants of the ferry post with a thunderous broadside. Swiftsure pulverises a nearby artillery battery. Even Horus gets in on the act, bombing some of the snipers that supported the attack. Johnny Turk might have grabbed a foothold on the edge of the Canal, but I'm going to make bally sure he struggles to hold onto it.
Kataib-El-Khail falls to a second charge from my Bengal boys. The lancers and the newly arrived camel cavalry then point their mounts to the SW and make for the second Turkish VL
TURN 8. The Rolls-Royces are on a roll. A covey of Turkish snipers capitulate after a brush with my mechanized cavalry.
HMS Swiftsure and Ocean continue their merciless pounding of targets in and around the ferry post. A few more turns of heavy-calibre hammering, and the way should be clear for the Kiwis - currently boarding dhows in Ismailia - to attempt an assault.

TURN 8 (Enemy phase). Ah. Perhaps my Bengalis should have tarried a while at Kataib-El-Khail. The area seemed free of foes, but Turkish troops - possibly reinforcements - have just dragged down the Union Jack that was flying over the VL.
TURN 9. Out of bombs and low on fuel, Horus heads for home. Far below, the panicking ferry post Ottomans retreat in disarray, allowing my Kiwis to de-boat directly into one of the map's bloodiest hexes.
TURN 10. A camel-drawn Indian Mountain battery has trotted onto the battlefield near Serapeum. I send them straight to the port to join the Bir Murra strike force massing in the hills across the Canal.
At the ferry post and El Kantara, the storms that have been raging since the start of the battle, seem to be blowing themselves out. Entrenched friendlies now outnumber depleted Bedouin and Nizamiye attackers. Targets for Swiftsure and Ocean's mighty armaments are becoming harder to find.
TURN 11. The assault on Bir Murra begins. Two Indians infantry battalions supported by MG and artillery units, collide bloodily with the dug-in defence line west of the settlement.
TURN 12. Leaving Kataib-El-Khail unguarded was definitely a mistake. An attack by my hastily recalled lancers and camel warriors, makes no impression whatsoever.

TURN 13. As the fuel-less Rolls Royces limp towards the nearest resupply hex, Bir Murra, softened by preliminary shelling, falls to turbanned Tommies. Only Kataib-El-Khail now stands between us and victory.
TURN 14. But time is marching on and my mounted core troops seem utterly incapable of winkling-out those opportunistic defenders. Once again the attack predictor shows 0-0 (no casualties likely on either side) and is proved depressingly accurate. Another inconsequential assault.
TURN 15. Twelve hot, sand-clogged hexes separate the conquerors of Bir Murra from the impasse at Kataib-El-Khail. If I'm to take this last crucial VL before the time limit expires, then it will have to be done without infantry or artillery. The refuelled Rolls-Royces are speeding eastward, but even they may not arrive soon enough to tip the balance.

TURN 16. Supported by a gun battery a couple of hexes to the north-west, the Ottomans at Kataib-El-Khail maintain their iron grip on the VL. The sacrifices at El Kantara and the ferry post may all have been for nothing.
TURN 17. Ignoring bleak attack predictions, my lancers and camel cavalry continue to test the Nizamiye defences. They pay for their pluck with more casualties. Half the Bengali horseman that cantered into battle this morning, are now lying dead or wounded in the Sinai dust.
Can the newly arrived armoured cars break the deadlock? The attack cursor says no, but with defeat beckoning, I hurl them into the fray.
Somewhere behind the scenes, a fistful of electronic dice bounce to a stop showing sixes. Against the odds, those militarised Silver Ghosts have done the trick! The Turks have lost a couple of their strength points and, more importantly, chosen to retreat. The VL is now empty. Ripe for capture. My Rollers roll. Kataib-El-Khail falls.

The fact that I snatched victory at the eleventh hour, isn't without consequences. If I'd wrapped things up sooner, I would have had more prestige point to spend before the next mission (an op against Berber jihadists in the Western Desert). In PG2, promptness pays.
In the light of my win, summaries of the actual battle make fascinating reading. The bloody amphibious landings, the invaluable contribution of the Royal Navy, the role of British spotter planes... It would be silly to claim PG2 was at the vanguard of wargame realism, but I don't know of many military strategy titles that blend history and entertainment so pleasingly.