Terraria bosses: how to summon and defeat them
How to unlock Hardmode


With all the updates to Terraria, there are just over 30 bosses to fight now. Some are completely optional fights, but others stand in the way of unlocking new NPCs and a harder difficulty setting.
For each boss, there's some setup required to give you a fighting chance. This doesn't just mean having the right equipment. You should also create arenas specifically designed around a boss's attack patterns, making it easy for you to dodge them.
Our Terraria bosses guide will tell you how to encounter bosses, detail their stats, and give you strategies for defeating them.
- How many NPCs are in Terraria? |
- Pre-Hardmode bosses |
- Hardmode bosses |
- Event bosses |
- Pre-Hardmode boss strategies |
- Hardmode boss strategies |
- Event boss strategies |
Terraria bosses guide
For the main bosses (both pre-Hardmode and Hardmode), we'll be listing their summoning requirements and the boss's health for each of the game's three difficulty settings chosen when you create a new world: Classic, Expert, and Master.
Pre-Hardmode bosses
These bosses can appear as soon as you meet their summoning requirements. Click a boss's name in the table to go to the strategy guide for that boss:
| King Slime | Eye of Cthulhu | Eater of Worlds |
| Brain of Cthulhu | Queen Bee | Skeletron |
| Wall of Flesh |

Hardmode bosses
Hardmode can be activated by defeating the Wall of Flesh in any of the game's three difficulty settings. Click on one of the bosses names in the table to go to the strategy guide for that boss:
| Queen Slime | The Destroyer | The Twins |
| Skeletron Prime | Plantera | Golem |
| Empress of Light | Duke Fishron | Lunatic Cultist |
| Moon Lord |
Event bosses
Event bosses work slightly differently to the other bosses. They aren't as tough as the main bosses and have a chance to appear during certain waves, along with other enemies. For strategies on how find and defeat an event boss, click their name in the table below:
| Dark Mage | Ogre | Betsy |
| Flying Dutchman | Mourning Wood | Pumpking |
| Everscream | Santa-NK1 | Ice Queen |
| Martian Saucer | Solar Pillar | Nebula Pillar |
| Vortex Pillar | Stardust Pillar |
Pre-Hardmode boss strategies
King Slime
How to summon King Slime
Kill 150 slimes during a slime rain or use a slime crown.
How to kill King Slime
This is an optional boss and is one of the simpler ones to defeat. It attacks in much the same way as regularly sized slimes but as it is much larger, it's harder to avoid its bounces.
There are a number of ways to beat the King Slime, but here's the simplest one:
- Build a 18-20 blocks high wall that's one block thick.
- Create a walkway with platforms that's 35-50 blocks long.
- Deploy a campfire nearby so you can regenerate health.
- Use long-range weapons to attack the King Slime.
As you hit the King Slime, it will shrink. This makes it harder to hit and trapping it in the environment is a little trickier as it will eventually get small enough to get through gaps. You won't be able to escape by running away from it as it will teleport towards you.
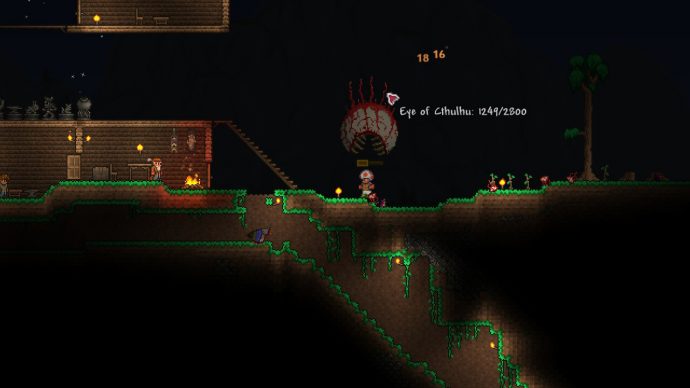
Eye of Cthulhu
How to summon Eye of Cthulhu
There is a 1 in 3 chance of this boss appearing at the beginning of nighttime if the player has:
- 200+HP
- 3+ NPCs in town
- 10+ defence
How to kill Eye of Cthulhu
I highly recommend having a grappling hook and the Hermes boots before even trying to fight the Eye of Cthulhu. The first phase will have the Eye of Cthulhu floating above you while it summons Servants of Cthulhu (Demon Eyes that can float through walls).
I also recommend building an arena designed for the boss and preparing in advance for the fight. Here are some things to keep in mind while preparing for battle:
- Make sure you have a full set of silver armour or tungsten armour.
- Don't start the fight until a little after the sun sets and you've ensured there is no Blood Moon - a random event that increases zombie spawns.
- Bring plenty of healing potions. You'll get hit a lot.
- Build a big arena with two long platforms above you. Make sure you can jump up to each level.
After the Eye of Cthulhu spawns three or four Servants, the Eye will try to ram you three times. It is quite slow while it charges up to ram you, so use this time to prepare your next dodge. The best way to kill the Eye is to stand underneath it and fire upwards with long range weapons.
When it reveals a fanged mouth, you'll reach the second phase. It becomes more aggressive and deals more damage with its attacks, but it no longer spawns Servants of Cthulhu. Don't attack it while it's charging. Instead wait until after the third attack as it will pause for a brief moment. It shouldn't be long before you defeat it.
Eater of Worlds
How to summon Eater of Worlds
Break three Shadow Orbs broken or use a Worm Food. Shadow Orbs are in the Chasms of the Corruption.
How to kill Eater of Worlds
A lot of this fight is about preparation. Purposefully building a place to fight the Eater of Worlds will make fighting it a lot easier. Here are some tips for building the arena:
- I highly recommend fighting this boss on the surface. Fighting it underground makes it too unpredictable.
- Build an arena that's thin, very tall, and easily climbable with many platforms. This ensures that you will always see where the boss is coming from.
- Don't make the arena too high. If it's too high, the Corruption background will disappear and the boss will despawn.
- Make sure the arena is not in a valley. If it's inside a valley, the boss can approach from the sides.
After a segment loses all of its health, the Eater of Worlds will split up. When it does split, focus on the head segment as it can hurt you a lot more than the tail. If it splits into too many segments, prioritise the smaller segments as they're harder to hit.
Brain of Cthulhu
How to summon Brain of Cthulhu
Every third Crimson Heart broken or use a Bloody Spine. Crimson Hearts are found in the Crimson area, usually at the ends of paths splitting from the main circular room.
How to kill Brain of Cthulhu
This is another boss where having a purpose built arena increases your chances of winning exponentially. These are the things to consider when making your arena:
- Create an arena of platforms that are five layers high.
- Have multiple health regeneration items such as campfires and heart lanterns deployed.
- Stars in Bottles and Bast Statues can also increase mana regeneration and defence respectively.
- Break two of the hearts before building the arena, but make sure you protect the third until you're ready. Make sure you have a path to the third that you can get to before the boss appears.
During the first phase, you can only attack the Creepers that clump up near the Brain of Cthulhu. Use the platforms to avoid the Creepers as the Brain teleports around the arena.
When all of the Creepers are defeated, the brain will split and reveal a heart with an eye. The Brain's second phase will teleport more often, ramming you as its main attack. It doesn't have much health, but using weapons with high knockback will keep it off you.
Queen Bee
How to summon Queen Bee
Destroy larva encased within walls of bee hives found in the Underground Jungle or use an Abeemination in the Jungle biome.
How to kill Queen Bee
I highly recommend that you have at least 300 health and a full set of gold armour as a minimum requirement for this fight. If you get a higher max HP and better armour, then this will keep you alive for longer. Once again it's recommended you build an arena, so here are some tips for doing that:
- Prepare a standard arena of wooden platforms that have at least five blocks of space between them.
- Fighting it outside is an option, but the hive itself has a pool of honey at the bottom which gives you a health regeneration buff. This is separate, so can be stacked with other buffs.
- Solid blocks help destroy the stingers the Queen Bee fires.
- Having items that give you increased jumping height is going to help a lot.
The Queen Bee is a lot like the regular hornets, in that she will fire stingers at you that can poison you. This poison effect lasts longer than the one that the Queen Bee gives you if you touch her.
In addition, she can fly to the left or right of you and charge at you three times. Use the platforms to avoid this attack.
She can also spawn bee minions from above you. This is where she's most vulnerable so use your most powerful weapons to hit her.
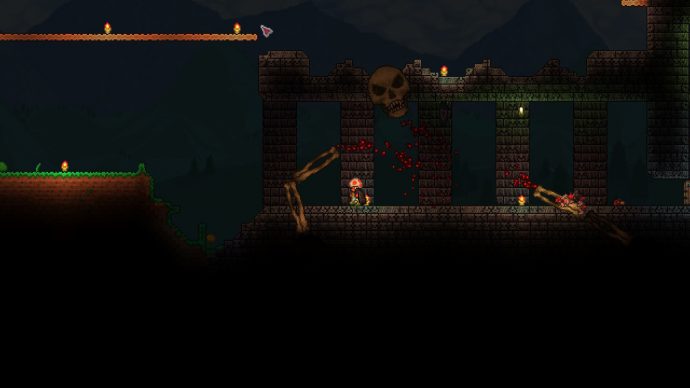
Skeletron
How to summon Skeletron
Speak to the Old Man NPC at the Dungeon and activate the curse at night.
How to kill Skeletron
Before fighting Skeletron, make sure you have at least 300 health (15 hearts). This will ensure that you have some breathing room in-between its attacks. Also use Shadow or Crimson armour for defence. Items that grant higher mobility are mandatory as you'll need to avoid some lethal attacks.
- Don't make to many changes to the dungeon floor. This will prevent the Cultists from spawning which blocks progression. Use the area above the roof instead, putting long platforms.
- Make the arena big enough so that you have plenty of space to dodge the hands.
- Weapons such as Yo-yos are very good against the Skeletron. The Yo-yo will get stuck between the hand and head, dealing tons of damage per attack. Flails can also work really well as they hit multiple targets per attack.
- In harder difficulty modes, you'll want to kill at least one of the hands first. The head will not take a lot of damage until the hands are destroyed, and the hands have a 50% chance to apply the slow debuff, which can get you killed very quickly.
- However you tackle this boss, just make sure you kill the boss before day breaks. Skeletron will gain lots of defence and attack during the day and will likely kill you instantly.
Wall of Flesh
How to summon Wall of Flesh
Throw a Guide Voodoo doll into a pool of lava in the Hell biome while the Guide is still alive.
How to kill Wall of Flesh
This boss is the last enemy in your way of Hardmode. You should be building an arena, but this one is a little different from the others:
- Build a long platform of at least 750 blocks. This should give you plenty of room to beat the boss.
- The Wall of Flesh will begin its attack from the side of the Underworld's map edge you are closest to.
- Use normal blocks for this so that you don't need to worry about falling through to the lava below.
As the wall moves towards you, use a weapon such as a yo-yo to take out the little arms known as "The Hungry". Each one of these munching mouths will break free from the cords at their back if they take enough damage, so kill them as quickly as you can to avoid getting overwhelmed.
Once the Hungry are gone, try to target an eye on the Wall of Flesh with your attack. It takes a lot more damage than the mouth. The eyes will fire lasers, but these should be easy to avoid. Other than that, keep walking backwards and avoid other enemies as you attack the boss. Once defeated, you'll unlock Hardmode.

Hardmode boss strategies
Queen Slime
How to summon Queen Slime
Use a Gelatin Crystal in the Hallow. You can find them in Pearlstone or Pink Ice Blocks in the Underground Hallow. It can be farmed by placing rows of Pearlstone or Pink Ice blocks in straight lines.
How to kill Queen Slime
You don't really need a special arena to fight Queen Slime but it does help to make a simple long path. Creating an arena to trap it doesn't work too well as its second form makes it fly around, so it's best just to have equipment that makes you faster and able to dodge attacks with ease. Here are some general tips for this boss:
- Create a simple platform path of around 350 blocks wide. If you have access to wings, use them to float over the top of the boss if you get to the end.
- Bring plenty of arrows to this fight. When we say plenty of arrows, we're talking thousands if you can. Wings are also very good to have for this fight.
- Apply a hit and run strategy using ranged attacks if possible. This should give you time to avoid projectile attacks of her own.
- Kill any flying purple slimes she spits out. They can easily overwhelm you if you're not careful.
- When Queen Slime is below 50% health, she will transform into a flying slime.
- In her second form, if you have wings, you can fly around, shooting arrows as she chases you. The ground is far more dangerous in this phase thanks to the number of slimes that get thrown at you, so it's best to just shoot while retreating.
The Destroyer
How to summon The Destroyer
Craft and use a Mechanical Worm. To make it, you need to craft it at either a Mythril anvil or an Orichalcum anvil (made with either 10 Mythril bars or 12 Orichalcum bars at an Iron anvil) with the following ingredients:
- 6x rotten chunks or 6 vertebra
- 5x iron bars (any)
- 6x soul of night
How to kill The Destroyer
The first of the "mechanical bosses", this is a variant on the Eater of Worlds boss that is much larger and can do a lot more damage. There is a method of beating it that does take a lot of preparation, but if you have all the pieces you should wipe out this boss within a couple of minutes.
- Break altars until you unlock either adamantite or titanium. Once you work your way through the pickaxes until you can mine either one of these resources, make all the full armour for the unlocked material, plus a repeater to deal with the Hollowed Mimic.
- The Daedalus Stormbow can be found on Hollowed Mimics, who are summoned by putting a key of light (made at a crafting bench from 15 souls of light found in the Underground Hollow) into any chest. They're very tough enemies, so bring a repeater and build a basic arena to help you avoid the Mimic's attacks. There is a 25% chance that the Stormbow will drop.
- Reforge the Daedalus Stormbow with the tinkerer to get the Unreal modifier.
- Craft some holy arrows to use with the Daedalus Stormbow, or use jester's arrows in a pinch. You'll need three pixie dust and one unicorn horn to make 200 holy arrows.
- Build a sky platform at least 150 blocks high. It will ensure the boss can't reach you with its normal attacks. You can build a little shelter too if you want.
Once you've organised everything, summon the Destroyer and rain down holy arrows with your Stormbow. It should be able to take it out relatively quickly.
The Twins
How to summon The Twins
Craft and use a Mechanical Eye at night. To make it, you need to craft it at either a Mythril anvil or an Orichalcum anvil (made with either 10 Mythril bars or 12 Orichalcum bars at an Iron anvil) with the following ingredients:
- 3x lens
- 5x iron bars (any)
- 6x soul of light
How to kill The Twins
The Twins are the second of the mechanical bosses and are essentially two Eye of Cthulhu's joined together by a cord. They are Retinazer (the eyeball with a red iris) and Spazmalism (the eyeball with a green iris).
Both eyes will chase after you, occasionally charging at you like the regular Eye of Cthulhu boss. Retinazer also fires lasers and Spazmalism projects a green flame.
- A good ranged attack option is to have a decent firearm and special bullets. You'll need as many bullets as you can muster to defeat both bosses. If you can craft it, the Megashark is a decent option. To make it, combine a Minishark from the arms dealer, illegal gun parts from the arms dealer at night, 20 souls of might dropped by the Destroyer boss, and 5 shark fins from sharks in the ocean.
- Combine Ichor or Cursed Flame with bullets to make the best bullets for the Megashark. They come from stingers in the Underground Crimson and clingers in the Underground Corruption respectively.
- Build a massive sky bridge. A longer sky bridge means that you can keep running in one direction while avoiding both of the bosses.
- Go kill Retinazer first. If you focus your attacks on it, you'll make this fight a lot easier in the latter stages where the remaining eyeball becomes more powerful.
- Spazmalism attacks at a closer range to Retinazer, so as long as you keep your distance and fire as many shots as you can at it, you should avoid being damaged by it.
Skeletron Prime
How to summon Skeletron Prime
Craft and use a Mechanical Skull at night. To make it, you need to craft it at either a Mythril anvil or an Orichalcum anvil (made with either 10 Mythril bars or 12 Orichalcum bars at an Iron anvil) with the following ingredients:
- 30x bones
- 5x iron bars (any)
- 3x soul of light
- 3x soul of night
How to kill Skeletron Prime
Skeletron Prime is the third and final mechanical boss. If you've already beaten the Twins, you should have everything you need set up, though I would build at least another layer of platforms to help avoid some of Skeletron Prime's attacks. I'd also put down as many campfires and heart containers as you can for health regeneration.
As for how to fight it, there are four arms. Focus on the laser hand and the bomb hand first as they are Skeletron Prime's ranged attacks. The other two hands are melee weapons, so can be taken down before fighting the head. This boss's head can hurt you quite a lot so try to avoid touching it.
Plantera
How to summon Plantera
Defeat all three Mechanical bosses, then go to Underground Jungle and destroy Plantera's bulb. The Mechanical bosses are The Twins, The Destroyer, and Skeletron Prime.
How to kill Plantera
This monstrous plant can be quite tricky without a purpose built arena and this arena will take some unique gadgets to create.
- Get the Steampunker to move into your town, then buy two teleporters from her for a total of 5 gold.
- From the Mechanic, buy two levers, a red wrench, a wire cutter, and a lot of red wire.
- Once you've found the bulb in the Underground Jungle, build an arena that's around 200 blocks wide. The arena should be an empty square around it except for two pods on the far sides of the arena shielded by dirt blocks.
- Place a teleporter in each one and connect the teleporters with red wire. Have a lever next to each one. Make sure you test your teleporters before activating the boss.
Once you're happy, destroy the bulb to activate the boss. Jump into one of the teleporters and fire with a repeater at the boss until it comes too close. Pull the lever to swap sides. You will get hit by the arms and the seeds go through walls on higher difficulty settings, so make sure you have plenty of healing potions to drink and lots of health regeneration items in the arena.
Golem
How to summon Golem
Summon using a Lihzahrd Power Cell at the Lihzahrd Altar in the Jungle Temple. This requires the Temple key obtained by killing Plantera.
How to kill Golem
After defeating Plantera, you should be able to unlock the Golem boss inside the "Lihzahrd Temple" in the Underground Jungle. But finding the temple in the first place can be difficult.
My recommendation here is to build lots of bombs and just keep throwing them downwards in the Underground Jungle. Bring some wire once you find the temple and use that to work out where the traps are. There are tons of things to kill you here and deactivating the traps should be something you do constantly before reaching the boss. Loot all the chests and kill the lizards to get power cells to summon the boss room. I would then modify the arena as follows:
- Build some platforms so that you can jump up and over the boss. A horseshoe shape is ideal.
- Fill the gap with random solid blocks. Just keep putting the blocks in, making sure you have room to fire through the gaps. Keep it tight towards the centre. The idea is to trap the boss and all its forms in one place.
After you've finished setting up, go ahead and awaken the Golem. Take out one of the arms first before moving to the head. Once you've got it below half health, the Golem will detach its head and it will fire lasers at you. Use the platforms to dodge the laser beams and you should win. This boss can be summoned multiple times and drops great loot, so is a fantastic option for grinding.
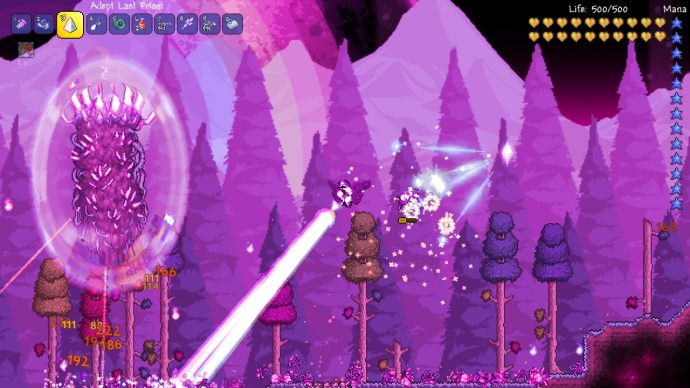
Empress of Light
How to summon Empress of Light
Defeat Prismatic Lacewing at night in the Hallow. These are rare critter spawns on the surface at nighttime (7:30pm - 12:00am in-game time). You can catch the Prismatic Lacewing in a net and save killing it until nighttime.
How to kill Empress of Light
This is one of the newer bosses in Terraria. The Empress of Light cannot be fought during the daytime as she will instantly kill you, but fighting her at night is doable. Build an arena that's at least 400 blocks wide with three rows of platforms as a minimum. Have a 30 block gap between each platform. Have some decent ranged attacks and wings for increased mobility. Once you're happy with your setup, go ahead and summon the boss.
The best way to describe the Empress of Light boss is that it is like playing a bullet hell shooter. She has a lot of ranged attacks and all of them are devastating. Here's how to avoid her first phase attacks:
- If she fires some homing projectiles, jump out of the way at the last second to avoid them.
- She can charge which can be avoided by jumping up or dropping down platforms as she charges. The afterimage is not part of her hitbox here, so don't worry if you think you're going to touch it.
- She can emit small beams of light to appear at close range in a petal-like shape. Just avoid touching it and keep away until she stops.
- If projectiles erupt from a flower-shaped pattern, head to the other side of the arena and don't return until the attack disappears.
- If lines of light appear from out of nowhere, the laser shots for each line of light will appear a few seconds later. If you move in a circular pattern, you should avoid all the laser shots.
When she disappears, this is the start of the second phase. All of the Empress of Light's second phase attacks have a smaller break from one attack to the next. Here are the ways to avoid the additional attacks:
- Upon her return she'll begin with a new kind of laser attack. If you move to the side next to where the lasers meet, you should avoid these attacks. Just don't be too far from the centre when the lasers fire.
- If the laser lines appear with a slight arc, go in a circle to avoid the laser shots.
- Stay as high up as you can throughout this phase. This is so that you can drop down multiple levels quickly should she combine her projectile attacks with the close range petal beam attack.
Make sure you kill this boss before sunrise, otherwise she will instantly kill you.
Duke Fishron
How to summon Duke Fishron
Use Truffle Worm as bait with a fishing rod in Ocean biome. Truffle Worms are found in a Glowing Mushroom biome. Catch it with a net, but make sure you use a grappling hook as walking or running up to it will make it disappear.
How to kill Duke Fishron
This giant pig/shark hybrid is a very tough boss without the right equipment and arena setup. Below are some tips for preparing for the battle against Duke Fishron:
- Have the best armour available to you equipped. This is either the Turtle, Beetle, Spectrite, or Shroomite armour.
- A Megashark with Ichor bullets is the best option for ranged attacks. To make the Megashark, combine a Minishark from the arms dealer, illegal gun parts from the arms dealer at night, 20 souls of might dropped by the Destroyer boss, and 5 shark fins from sharks in the ocean. Ichor can be found on stingers in the Underground Crimson and can be combined with bullets to make Ichor bullets.
- Build a high platform that reaches from one end of the ocean to the other. Place a teleporter at the both ends and connect the two with wire. Then make sure you break the platform. This will ensure no tornadoes form.
Once built, simply use the same strategy that you used for the Plantera boss: firing a repeater ranged weapon at it until the boss gets close, then warping to the other side. The only real difference here is Duke Fishron can get more aggressive as he drops below half health, but you should be able to beat him with ease by repeating this method.
Lunatic Cultist
How to summon Lunatic Cultist
Kill all the cultists at the entrance to the dungeon after killing the Golem. Slaying this boss will trigger the Lunar Event.
How to kill Lunatic Cultist
You should only take on this boss if you're ready to take on the Moon Lord. Have some decent armour and weapons to hand (the ones you've been using up until now should still be okay for this fight).
In addition to having the best gear, you should also pick up the Cosmic Car Key. This can be found by travelling to the beach and building high up. Eventually a UFO will drop to inspect you. Do not kill it. Let it get away and you'll begin the Martian Madness event. Once done, build a small room with a platform above you and some walls to protect you. This is so you can shoot down the giant UFOs who have the Cosmic Car Key item.
Outside the dungeon entrance are some cultists. Kill all of them to summon the Lunatic Cultist.
- He'll fly around above the dungeon. With your Cosmic Car Keys, you should be able to fly up there with him and avoid most of his projectile attacks with ease.
- If he creates a sigil in the sky, take some time and only hit the cultist with narrow eyes and a yellow stripe on his hood. If you accidentally hit one of the other images, a dragon will be summoned.
This is a mini-boss technically, so shouldn't be too difficult to beat, but he is the boss that starts the Lunar event. Once he's dead, you're on your way to taking on the Moon Lord.
Moon Lord
How to summon Moon Lord
Defeat all four Celestial Towers in Lunar Events or use a Celestial Sigil. The four Celestial Towers are: Solar Pillar, Nebula Pillar, Vortex Pillar, and Stardust Pillar.
How to kill Moon Lord
This is the final boss of the main game and is a gigantic space monster. He'll fire laser beams, sap your health, and all sorts of nasty things. But you can easily exploit this fight with some key items. Here's what you need to do to defeat the Moon Lord for the first time:
- My suggestion is not to build an arena for this fight. Instead, invest in some Shroomite armour and Vortex Beater with the Unreal modifier. Chlorophite bullets are good against this boss.
- Have a lot of buff potions to hand as well. You'll definitely want as many buffs as possible to take this boss down quickly.
- I also recommend doing the Pirate Invasion event before killing the Lunatic Cultist. This is so you can get the Flying Dutchman to spawn who will give you The Black Spot. This is a mount that flies through the air at a breakneck speed. Pirate Invasions have a random chance of occurring once or you can obtain a Pirate Map. This map has a 1% chance to drop from enemies close to, or in the Ocean biome during Hardmode. Use a Daedalus Stormbow to kill it for a chance to get The Black Spot.
- Create a bed next to the nurse and have recall potions to hand. This is so you can heal in a pinch. Just be sure to heal and get back onto The Black Spot quickly before the Moon Lord appears.
Fly using your Black Spot mount to the one end of the map. Moon Lord will appear out of nowhere, but since you're going at a breakneck pace anyway, you should just need to fire behind you. The bullets will even hit the Moon Lord off screen, so just keep moving and shooting and you should be fine. If it all gets too much, use a recall potion to warp back to the nurse. Eventually you'll beat the last main boss of the game!
Event boss strategies
Dark Mage
How to summon the Dark Mage
You'll find this mini-boss during the Old One's Army event, which is activated by placing the Eternia Crystal onto the Eternia Crystal Stand. Both are obtained for coins from the Tavernkeep, who appears after Eater of Worlds and Brain of Cthulhu have been defeated.
How to kill the Dark Mage
This is one of the simpler event bosses in the game. After a few waves of enemies, the Dark Mage will appear out of one of the two portals. It can hurl magical energy at players, summon skeletons, and summon a large rune that heals enemies. You shouldn't really need to build a dedicated arena for this boss, but a flat path between both portals and the Eternia Crystal can help out if you're struggling.
Ogre
How to summon the Ogre
This mini-boss also appears during the Old One's Army event, but only after defeating one of the three mechanical bosses. The Old One's Army event is activated by placing the Eternia Crystal onto the Eternia Crystal Stand. Both are obtained for coins from the Tavernkeep, who appears after Eater of Worlds and Brain of Cthulhu have been defeated.
How to kill the Ogre
He's very slow, but the Ogre packs a big punch. His three main attacks are avoidable, so here's a list of what the Ogre can do:
- The Ogre can slam onto the ground with a jump to create a shockwave. This shockwave deals high damage and knockback to all allies within 10 blocks of the point of impact.
- He can also can swing its club if you get too close, dealing big damage and knockback. Just don't get too close to it to avoid this attack.
- The Ogre also has a ranged attack. He can flick snot at a target, which deals damage if it hits, but it can also make the terrain inflict the Oozed debuff (slows down the affected player significantly) on those who walk on it.
Betsy
How to summon Betsy
Another mini-boss that appears during the Old One's Army event, but this one only appears after killing the Golem. The Old One's Army event is activated by placing the Eternia Crystal onto the Eternia Crystal Stand. Both are obtained for coins from the Tavernkeep, who appears after Eater of Worlds and Brain of Cthulhu have been defeated.
How to kill Betsy
This big dragon appears in the wave seven and will constantly bombard you with fire attacks, dash into you, and summon Etherian Wyverns. Here are some tips for dealing with this big dragon:
- I only recommend trying this fight solo once you've unlocked the S.D.M.G and have either ichor bullets (for big damage) or chlorophyte bullets (as they can home in on her).
- Sentries can also help fend off other foes while you focus on the boss, but they won't be able to deal with every enemy that appears in this phase.
- If you're playing with other people, you can get away with having equipment that's not found after beating the Moon Lord. Have one person focus on dealing with the monsters coming out of the portals and the other focus entirely on Betsy. Having an arena with multiple levels of platforms can help keep the heat off the player that's keeping the other monsters from destroying the Eternia Crystal.
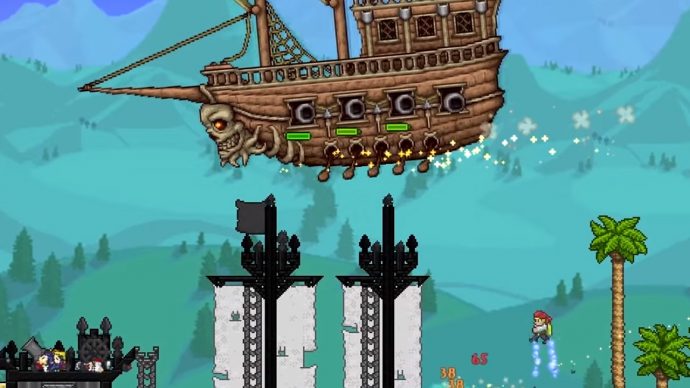
Flying Dutchman
How to summon the Flying Dutchman
Pirate Invasions have a random chance of occurring once or you can obtain a Pirate Map. This map has a 1% chance to drop from enemies close to, or in the Ocean biome during Hardmode.
How to destroy the Flying Dutchman
After killing a certain number of pirates, a giant pirate ship will swoop in from the air. I recommend creating a solid platform high in the sky with a wall to the left side and some platforms sticking out of it. Once the Flying Dutchman appears, it will get stuck on the platforms, leaving it open for a rain of arrows from a Daedalus Stormbow.
If you don't get the The Black Spot - the most desired item from this mini-boss - wait for another one to appear. Don't kill any pirates but kill any other enemies that spawn. This is so the event doesn't end prematurely.
Mourning Wood
How to summon Mourning Wood
This is one of two bosses that appears during the Pumpkin Moon event. You will need to combine 30 pumpkins, 5 ectoplasm, and 10 hallowed bars at a Mythril anvil or Orichalcum anvil to make a Pumpkin Moon Medallion. Activate the Medallion when nighttime begins (7:30 in-game time) to begin the event. This mini-boss first appears during wave four, but multiple copies of the boss can appear in later waves.
How to kill Mourning Wood
Mourning Wood only has one attack, which is to fire spores that light up the ground and deal damage. The main difficulty with fighting Mourning Wood is also dealing with the other enemies. If Mourning Wood ever goes off-screen, it will warp to the nearest hard surface while continuing to fire burning spores.
Pumpking
How to summon Pumpking
This is one of two bosses that appears during the Pumpkin Moon event. You will need to combine 30 pumpkins, 5 ectoplasm, and 10 hallowed bars at a Mythril anvil or Orichalcum anvil to make a Pumpkin Moon Medallion. Activate the Medallion when nighttime begins (7:30 in-game time) to begin the event.
How to kill Pumpking
The Pumpking appears in wave seven and acts very similarly to Skeletron. It can appear alongside Mourning Wood in some circumstances. Multiple Pumpkings can appear in later waves of this event.
Pumpking follows you while constantly waving its sickle hands. In addition, it will also generate spinning sickle projectiles that are rather big and do a lot of damage if you hit them.
My suggestion here is to activate the Pumpkin Moon event near a purpose built arena with multiple levels. Once when the Pumpking appears, go to your arena and keep attacking with ranged weapons while dodging the sickles and its other attacks.
If you have unlocked the S.D.M.G and have chlorophyte bullets, this can make the fight a lot easier as you can focus on dodging while the bullets home in on it. Keep firing and you should beat it.
Everscream
How to summon Everscream
This is one of three bosses that appears during the Frost Moon event at around wave 4. You will need to combine 20 silk, 5 ectoplasm, and 5 Soul of Fright at a Mythril anvil or Orichalcum anvil to make a Naughty Present. Activate the Present when nighttime begins (7:30 in-game time) to begin the event.
How to kill Everscream
You'll need to set up a trap arena beforehand to deal with this event with minimal fuss. I recommend watching this guide from "GrobeMan" for an example of creating a trap arena for this event.

Everscream is very similar to Mourning Wood in that it only has one attack: firing pines that deal damage. The main difficulty with fighting Everscream is also dealing with the other enemies. Much like Mourning Wood, if Everscream ever goes off-screen, it will warp to the nearest hard surface while continuing to fire pines.
Santa-NK1
How to summon Santa-NK1
Santa-NK1 is one of three bosses that appears from wave 7 during the Frost Moon event. You will need to combine 20 silk, 5 ectoplasm, and 5 Soul of Fright at a Mythril anvil or Orichalcum anvil to make a Naughty Present. Activate the Present when nighttime begins (7:30 in-game time) to begin the event.
How to kill Santa-NK1
If you're using the above trap arena in the Frost Moon event, then the only thing you need to worry about with Santa-NK1 is the missiles this robot fires at you. He can also bombard the area with presents that hurt you if you touch them.
As you damage Santa-NK1, his face will begin peeling off to reveal a Terminator-esque visage. He'll also get faster and a lot more aggressive. Just dodge his attacks while keeping your health up and you should be able to defeat him.
Ice Queen
How to summon Ice Queen
The final boss of the Frost Moon event is the Ice Queen. She begins appearing in wave 11. You will need to combine 20 silk, 5 ectoplasm, and 5 Soul of Fright at a Mythril anvil or Orichalcum anvil to make a Naughty Present. Activate the Present when nighttime begins (7:30 in-game time) to begin the event.
How to kill Ice Queen
She won't be affected by your traps, so you'll need to defeat her the old-fashioned way. Grab a decent gun and as many ichor/chlorophyte bullets as you can muster, then switch to this weapon as soon as she appears. She'll be joined by Flocko, which are floating snowflakes that hurt on contact.
She attacks at range with ice shards while moving incredibly fast. It can be tricky to land a hit on her. My recommendation is to attack when she stops moving and spins. You'll take some damage from the shards, but you can always drink a healing potion to heal if you need to.
If you're finding her hard to hit, make sure you have unlocked the S.D.M.G and have chlorophyte bullets before taking on the Frost Moon event. This can make the fight a lot easier as you can focus on dodging while the bullets home in on it. Keep firing and you should beat her.
Martian Saucer
How to summon Martian Saucer
Activate the Martian Madness event by travelling to the beach and building high up. Eventually a UFO will drop to inspect you. Do not kill it. Let it get away and you'll begin the event. Alternatively you can use a Martian Probe to start the event.
How to destroy Martian Saucer
Build a small room with a platform above you and some walls above your head to protect you. This is so you can shoot down these giant UFOs and be relatively safe. Just don't get hit by the giant laser as it can hurt for at least 200HP.
Solar Pillar
How to summon Solar Pillar
The four pillars of the Lunar Event (activated by killing the Lunatic Cultist) are all essentially the same boss in structure. They are giant pillars that remain in place throughout the fight.
How to kill Solar Pillar
They are all initially guarded by a shield. This shield only disappears after defeating a set number of enemies that it spawns. If no line appears after killing an enemy, the pillar is able to be hurt. Here are some notes about the Solar Pillar specifically.
- Each pillar has a theme and this one summons a lot of enemies that deal contact-based damage.
- The main enemies to watch out for is the Crawltipede. It's a worm enemy that's only vulnerable on the tail, but will be passive if you have blocks below your feet.
- The rest are focused on charging at you, either from the ground or in the air. The Corite can charge through blocks, while the Selenian reflects projectiles you fire at it while it is charging.
- The Solar Pillar can spit out fireballs which hurt for a lot of damage.
Nebula Pillar
How to summon Nebula Pillar
The four pillars of the Lunar Event (activated by killing the Lunatic Cultist) are all essentially the same boss in structure. They are giant pillars that remain in place throughout the fight.
How to kill Nebula Pillar
They are all initially guarded by a shield. This shield only disappears after defeating a set number of enemies that it spawns. If no line appears after killing an enemy, the pillar is able to be hurt. Here are some notes about the Nebula Pillar specifically.
- Each pillar has a theme. This one is a mage themed pillar and summons enemies capable of teleportation, flight, and other unorthodox attacks and abilities.
- Be careful of Brain Sucklers. They can inflict the Obstructed debuff, which darkens the screen, while also dealing big damage.
- Nebula Floaters shoot lasers at you while moving very fast in the air. It will teleport around when it is hit.
- The Evolution Beast shoots projectiles that home in on the player, dealing high damage multiple times if they hit.
- The Predictor has a spread shot that fires four projectiles at once.
- This Pillar is the only one that does not attack on its own.
Vortex Pillar
How to summon Vortex Pillar
The four pillars of the Lunar Event (activated by killing the Lunatic Cultist) are all essentially the same boss in structure. They are giant pillars that remain in place throughout the fight.
How to kill Vortex Pillar
They are all initially guarded by a shield. This shield only disappears after defeating a set number of enemies that it spawns. If no line appears after killing an enemy, the pillar is able to be hurt. Here are some notes about the Vortex Pillar specifically.
- Each pillar has a theme and this one is the ranger-themed Pillar. These minions that the Vortex Pillar spawns fire long-ranged projectile attacks.
- Alien Queens can inflict the Distorted debuff if they hit you with their stingers. You won't be able to fly upwards or fall downwards for a few seconds, but you can still move horizontally.
- Alien Queens generate two Alien Larvae when killed. Kill these as soon as you can or they will turn into Alien Hornets.
- Vortexians summon a portal that shoots a lightning bolt upon their death. This deals a small amount of damage.
Stardust Pillar
How to summon Stardust Pillar
The four pillars of the Lunar Event (activated by killing the Lunatic Cultist) are all essentially the same boss in structure. They are giant pillars that remain in place throughout the fight.
How to kill Stardust Pillar
They are all initially guarded by a shield. This shield only disappears after defeating a set number of enemies that it spawns. If no line appears after killing an enemy, the pillar is able to be hurt. Here are some notes about the Stardust Pillar specifically.
- Each pillar has a theme. This one is based on summoning, so the enemies that appear will summon other smaller enemies.
- Milkyway Weaver is a worm that only attacks if you are not standing on any kind of block. It attacks in much the same way as the Crawltipede from the Solar Pillar boss, only this time it's vulnerable in the head.
- Kill all the smaller Star Cells that appear when you defeat a Star Cell, otherwise they'll grow to full size and will be much harder to deal with.
- The Flow Invader will summon smaller creatures around it. They shoot themselves like projectiles towards the player if there are ever three surrounding the Flow invader. Once the Flow Invader is killed, any remaining creatures around it will fire at the player.
- The Twinkle Popper can release smaller enemies called Twinkles. They chase the player and explode nearby, dealing lots of damage.
- The Stargazer will chase after you, shooting very powerful lasers.
Whew, that a lot of Terraria bosses! Thanks for reading this guide.
There are few other guides featured for the game covering the Journey's End update that came out in 2020, so if you want to learn How to make a bed in Terraria, learn Best wings in Terraria, or everything about all the Terraria NPCs , then do have a look at our other guides.