How to overclock your GPU
Squeeze a little extra juice out of your graphics card

Knowing how to overclock your GPU can be the key to extracting every last iota of power from your PC, boosting games performance without the need to replace and upgrade any hardware. More frames per second at no additional cost? Sure, why not, especially since almost every GPU on the market is unlocked for overclocking. Even a lot of the best graphics cards, which often come with pre-applied factory overclocks, will leave enough headroom for you to make further tune-ups.
The catch is that unlike a lot of other useful PC ownership skills – knowing how to check CPU temperature, for instance, or indeed how to install a GPU in the first place – GPU overclocking can be a tricky process. You’re essentially trying to find a point where your card is running as fast as it can, but stopping just short of where the increased heat and power draw start causing stability problems. This can take some trial and error, but worry not: this GPU overclocking guide will walk you through every step.

Get it right, and an overclocked GPU will net you performance that could match the effect of upgrading your CPU or RAM. It’s absolutely worth trying if you find you’re just falling short of smooth FPS in a certain game, or if you’ve invested in one of the best gaming monitors and want to make the most of its heightened refresh rate.
What is GPU overclocking?
Skip ahead if you already understand what overclocking GPU speeds entails, but if not, here’s a quick primer. Every graphics card includes both a processor and its own RAM (sometimes called VRAM or video RAM) that’s separate from the PC’s system RAM. Both these components-within-a-component have their own clock speeds, which refer to how many operation cycles they can perform in a second. A completely stock-spec RTX 3080, for instance, can reach processor core clock speeds of up to 1710MHz, which is 1.71 billion cycles per second.
That’s a lot of cycles! But you can overclock these speeds so that even more cycles are completed every second, allowing for faster number-crunching and ultimately faster performance. Generally, you can overclock both the graphics card’s processor cores and its VRAM independently – the trick is not to push them too hard, as faster clock speeds will make the processor cores/VRAM both run hotter and demand more power from the PSU. A good GPU overclock is all about finding that balance between system stability and enhanced performance, which could potentially be up to 20% over stock speeds. It can vary depending on the graphics card and the PC’s cooling, mind you.
How to overclock a GPU
Fortunately, you don’t need to dive into your PC’s BIOS/UEFI for GPU overclocking; all you really need is a lovely bit of desktop software called MSI Afterburner. A lot of graphics cards manufacturers – Asus, Zotac and the like – have their own overclocking software too, but Afterburner is the best I’ve used, and it works with any make or model of GPU even if it’s not an MSI card.
Here we go, then: a step-by-step guide on how to overclock your GPU…
Step 1: Install MSI Afterburner
Download MSI Afterburner from here, extract the downloaded executable, then run it. Complete the installation wizard then launch.
Step 2: Set GPU overclocking headroom
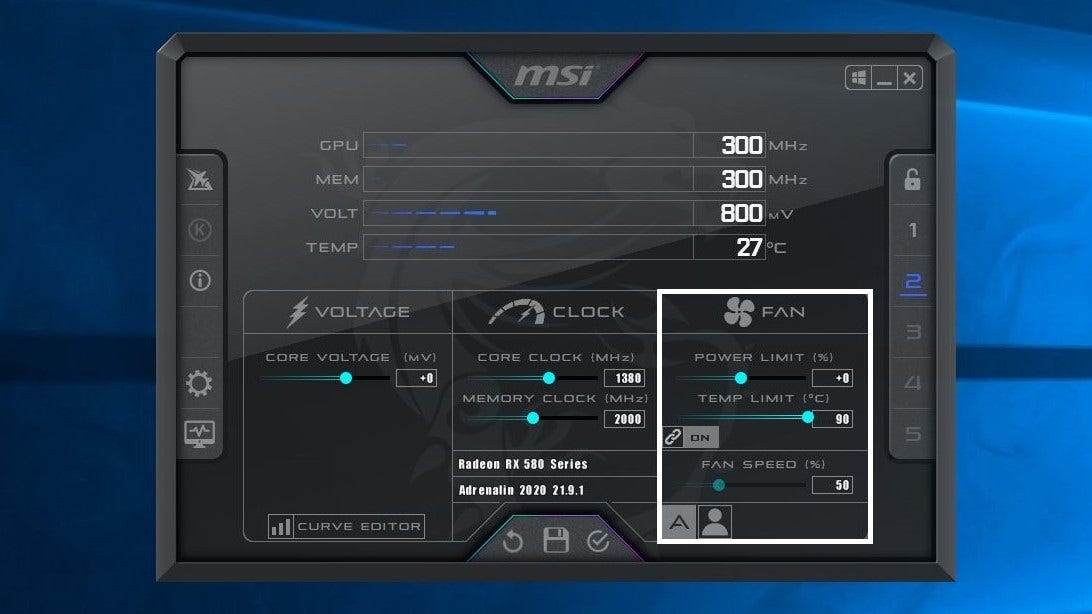
Once you're inside the app, don’t be too overwhelmed by the deluge of numbers! For now check out the Power Limit and Temp Limit sliders at the bottom-right, within the “Fan” section. Slide both of these as far to the right as they’ll go, and don’t worry: this won’t break anything. All you’re doing is telling the system that you’ll want as much overclocking headroom from the GPU as the manufacturer safely allows. You won't actually exceed those set limits.
Any settings changes won’t take effect until you click the Apply icon (a check within a circle, located at the bottom-centre of the app), so don’t worry if nothing seems to happen as soon as you make an adjustment. Just make sure to hit Apply once you're done.
Step 3: Adjust GPU fan speeds
You can let your GPU cooler continue to adjust its fan speeds automatically, but since overclocking raises temperatures, it’s probably wise to force any fans to maintain higher speeds. If Afterburner’s Fan Speed section is greyed out, open the settings menu by clicking the cog icon on the left sidebar, then click on the Fan tab. Then, click “Enable user defined software automatic fan control” and click OK. Back on the main app screen, click the “A” icon below the fan speed slider to disable Auto mode, then move the slider to the right to increase fan speed.
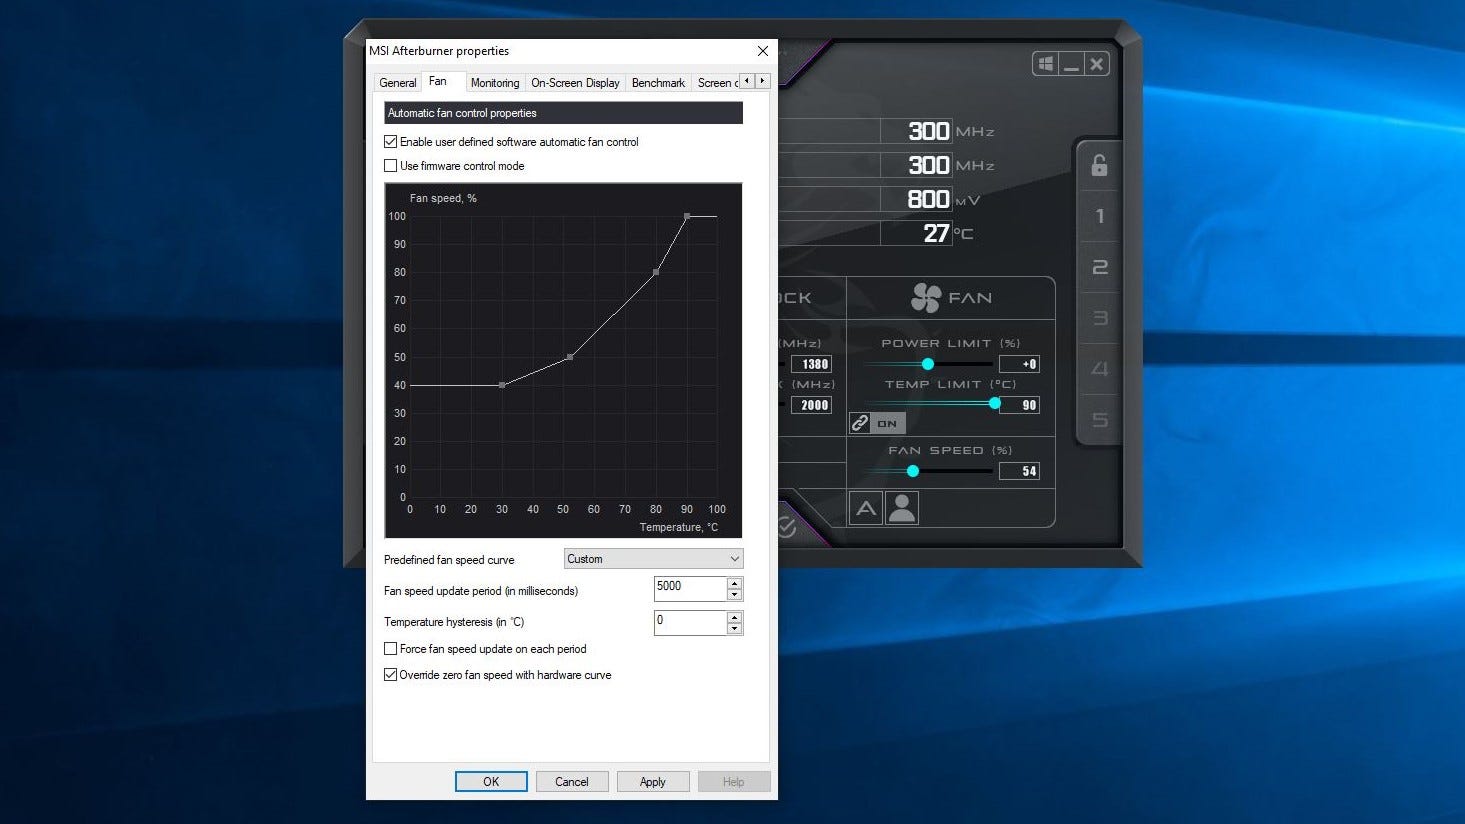
This can potentially produce a rather distracting whirr from within your PC. Results will vary between GPU coolers, but I generally find a setting between 50 and 70 strikes a good balance between cooling power and noise.
Step 4: Overclock GPU clocks
Now for the awkward bit. In the middle of the app are the Core Clock and Memory Clock sliders, i.e. where your overclock is actually set. Simply slamming these to the right will likely push them past their stable limits, especially if they’re on simple air cooling. The trick is to raise them slowly and slightly – in 10MHz increments is fine – and testing performance with every increment. If your system remains stable, raise them slightly again. See the ‘How to test GPU stability’ section below on how to make sure everything is running smoothly.
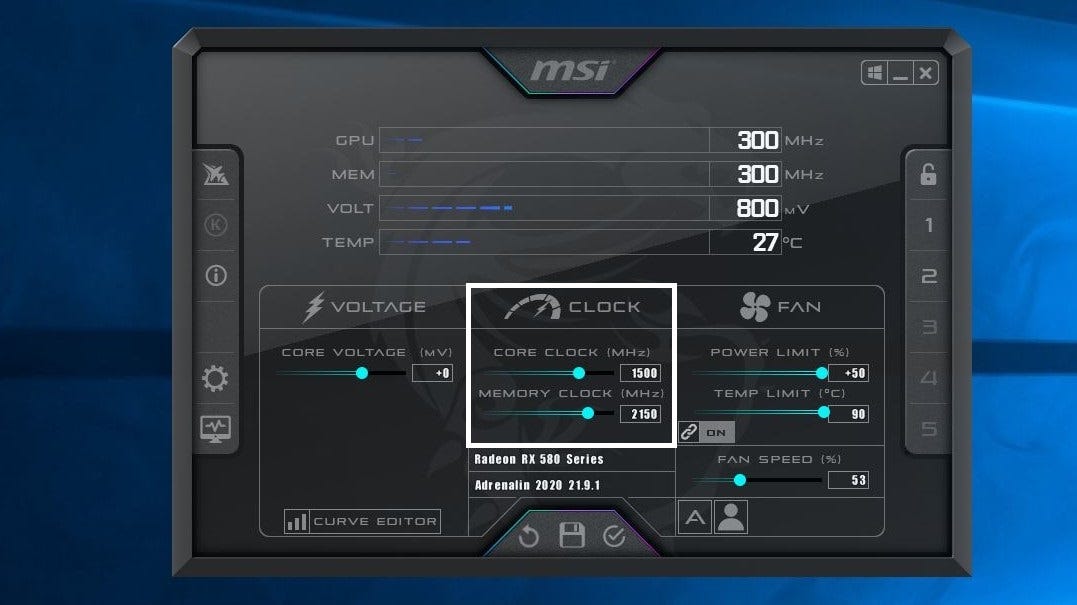
By repeating this raise, test, raise, test routine, your GPU will eventually reach its limit and start causing crashes. From here, simply roll back the clock speeds by 10-20MHz, and you should hopefully have a working, stable overclock. Is this a tedious process? Yes. Yes it is. But all graphics cards are different, so you can't just look up which settings will be perfect for your specific model (though this might give you an idea of where to aim for). Also, this incremental, upwards approach is both safer and probably still quicker than whacking clock speeds as high as they’ll go before trying to work backwards with an unstable PC.
Afterburner also provides core voltage adjustment, though I’m going to break with PC overclocking orthodoxy here and say you should try to avoid this if you can. It’s true that feeding a touch of extra power to a card can help fuel core and memory overclocks, but often your PC will be able to handle power delivery by itself, and improper voltage tinkering is the fastest way towards botched stability – or worse. If you’re confident enough to try anyway, you’ll first need to unlock the voltage slider by entering settings and checking both the “Unlock voltage control” and “Unlock voltage monitoring” boxes. And again, only raise it in small increments at a time: no more than 10mV, to be on the safe side.
Once you’re ready to try your GPU overclock settings, click the Apply icon at the bottom. You don’t need to restart your PC, so it’s easy to keep coming back and making adjustments. If you click the Windows icon in the top-right, the currently selected profile will also load automatically when you boot.

How to test GPU stability
Just because you apply an overclock and your graphics card avoids immediately bursting into flames, doesn’t mean you actually have a stable overclock. You’ll need to make sure the new settings can handle the strain of sustained game-playing without throttling or overheating outright.
There are plenty of free-to-download stress tests available for such a purpose. These aren’t playable games but are a similar workload in the eyes of your GPU, and can be looped so that they’ll run for hours without any additional input, leaving you free to go have lunch or learn Python or something. I’m a fan of Unigine Heaven – despite being over a decade old, it’s still reasonably taxing. Leave this running for a while, and if it or your PC crashes, you may have overdone the overclock, so go back and reduce the clock speeds or voltage by an increment before trying again.
I’d also recommend trying a few actual games before declaring your benchmark a success. You can use in-game benchmarks for this if you want to do something else in the meantime; lengthy, GPU-intensive benchmarks work best here, like those of Shadow of the Tomb Raider or Horizon Zero Dawn. Again, if you get a crash, or performance hasn’t increased from stock speeds, don’t despair. Just head back into Afterburner and experiment some more.
Why not use Auto OC?
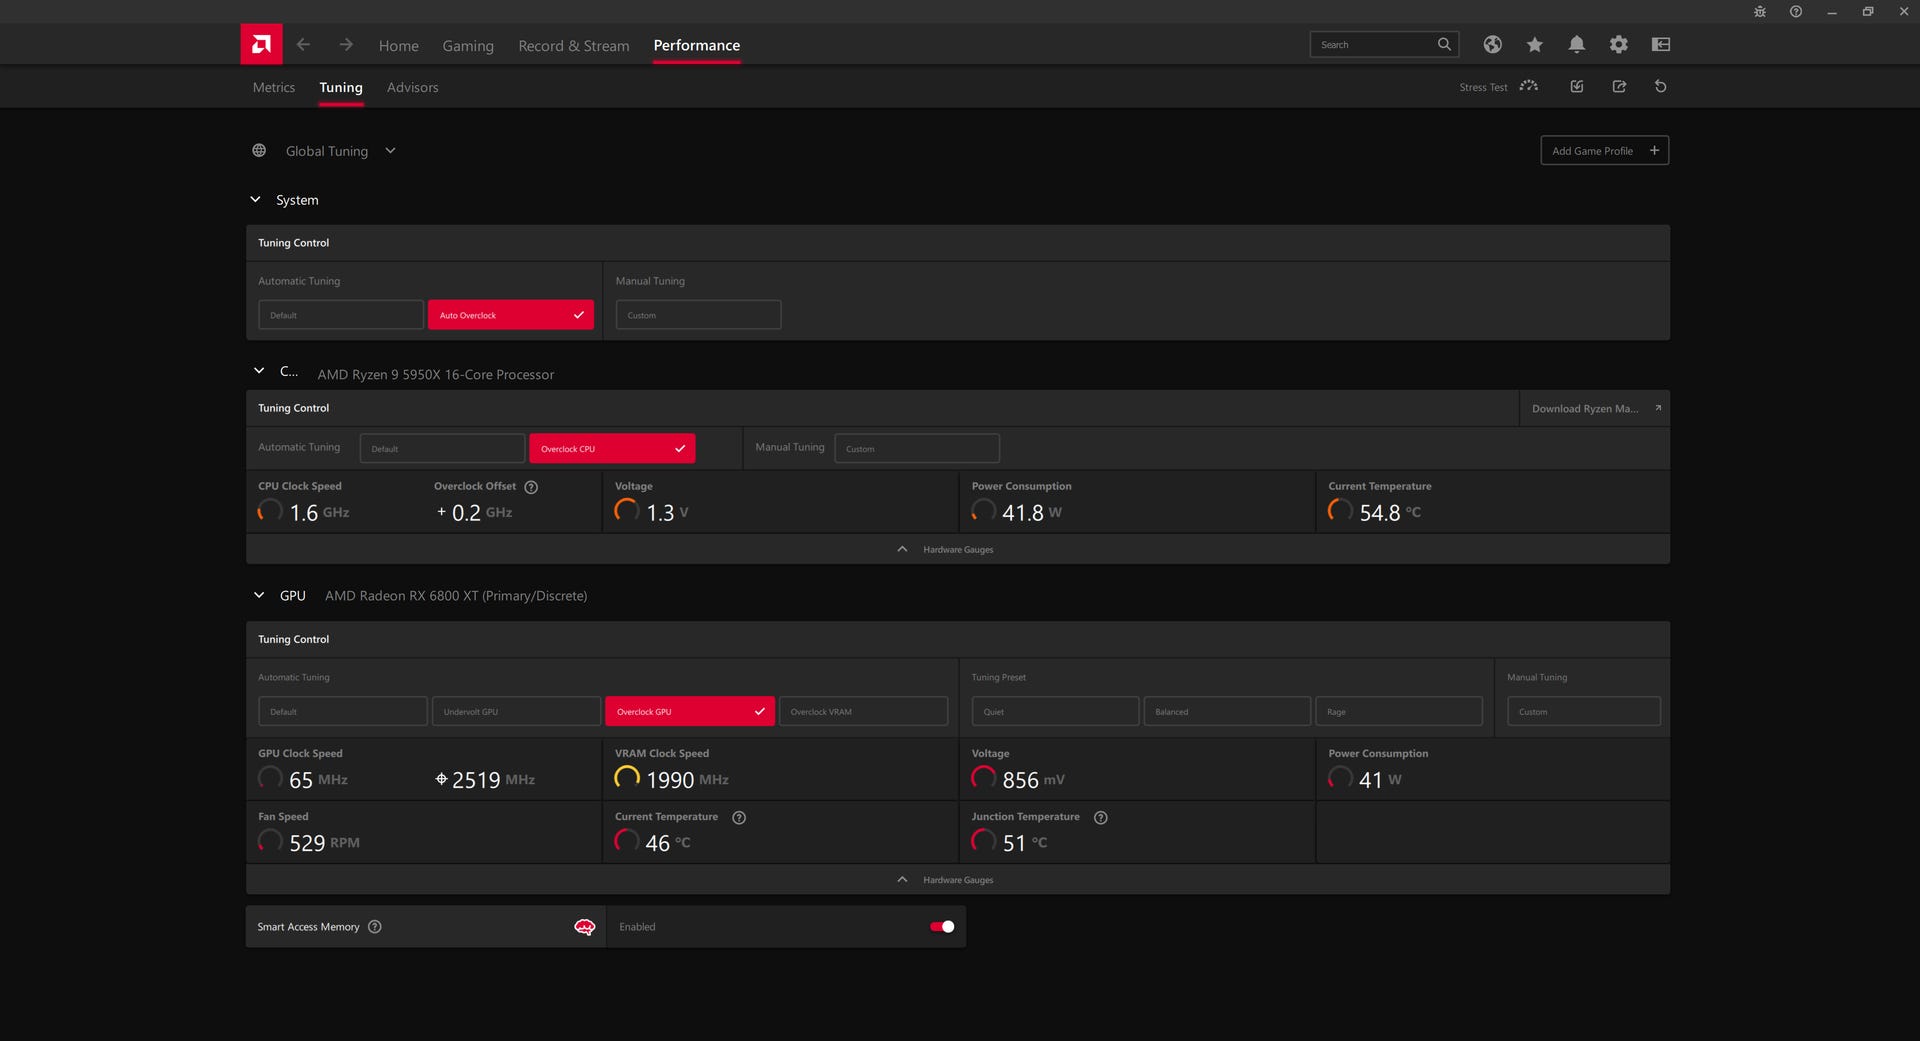
Many software utilities include “one-click” overclocking tools; MSI Afterburner itself offers this for recent Nvidia cards, while AMD’s Radeon Software now includes both automatic GPU and CPU overclocking. With these tools, the software will detect which GPU you have and apply a preset overclock in seconds.
Auto OC is a great idea, or at least it would be if it worked more reliably. These tools appear to take all the guesswork out of setting a core clock speed, but are more or less guessing how far to overclock themselves, without the fine-tuned consideration you only get when you provide it yourself. As a result, they can often set overclocks that are too timid to noticeably improve performance, or go too far and cause crashes.
By all means, give them a try if they’re available – I haven’t tested anywhere near every graphics card with every kind of Auto OC tool, so you might just have better luck than me. But even if you get a stable result, you could potentially improve performance further by using the automatically-applied settings as a starting point and manually refining clock and fan speeds with Afterburner.
Risks of overclocking a GPU
To clear, the point of this section isn’t to put you off; it’s actually quite difficult to do lasting damage to a graphics cards through overclocking, save for the most bone-headed of tweaks. And if you were daft enough to attempt these, you wouldn’t be consulting a guide like this in the first place.
That said, overclocking any piece of PC hardware does require a light touch, as you’ll essentially be trying to find a balance of GPU core and memory speeds, heat, and voltages. Get that balance wrong, and you’re looking at crashes – or thermal throttling that can nullify any performance gains you might otherwise have made. Crashes aren’t the end of the world, nor the end of you having a working PC, and can in fact be a useful marker for determining the limit of your card’s overclocking capabilities. Even so, you don’t want an unstable GPU either.
If you’re still concerned, take comfort in knowing that – unlike with CPUs – overclocking a GPU is unlikely to void its warranty. Some manufacturers, like EVGA, have specified outright that OC’ing their cards is fair game, and the rest generally don’t care as long as you avoid bricking it at the BIOS level. Luckily, all the tools you need for overclocking a GPU are usable through your desktop.
It’s also fine if your whole PC warms up a little after overclocking, provided it’s not getting hot enough to cause instability or component throttling. You could potentially add a case fan or two for some extra ventilation, if you want: our guide on how to install a PC case fan will show you how.
Don’t forget that there are other, less hardware-intensive ways of boosting games performance as well. Upscaling tools like Nvidia DLSS and AMD FSR 2.0 can get you a much higher FPS with a simple in-game settings toggle, while Nvidia Image Scaling and AMD Radeon Super Resolution are available for when games lack built-in DLSS or FSR support.