Path Of Exile Sentinel league explained: How to use the Sentinel Controller and Sentinel strategies
How to maximize your loot using the new Sentinel mechanic


Looking for help with the Sentinel league mechanic in Path Of Exile? Sentinel league introduces a layered new mechanic to Path Of Exile’s endgame, allowing players to create on-demand loot explosions throughout the campaign and the Atlas. However, setting up your Sentinels to actually earn meaningful rewards is a bit convoluted. Once you know how to manage the mechanic though, it is surprisingly rewarding. Set up your Sentinel Controller and maximize your loot with this walkthrough and strategy primer.

How to use the Sentinel Controller
If you’re just diving into Sentinel league, you will first encounter Sentinels in The Coast zone in Act 1, where most league mechanics make their first appearance. Here you will find a Sentinel Cache containing a Stalker Sentinel and the Sentinel Controller. The button for this will reside on the left side of your inventory for the rest of the league.
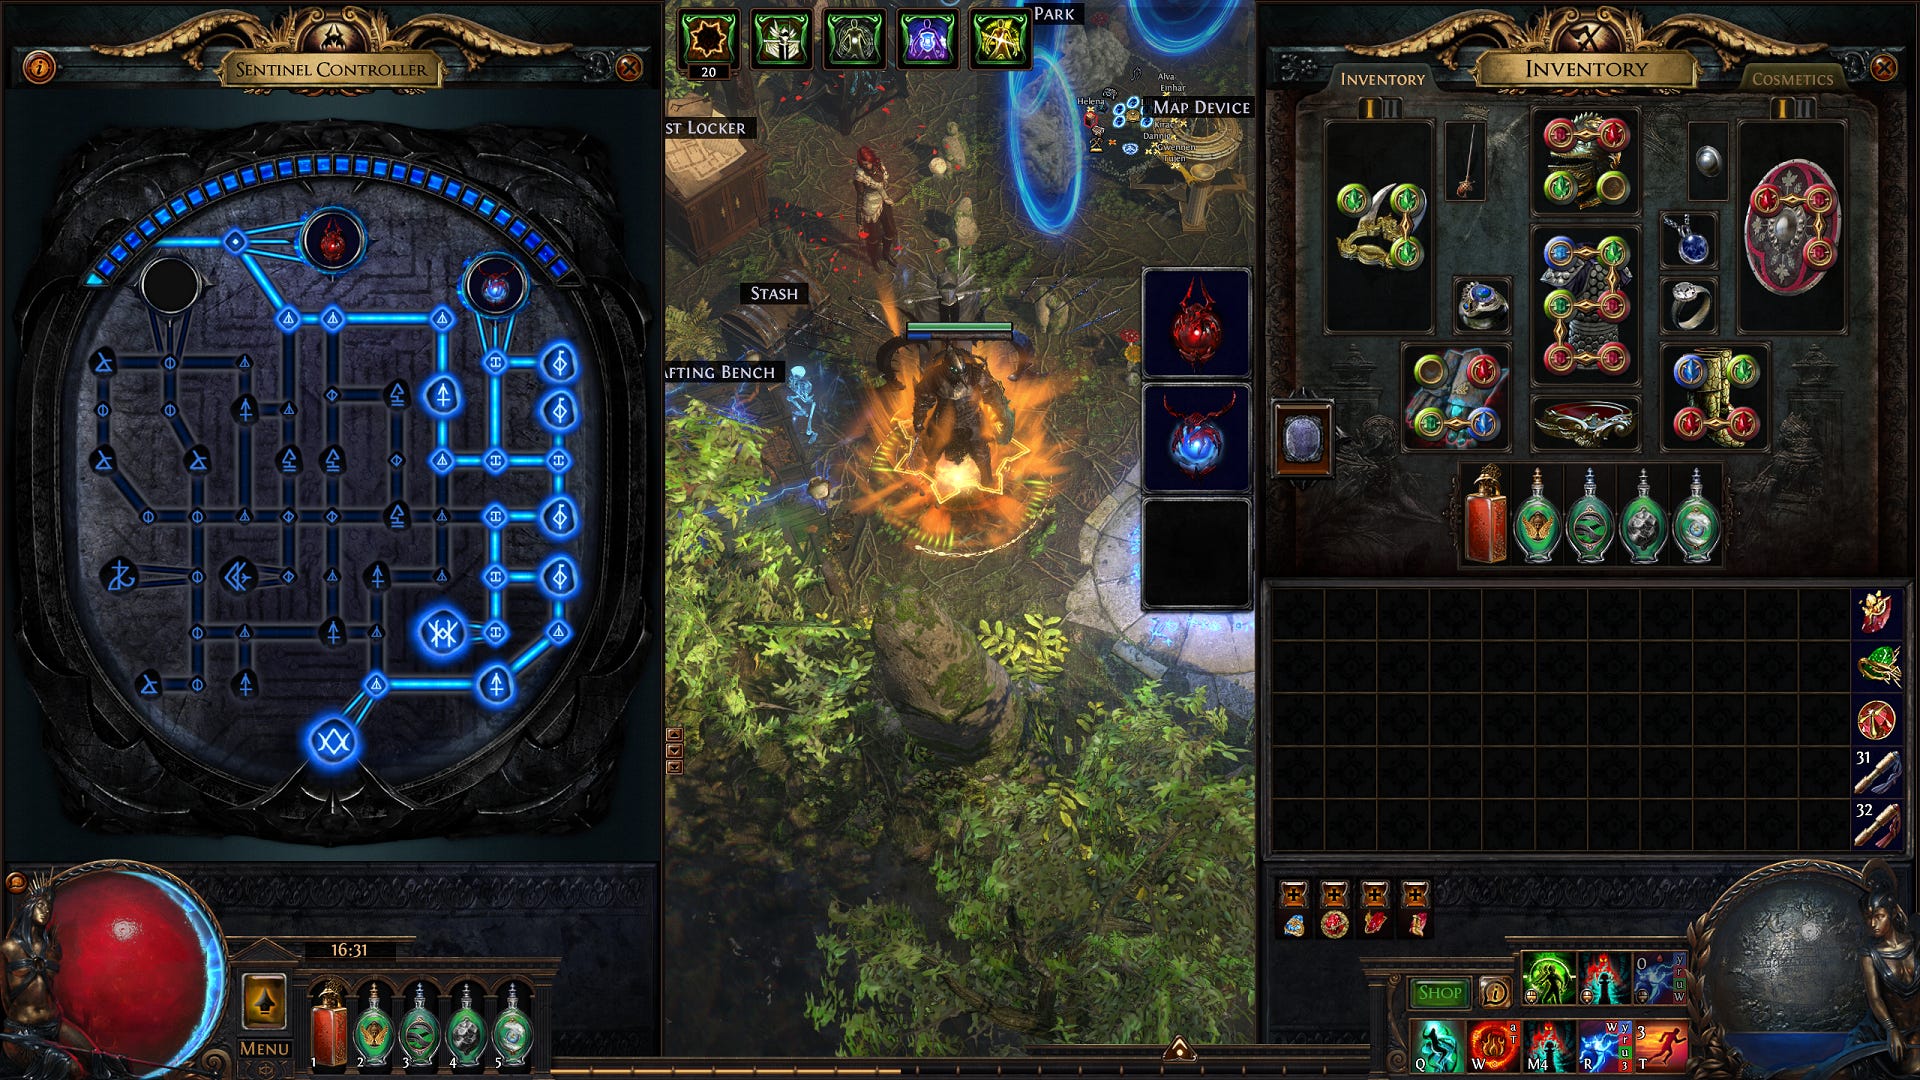
Open the Sentinel Controller and you’ll find a grid of runic symbols, which you can hover over to read the various bonuses they grant. You can connect nodes as you please to plan out your grid, and change them at any time for no cost. However, you’ll need Sentinel Power before your Controller nodes actually do anything.
To gain Sentinel Power, all you have to do is use your Sentinels. There are three types of Sentinels that each empower monsters differently (we’ll discuss what that actually means in detail below). Killing empowered monsters powers up your Sentinel Controller and fills in the Power arc across the top, with each square representing one more connection you can activate. The Sentinel Controller will automatically power connections you’ve set up as you gain power so that you can plan ahead.
Path Of Exile Sentinel types and how to "recharge" them
There are three types of Sentinels. Stalker Sentinels are available from the moment you pick up your Sentinel Controller and will follow you around shooting their empowering beams at enemies until they time out or run out of power. Apex Sentinels function similarly, but can only empower Rare and Unique enemies. Finally, Pandemonium Sentinels empower a large number of enemies all at once before disappearing immediately. Apex and Pandemonium Sentinels are only available once you power their slots on the Sentinel Controller.
Each Sentinel has an “empowerment” stat that determines how much it powers up its targets. Higher empowerment grants monsters increased life, damage, and damage reduction. However, it also increases the quantity and rarity of items they drop. That means you can use high empowerment Sentinels to juice up fights on the spot, making them more difficult and potentially far more rewarding.
All Sentinels have charges that determine how many times you can use them. Higher-level Sentinels typically have more charges. Once you use up all of a Sentinel’s charges, it cannot be recharged. However, you can use items called Power Cores to combine two expired Sentinels into a single new one that inherits some of their modifiers. If you combine your best expired Sentinels and have a bit of luck, you can create very powerful new Sentinels with highly desirable modifiers that increase the odds of dropping specific, desirable reward types.
Path Of Exile Sentinel strategies
Right now there are two main Sentinel strategies. The more popular strategy is to focus on upgrading Pandemonium Sentinels and activate them in monster-dense areas for tons of loot all at once. This is the strategy I’m currently using, and I’ve managed to load up on currency, Scarabs, Essences, and other valuable rewards by activating my Pandemonium Sentinel near a Shrine twice per map. See the Controller layout above for an example.
The two key nodes for this strategy are:
- Pandemonium Sentinels can be deployed an additional time in each area.
- Pandemonium Sentinels spawn monster packs on deployment.
Both of these nodes are located on the bottom right of the Controller. This allows you to use your Pandemonium Sentinel twice per map and guarantees extra monsters when you do. Activate your Pandemonium Sentinel near a large monster pack and watch the loot fly. You can use mechanics like Shrines and Strongboxes on your Atlas passive tree to guarantee good Pandemonium Sentinel targets on every map.
The other less popular strategy is to invest in Apex Sentinels to turn bosses into loot bombs. This of course requires a character with excellent single-target damage, but may be a good way for bossing-focused characters to increase their map rewards. Invest fully into the left side of the Sentinel Controller then activate your Apex Sentinel on map bosses to load up on loot. There may also be some value in targeting things like Metamorphs, Rogue Exile, and Legion rare monsters with your Apex Sentinel, but the added loot may not outweigh how long it takes to kill these enemy types when empowered.
That's everything you need to gets tons of loot out of Sentinel! The mechanic is less complicated than it looks, and pretty much boils down to pressing three extra buttons per map once you're set up. If you haven't yet started the league or struggled with your first build, check out our Sentinel league starters guide for some suggestions! We've also got guides to all of the Siege Of The Atlas pinnacle bosses, including the Searing Exarch and the Eater of Worlds.