The Cycle: Frontier tips and tricks: A beginner's guide to PvP, PvE, equipment, and more
A comprehensive beginner's guide to The Cycle: Frontier

Do you want to get better at The Cycle: Frontier? It's a slow but glorious journey on which you've chosen to embark, fellow prospector. The latest in a burgeoning line of multiplayer extraction shooters, The Cycle: Frontier drops its players into the gorgeous world of Fortuna III, where they must fend against both the fauna and rival prospectors while attempting to gather precious materials and extract with their lives and gear intact.
I've played a great deal of The Cycle at this point, and I've got a pretty good grasp on how to quickly learn the game, improve your gear, and turn yourself into a powerful rival against any enemies you come across. So, to help you achieve the same, I've put together the below beginner's guide to The Cycle: Frontier.
This comprehensive guide is split into 9 sections, each one filled with numerous in-depth tips, tricks, and tactics. We'll cover everything from what equipment to take into your first drop to good stamina management and stealth; from hunting creatures to defeating other players; from armour and penetration stats to quickly earning money to buy better gear. Just about everything you need to become an expert in The Cycle is waiting for you below, so let's get started.
On this page:
- Preparing for your first drop
- Always enter the match with a gameplan
- Movement and exploring the map
- Weapon penetration and armour explained
- PvE tips: How to survive against creatures
- PvP tips: How to survive against enemy prospectors
- How to get better gear
- How to get more money quickly
- Miscellaneous tips and tricks
Preparing for your first drop
Understanding how The Cycle: Frontier works
If you've played Escape From Tarkov or Hunt: Showdown, you'll be familiar with the core loop of The Cycle: Frontier. Unlike traditional battle royales, in The Cycle you don't drop into the game at the same time as every other player and fight until one player is left standing. Instead each server persists throughout the day, and players drop in, complete their objectives, and extract whenever they like.
There's no overarching aim with each match in The Cycle. Instead, you set your own objectives. Do you want to gather metals and plastics to upgrade your gear once you're back home? Do you want to hunt creatures to complete a certain faction's quest? Do you want to hunt and kill other players, and take their high-value loot and gear?
In Part 2 we'll talk more about entering the match with a gameplan in mind. The key takeaway is: in The Cycle you don't stay in a match until either you die or "win". Instead you drop in, accomplish whatever goals you want, and then extract at one of the two extraction points available to you. So if you want to stay alive, you should always try to extract as soon as you've completed your goals.
What equipment should you bring?
If you're not sure what equipment to take into your first drop in The Cycle, here's a good checklist to follow:
- Small backpack: Your most important item. You need it to carry stuff, from ammo and meds to materials. A small backpack is very cheap, and allows you to store up to 200 weight in items.
- Common Shield: If an enemy's gun penetration value exceeds your shield armour value, then you'll take extra damage. Without a shield, you'll die very quickly to any weapon in the game.
- Common Helmet: A Helmet offers the same armour protection as a Shield, but exclusively for your head. Headshots are pretty powerful in The Cycle, so always bring a Helmet of some sort.
- AR-55 Autorifle: The AR-55 is a weak but reliable Assault Rifle which has a better range than other white-coloured weapons (with the exception of the Sniper Rifle, which is fairly expensive, so I wouldn't recommend new players take one into their first ever match).
- (Optional) Secondary weapon: The more you bring into a fight, the more you risk losing. But if you want the extra firepower, you can put another weapon into your secondary weapon slot. The K-28 (Pistol) is the cheapest but weakest option, while the PDW (SMG) and the B9 Trenchgun (Shotgun) both make for decent close-quarters weapons.
- 1 Weak Medkit: A Weak Medkit takes a lengthy 9 seconds to use, but it fully restores your health. I'd suggest you bring one into every single match.
- 3-5 Weak Stims: Stims are the faster-acting health regen option. A Weak Stim takes just 3 seconds to apply, but only restores 15% HP. Use Stims when you only have a moment to heal or just need to replenish a small amount of HP.
- Ammo: There are five different ammo types in The Cycle. Make sure you bring in the right type of ammo for your guns, and also make sure you bring in the right amount for each gun. Here's my advice for ammo amounts to take into battle:
| Weapon Type | Ammo Type | Amount |
|---|---|---|
| Pistol | Light Ammo | 20-50 |
| SMG | Light Ammo | 200-300 |
| Assault Rifle | Medium Ammo | 250-350 |
| LMG | Medium Ammo | 250-350 |
| DMR | Heavy Ammo | 50 |
| Sniper | Heavy Ammo | 20 |
| Shotgun | Shotgun Ammo | 15-25 |
| Launcher | Special Ammo | 10-20 |
Insuring your gear
If you're worried about losing a particular piece of gear that you're bringing into a match, then you can insure that item against losing it. You have two options when it comes to insuring an item:
- Standard Insurance: Costs K-Marks. If you lose this item, you'll receive a large portion of the item's cost in K-Marks.
- Gear Salvage Insurance: Costs either Aurum or Gear Tokens. If you lose this item and it isn't looted within a certain amount of time, then it will be returned to your quarters. If it is looted, then you'll instead receive a large portion of the item's cost in K-Marks.
Standard Insurance has very little downside, and I'd recommend using it whenever you have a decent-tier piece of gear that it would pain you to lose. Gear Salvage Insurance is better because you have a chance of the item being returned to you; but it's also more expensive (because Aurum and Gear Tokens are much harder to accrue than K-Marks), and the cost increases the more items you have insured in this way.
Which map should you play on?
From the very start of the game you'll have access to two maps: Bright Sands, and Crescent Falls. Each time you drop, you can choose which of these two maps you want to land on. For now, I'd strongly recommend you land exclusively on Bright Sands.
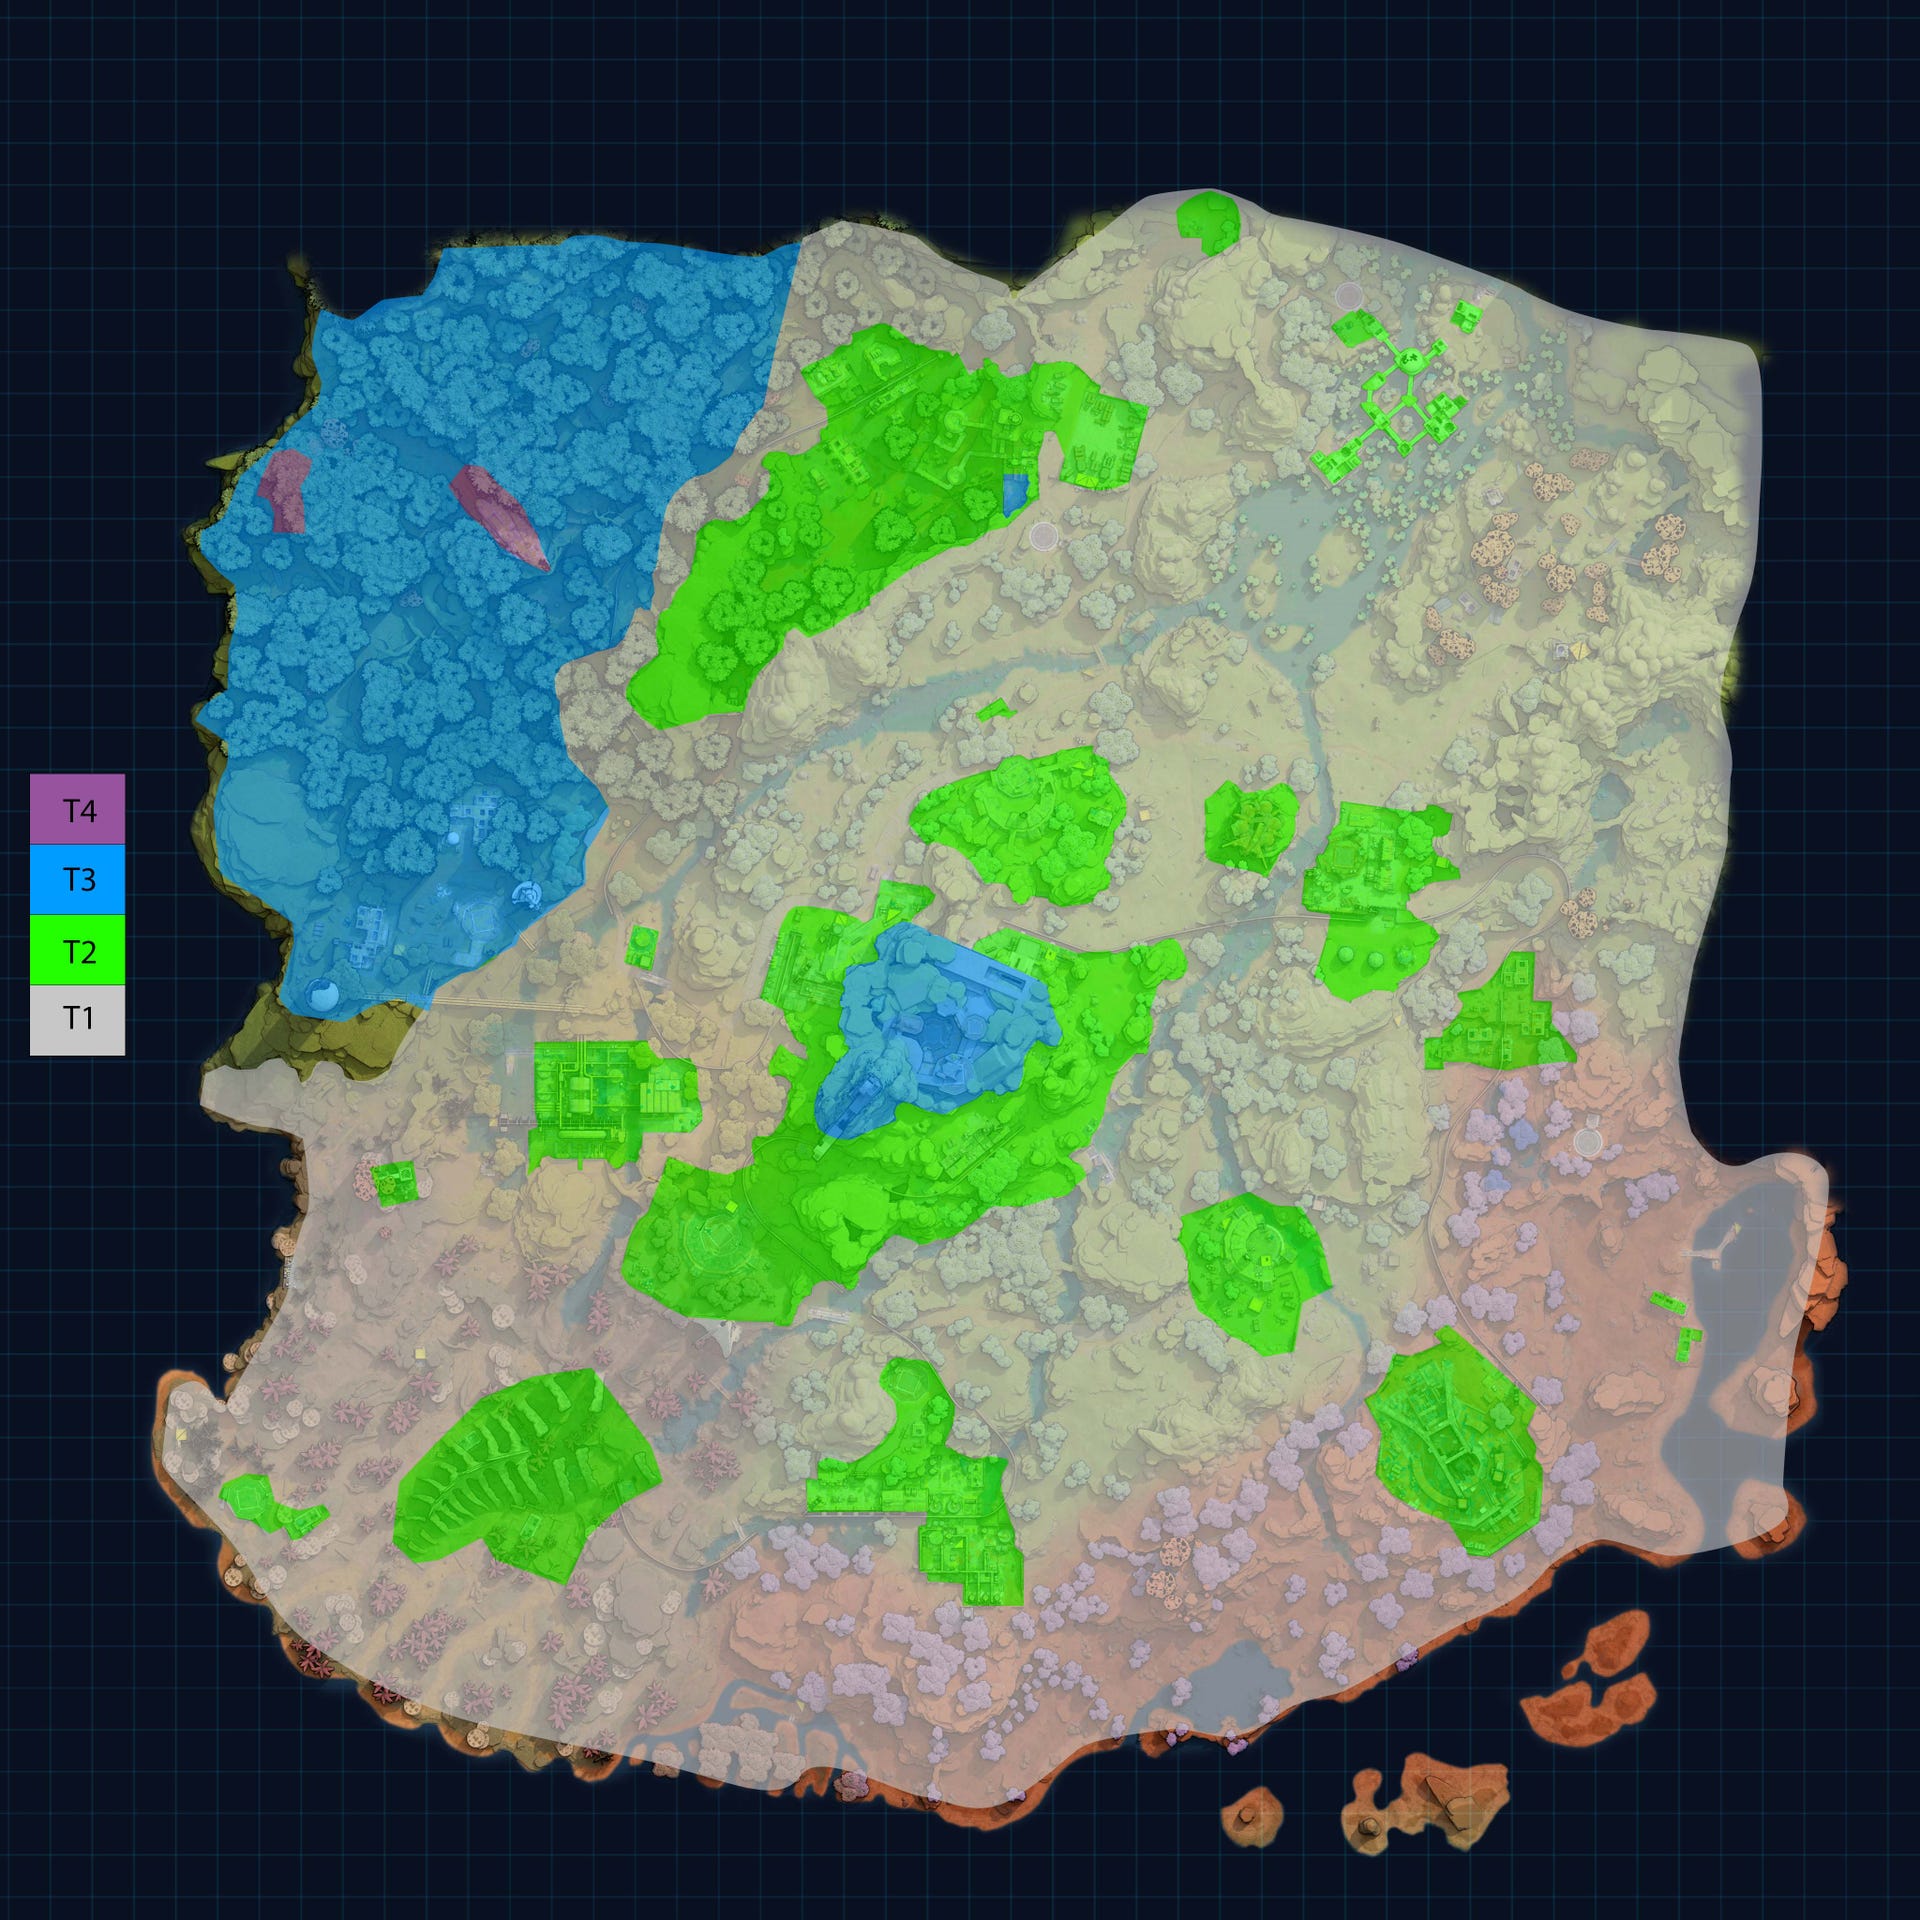
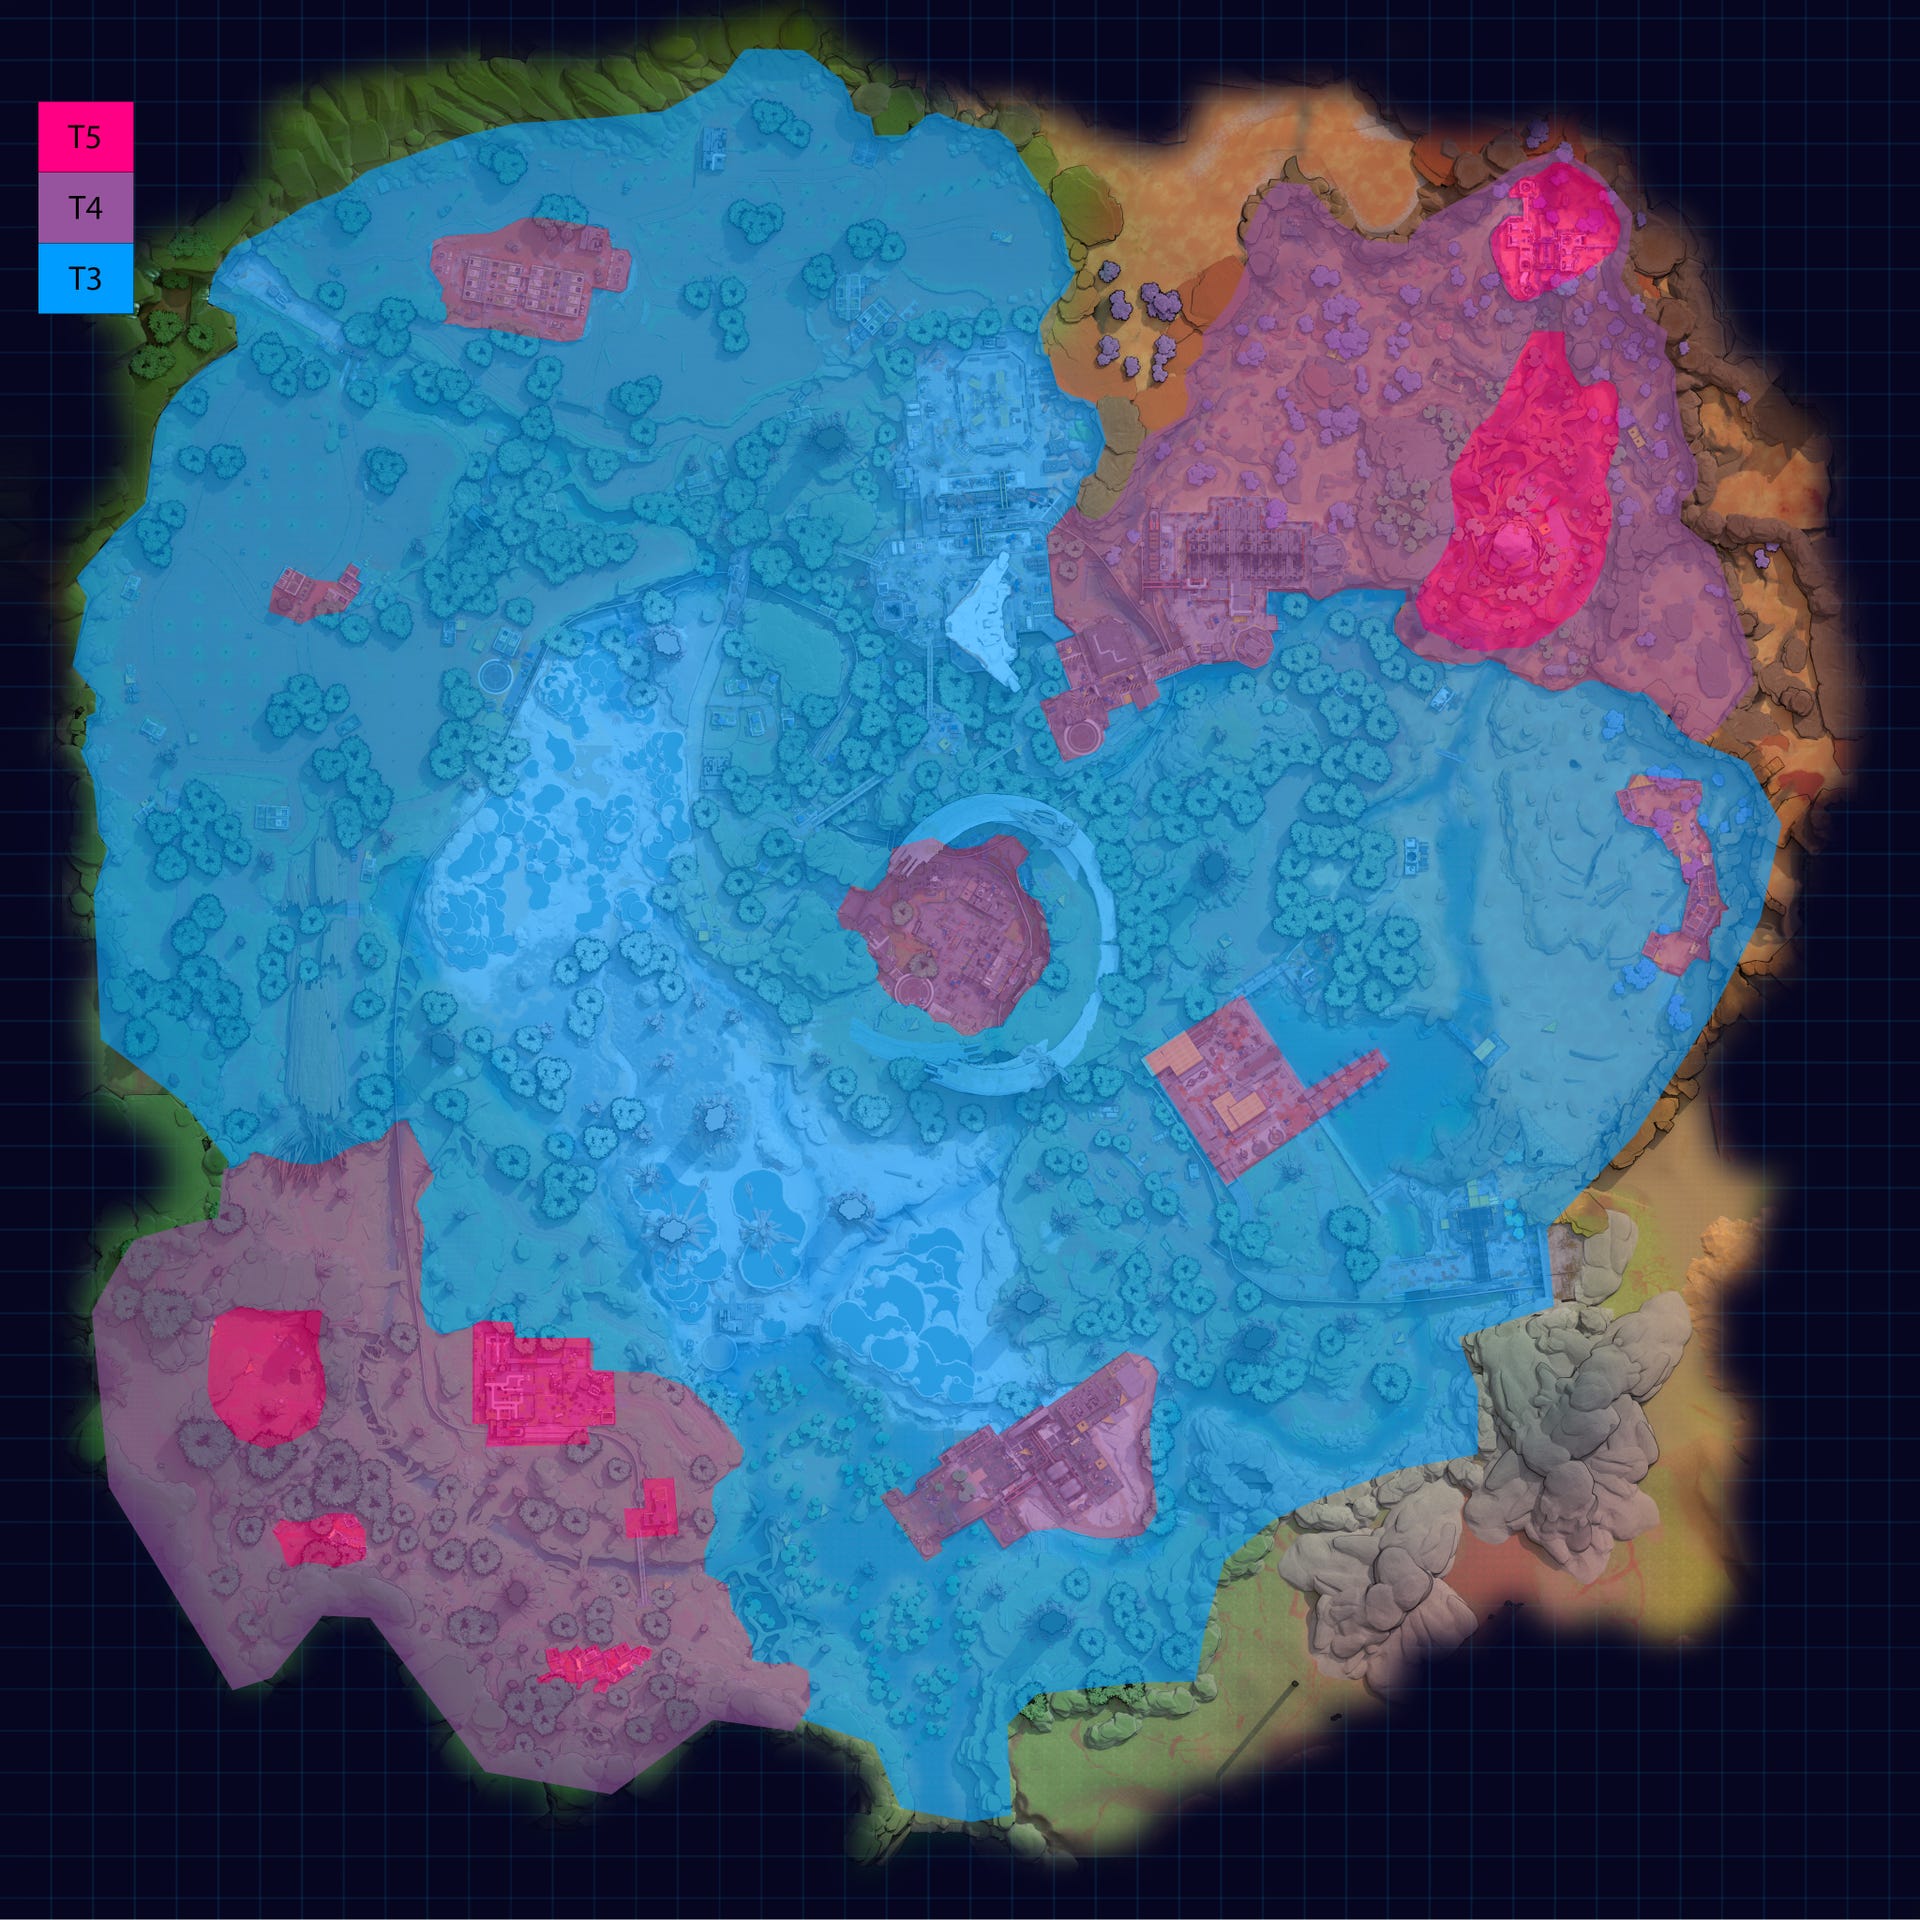
Different areas of the maps are broken into tiers, which represent the PvE threat level and loot quality. Bright Sands is broken into Tiers 1-4, while Crescent Falls is Tier 3-5. Here's what each of the tiers adds atop the previous tier in terms of PvE threats:
- Tier 1: Striders, Rattlers, Blast Ticks
- Tier 2: Enemies are more common
- Tier 3: Heavy Striders, Mature Rattlers, Marauders
- Tier 4: Higher ratio of elite variants
- Tier 5: Savage Marauders
It's also worth noting that the toughest PvE enemy (Crushers) are exclusive to Crescent Falls, and manually placed regardless of Tier. So in short: Crescent Falls is a really, really dangerous place for new players. Stick to Bright Sands for now.
Always enter the match with a gameplan
There are no fixed objectives in The Cycle. However, there are faction quests and jobs that you can accept and complete (more on these later). As time goes on you may end up having more and more faction quests active at once - far too many to attempt completing in a single match. So you'll need to make a plan of action, taking into account where on the map you're spawning and where your extraction points are located.
For example: say I have four active missions:
- Deliver 3 Toxic Glands.
- Hunt 5 Striders in Science Campus.
- Stash 5 Weak Medkits in the Waterfall Lab Dead Drop.
- Hunt 15 creatures in Base Camp.
I get into game, having spawned on the far north-east of the map next to Woodcutter Camp. My two possible extraction points are: at Rock Pools, and north of Dig Site.
Here's an image of those locations marked on the map, to make things easier:

Ideally, within a few seconds of landing you should have figured out a basic plan for what you want to accomplish in this match. So given the above, what's your gameplan? Here's mine:
- Head to Waterfall Labs and drop off the 5 Weak Medkits I brought in preparation.
- Head down to Base Camp and hunt as many creatures there as I can find. I probably won't finish this quest in one go, but I'll get a good headstart on it.
- Head to the extraction point at Rock Pools. I know there are lots of Blast Ticks around here, which have a chance of dropping Toxic Glands on death. So on the way I'll kill any Blast Ticks I see before extracting.
Notice I didn't even attempt to head down to Science Campus to hunt 5 Striders as part of my plan, because I felt it was too far out of my way. There's no time limit in The Cycle so you can technically stay in the match for upwards of an hour, bouncing between points of interest and completing your objectives. But realistically, this is not a very efficient way to progress through the game. You'll run out of backpack space, run out of ammo, and increase your chances of being set upon and killed by another player who will take all your hard-earned loot for themselves.
This is why heading into a match with a gameplan is so useful: it focuses you, makes you more efficient, and reduces the risk of death.

Movement and exploring the map
This next section covers a few important points to bear in mind when it comes to exploring and moving about either of the two maps in The Cycle: Frontier. As you get more experienced, these things will become second-nature to you.
- Pay attention to your Stamina. Your stamina bar is located at the bottom of the screen, above your health. Running, jumping, and meleeing will consume stamina. If you run low on Stamina, your character will start to breath heavily, which can alert nearby enemies of your whereabouts. And if you run out of stamina, you won't be able to run or heavy attack, and you'll be much slower for a short while. Stand perfectly still to regain stamina very quickly, or walk (or crouch-walk) to regain stamina at a slower rate.
- Be very wary of fall damage. It only takes a small drop to deal fall damage in The Cycle, and the terrain of both maps vary a lot in elevation, so there are lots of potential falls everywhere. It's always worth taking the longer, safer path somewhere than to risk taking damage and alerting nearby enemies (both creature and player) of your presence.
- Take your time, particularly as a solo player. The Cycle is a game that really rewards patience. If you're crossing a fairly high-profile region and don't want to draw attention to yourself, then there's nothing wrong with just walking instead of running - or indeed, side-stepping the region altogether. You're not on the clock here. Likewise, if you're in a tense firefight and you're not sure exactly where the enemy is, take your time. Wait to see if they come out of cover. If you have to move but don't want to give away your position, then crouch-walk. Crouch-walking is slow, but it's also silent, and silence is safety.
- Storms are no joke in this game. Storms are one of my favourite things in The Cycle, but there's no denying they are dangerous as hell. It's hard to hear threats over the thunder and wind, and it's even harder to see in the pitch blackness that comes with each storm. But most dangerous of all is the lightning, which follows players and strikes repeatedly at every player's location, dealing considerable damage unless you find some cover. Only when you're quite a lot more experienced with the game should you start to venture out in the middle of a storm - and even then, it's always risky.

Weapon penetration and armour explained
Weapon stats in The Cycle can be slightly misleading for new players. Say you take a look at a Manticore Assault Rifle and see that it deals 13 damage per shot - but does it really? Then why would you ever use it over the far cheaper AR-55, which also deals 13 damage per shot?
The answer is penetration. If Player A fires at Player B, then the penetration value of Player A's gun is compared to the armour value of Player B's shield to determine the damage dealt. If the penetration is greater, the shot deals bonus damage. If the armour is greater, the shot deals reduced damage.
There are other things which determine how much damage you deal with a shot, such as the gun's effective range and whether you land a headshot or not. But the most important aspect to remember is the penetration system. It may sound complex, but it becomes very straightforward once you realise that you just have to take a look at the colour of the gear in question:
- If the attacker's weapon colour is the same as the defender's armour colour, then the shot deals 100% damage.
- If the attacker's weapon colour is better than the defender's armour colour, then the shot deals more than 100% damage.
- If the attacker's weapon colour is worse than the defender's armour colour, then the shot deals less than 100% damage.
So even if a white weapon and a green weapon appear to have similar damage stats, realistically the green weapon will always deal more damage because it has higher penetration. Ultimately, the rarer the weapon, the stronger it is - even if the damage stats don't seem to reflect this. If you want to learn more, there's a fantastic damage calculator on one of the Cycle: Frontier wikis.
PvE tips: How to survive against creatures
PvE in The Cycle is no joke. If you don't respect the creatures, you will likely end up dying to them. Here are a few things to bear in mind when it comes to hunting and escaping the dangerous fauna of Fortuna III.
- Every single creature attack hurts a lot. Don't feel like you can withstand attacks from a creature while you take care of a more pressing threat. Every creature in the game can deal significant damage if you let them attack you freely. This is why it's so important not to attract unnecessary creature attention while fighting players (or other creatures).
- Scan your surroundings before attacking a creature. Many creatures spawn in groups in The Cycle. If you see a Rattler and immediately start shooting it without looking around first, you run the risk of there also being two other Rattlers and a Strider or two nearby. That many creatures is likely too much for a player to handle cleanly, so it's always best to scan around to see exactly how many creatures are nearby before attacking one.
- Use your knife against Striders and Ticks. A single heavy attack with your knife will insta-kill a Strider, Blast Tick, or Acid Tick, so it's best to use your knife against these creatures where possible because melee attacks are far quieter than guns, and stealth is always important no matter what you're doing.
- You can sneak quite close to sleeping creatures. Striders and Rattlers will both sleep at times. The Strider will curl up on the ground, and the Rattler will retreat further inside its shell than usual. While they're sleeping, you can crouch-walk surprisingly close to them, which allows you to move past them without causing a ruckus. Just don't stand up again until you're sure you're out of earshot.
- Elevation is your friend. None of the creatures in The Cycle can climb ledges like players can, so if you find a nearby elevated platform to hop up onto, then the only way the creatures can hurt you is using ranged attacks or by finding another way up to your location. Elevation is the safest way to tackle powerful creatures such as Marauders.
- Running straight past creatures is always an option. The creatures in The Cycle are fairly quick - about as quick as you are. But if you need to run straight past one, it's not the end of the world. Just watch your stamina levels, and try to climb onto an elevated platform as soon as possible. If you get out of the creature's territory radius, it will retreat back to its starting spot.
- Don't mix PvE and PvP. Creatures are very dangerous in The Cycle, particularly when your attention is split. Many a PvP fight is determined by who runs into the most PvE trouble while fighting. Try to maintain an awareness of nearby creatures and avoid those areas while you fight.
PvP tips: How to survive against enemy prospectors
Right, here we are: probably the most important part of the entire beginner's guide. PvP is an enormous part of The Cycle, and for new players it can be very intimidating and unforgiving. Below is a compendium of the best advice I can give you from my time spent killing my fellow prospectors.
- Communication with enemies can be a powerful tool. There is proximity-based VOIP enabled by default in The Cycle, which means if you're close enough to another player you can talk to them, whether they're in your squad or not. Convincing nearby enemies that you're not a threat is a very useful tool, regardless of whether you're telling the truth. Just be prepared for other players to deceive you, too.
- There are no revives in The Cycle. If you're playing in a squad with your friends, be aware that there's no way to revive a fallen teammate. Once you're dead, you're dead. This means the gap in power between a solo player and a squad is smaller than in many other games, because if the solo player manages to get a kill, they don't have to worry about the downed player being revived by a teammate.
- Reposition after each engagement. One of the biggest tips I can give any new player in PvP is to always reposition after each engagement. And by engagement I mean every time you show your position to an enemy player. There's a fairly low time-to-kill in The Cycle, so if you know where the enemy is but they don't know where you are, that's an enormous advantage. Keep moving, and you'll make it harder for enemies to know where you are.
- Use weather and foliage for stealth. There's a lot of opportunity for stealth in the lush greenery and foggy hills of The Cycle. Unless you backlight yourself against the sky, it can be pretty hard for an enemy to spot you in amongst the weather effects and foliage - particularly if you're staying still. Some players may dislike this fact, saying that it promotes camping - and that is understandable. Honestly, you do have to accept that this is a game that rewards patience and care, and that is appealing to players who want to camp. But there's also a big difference between someone who camps for half an hour at an evac spot to try and get a kill on someone leaving, and a player who gets into a fight, repositions, and waits patiently for their opponent to make the next move.
- Pay close attention to your hit-markers. When you land a shot on an enemy, the hit-marker around your crosshair can tell you a lot. A white marker indicates that the hit has landed; a yellow/orange marker indicates a headshot; and a red marker denotes a kill. So if you see red, they're dead. There's also an icon below the crosshair whenever you hit an enemy which tells you the colour of shield you just hit (if you land a headshot, it shows you the colour of the enemy's helmet instead). And there's even a distinctive (but rare) noise that occurs when you drop an enemy's shield or helmet durability to zero, which of course means that enemy is now extremely vulnerable.So pay attention to the outcome of your shots.
- Don't sprint everywhere. You need to be very aware of how much noise you make in The Cycle, particularly if you believe there are enemies nearby. Sprinting is a great way to become the centre of attention, and it also makes it harder for you to hear what's going on around you. Walking is fine. Crouch-walking is even better. Only run when you really need to run.
- Solo vs Squads is very possible. For all the reasons above - the ease of stealth, the lack of revives, and the low time to kill - defeating an enemy team that outnumbers you is very possible, even if you're playing on your own. Positioning is everything when you're playing solo. With a good position on an enemy, you can kill them all even when all their attention is focused on you. Just remember to move positions when you begin to take too much heat.
- Shotguns are very strong at the moment. Sniper Rifles are obviously very strong, but that's to be expected. What you may not have realised is just how powerful Shotguns are as well. The early shotguns - the Trenchgun and the Bulldog - are both very adept at killing enemies at close range with just 2 or 3 hits, even while the enemy is wearing blue shields. If you hear an enemy use a shotgun and you don't have one, try to keep your distance and force them to engage you at mid or long range instead.
- Grenades are also strong in the current meta. Grenades deal tonnes of damage if they land, and there's no on-screen indicator like in certain other games when you're in range of a grenade that's about to explode. Once you leave the beginner's bucket of The Cycle's matchmaking, you'll start to see quite a few prospectors going round with multiple grenades ready to chuck at your feet. The explosion radius is fairly decent, so if you hear the telltale plink of a grenade landing nearby, it's time to run.
- Don't get intimidated by players with good gear. There are diminishing returns as you progress up the tiers of available gear in The Cycle. From white to green to blue to purple to pink, the armour/penetration values are: 10, 17, 23, 26, 28. The difference at the earlier levels is huge, but at the later levels, not so much. This means two things. First: don't assume that you're invincible if you have purple gear and the enemy has white gear. They can still kill you quite easily. And the other side of that coin is: don't assume that you have no chance against an enemy with high-tier gear. All it takes is good positioning, good tactics, and good enough aim, and you could be heading home with all that good gear instead.
How to get better gear
A large part of the overarching progression in The Cycle: Frontier is the gradual accrual of better weapons, armour, and gear. Here are a few tips to bear in mind to help expedite this process, and get you decked out in the strongest equipment as soon as possible.
- Economy drops are a very strong progression strategy. This is important. If you really want to excel in The Cycle, don't just keep dropping into Fortuna III with the very best armour and weaponry you have. That's a great way to go from hero to zero really quickly. A much better way to quickly progress is by frequently doing "economy drops", where you go in with lower-tier gear than usual, and try to leave richer than you came in. It's very possible nowadays to beat a heavily armed player with very low-tier weapons and armour. Or if you don't want to fight, you can just gather materials, fill your small backpack to the brim, and extract. Rinse, repeat. Low risk, potentially very high rewards.
- Prioritise quests with good gear rewards. If you haven't really been paying attention to the rewards promised by factions for completing their quests, now's the time to start paying attention. As quests get more involved, you'll need to start prioritising. And a great way to prioritise quests is by looking ahead to see if completing specific quest chains will result in a shiny new piece of rare armour or weaponry.
- Improve your standing with every Faction, but prioritise just one. Completing quests and selling items to the three Factions back home is extremely important. As you upgrade your standing with a Faction, you'll unlock new items for purchase in their specific Faction shop - most notably, some very powerful new weapons. It's a good idea to improve your standing with every Faction as much as possible so you can gain access to a wider variety of weapons and other items. But I'd recommend taking a look at the weapon unlocks of each Faction, picking the one set of weapons that you most like the look of, and then focusing on earning points with that particular Faction. That way, you'll more quickly unlock the higher-tier weapons and gear that you're after.
- Browse the Gear Printer and set your own goals. While most of the more advanced weapons in The Cycle are found in the Faction shop, the more advanced armour, backpacks, attachments, and consumables must be crafted at the Gear Printer. Don't get excited quite yet: it takes a little while for a new player to get to the stage where they can start comfortably crafting their own gear. It costs a bunch, both in materials and in K-Marks. But what you can do is start browsing through the things you can craft in the Gear Printer, and then setting your own goals. Want to work towards getting a purple Shield? Then start prioritising looting Smart Mesh and killing Marauders for Hardened Bone Plates. Want a shiny long-ranged scope for your sniper rifle? Then you'll need to start scrounging for Optic Glass and Pale Ivy Blossom to make Print Resin. Set your own goals, prioritise them, and you'll quickly become a far stronger and more heavily geared player.
- Weapon attachments are important. Most weapons have various attachment slots, and you can add or remove attachments from any weapon on the fly, both in-match and back at home. These attachments can vastly improve a gun's effectiveness. If an otherwise powerful gun has horrible ironsights and heavy recoil, slap on a 2x scope, and a stock or foregrip. If you're going to hunt a Marauder or Crusher, then add an ammo converter which increases damage against creatures before you leave. Pay attention to attachments. They're important.
- Upgrade your Supply Crates in your Quarters. Some of the possible upgrades you can unlock in your quarters back home serve to increase the likelihood of getting high-quality loot from your daily Supply Crate. These Supply Crates run on a 24 hour timer, and each Supply Crate gives you a chance to earn gear such as weapons, armour, backpacks, consumables, and more. The more materials you pump into the Supply Crate upgrades, the more you'll start to get fairly powerful gear every day for free.
- Start playing on Crescent Falls. As mentioned earlier, Crescent Falls is a more dangerous map than Bright Sands - but that also means it's easier to find higher-tier loot. If you're starting to reach bottlenecks in finding materials for your needs, you may need to start dropping on Crescent Falls instead. You'll find it far easier to start accruing stockpiles of slightly rarer items like Smart Mesh, Pale Ivy Blossoms, Aluminum Scrap, and so on. And remember - even though it's a more dangerous map, there's nothing wrong with doing an economy drop into Crescent Falls for a low-risk venture to get some high-tier loot.
- Be patient. It takes time to get to the stage where you can afford to consistently drop with high-level gear and weapons. It's meant to be a gradual progression. Try to remember this and avoid getting frustrated when you're running low on good equipment after a series of unfortunate drops. You'll get there, I promise!

How to get more money quickly
There are three types of currency in The Cycle: Frontier. Here's a quick run-down on how they all work:
- K-Marks (short for Krypto Marks) are the regular in-game currency. You earn K-Marks mainly by completing missions and selling items, and you use them for purchasing items from the various shops on Prospect Station.
- Aurum is the premium currency, used for Gear Salvage insurance, and buying cosmetics. It can either be bought with microtransactions or slowly accrued over time with the Aurum generator in your quarters.
- Gear Salvage Tokens are special tokens that will be gained from the game's Battle Pass once the first season begins. You start the game with 5 Tokens, and they can be used in place of Aurum to pay for Gear Salvage Insurance. In the pre-season there's no way to earn more Tokens.
Aurum and Tokens are obviously useful for Insurance purposes, but K-Marks are by far the most important currency in the game. Without K-Marks, you'll often be stuck with the lowest-level weapons, armour, and equipment. So here are a few key tips to help send your K-Marks net worth into overdrive from day one.
- Focus hard on completing quests for your first few days. Quests give you a phenomenal amount of K-Marks if you focus on completing them regularly. Within my first two or three days of full release I had reached around 200,000 K-Marks, and a lot of it was down to trying to complete my faction quests and jobs as efficiently as possible. Some slightly quests give you 15,000 K-Marks or more upon completion, and many of them are actually fairly easy to complete if you incorporate them into your gameplan for a match.
- Unless necessary, sell materials until you're down to a single stack of each. Selling spare items in Faction shops is extremely important. Not only does it improve your Faction level, but it also earns you quite a lot of extra K-Marks. I almost always sell all my materials until I'm down to just one stack of each. The only exceptions are when I am actively trying to amass particular materials for quests or crafting purposes. For example: early on you may want to accrue a small stockpile of Spinal Bases or Rattler Skins so you can easily craft new green and blue armour. But everything else can be sold until I'm down to just a stack of each item type.
- Go on Jungle economy runs and collect Focus Crystals to sell. The Jungle is by far the most dangerous part of Bright Sands, but it's also home to Focus Crystals, which are the most valuable ore you can mine from this map. If you want to accelerate the rate at which you earn K-Marks, it's a great idea to drop into the Jungle with basic gear (so as to minimise risk), mine as many Focus Crystals as possible from the rocks scattered about the Jungle, and then extract. Afterwards you can sell the Focus Crystals for an impressive amount of money considering how easy they are to farm.
- Keep an eye out for nearby Meteor Showers. The one type of rock more valuable than Focus Crystals are Meteor Shards and Meteor Cores. These items can be sold for 1,013 and 7,594 K-Marks each (respectively). So if you see a meteor shower start to occur near you, it might be an idea to follow the explosions and smoke, and if the area looks safe, quickly jump in, mine everything of value, and extract. Just be aware that meteor parts are hot commodities in The Cycle, and so these meteor showers may attract a lot of attention. Best be quick and careful.
- Upgrade data drives during storms. Data Drives can be upgraded in matches by plugging them into one of the map's Uplinks and downloading data into those drives. The more data you download, the more valuable these drives become. Using an uplink is a noisy and time-consuming process that is bound to attract enemy players, so the best time to upgrade them is during storms when all the players on the map are likely bunkered down in their respective points of interest. If a storm is coming, and you have data drives at hand, consider heading to an Uplink so you can earn some extra money upon extraction.
- Follow creature tracks to find valuable Blue Runner Eggs. Blue Runner Eggs are another rare item worth a tidy sum back at the Faction shops. Each one can be sold for 2,531 K-Marks, and they're fairly easy to find thanks to the footprint trails nearby each one which lead you directly to the eggs themselves. Farming these Eggs isn't a terribly efficient way to earn money, but if you stumble across these tracks while on your missions it is well worth following them to pick up the Egg and sell it back on Prospect Station.
- Unlock and upgrade your K-Marks Generator. Aside from everything else you're doing to earn money, it's always good to have a small, steady influx of K-Marks which you don't need to do anything to earn. That's what the K-Marks Generator in your quarters is for. It's very easy to unlock and upgrade, and will just continually give you small amounts of K-Marks which can stack up over time to make a decent difference.
- Use insurance. Insurance is incredibly generous in The Cycle. Every time you insure an item, it's a one-off payment. Full lifetime insurance. That means that one day, you are going to get your money back on whatever piece of gear you've insured, as long as you don't sell the item or otherwise void the insurance. So if you can easily afford it (and if you've been following the other tips in this list, you should be able to), then it's basically always worth using standard insurance on pretty much every item you take into a match.
Miscellaneous tips and tricks
We're nearly at the end of our beginner's guide to The Cycle: Frontier. To wrap up, I'm going to list a number of small useful tips and tricks that will improve your game in various ways.
- Your movement speed depends on your gear. You'll run faster with your knife equipped than with an Assault Rifle in your hands. But your movement speed (and the noise you make, and your stamina regen speed) is also affected by the amount of weight you're carrying. So if you want to be fast and silent, best not overencumber yourself.
- Tactical and Restoration armour is worth using situationally. There are both Tactical and Restoration variants of white-to-blue shields and helmets. Tactical variants increase your max stamina, while Restoration variants very slowly replenish your health while not in combat. But neither will provide as much armour as the standard armour variant. Nevertheless, Tactical armour is very useful for repositioning, particularly as a helmet (so that you can keep maximum armour for body shots), while Restoration armour can be nice for econ rounds in case you run low on heals.
- Use your binoculars. I've said before that The Cycle: Frontier is a game that rewards patience, and the gathering of intelligence before taking action. If you hold down your Tool key you'll open a radial wheel menu of all your tools. Just like your pickaxe, every single match you'll also have a pair of binoculars by default. Use your binoculars to scope out players and other threats across large distances, or to take a very close peek at a nearby bush that you suspect might harbour an enemy prospector.
- 6x and 8x scopes have glints. Once you get to the point where you start accruing lots of Optic Glass, you might want to craft some better scopes than the usual Red Dot Sight and 2x Optic you can buy at the Quick Shop. Obviously there are good benefits that come from supplying your sniper rifle or DMR with the longest-range scopes, but bear in mind that the 6x and 8x scopes emit sniper glints that can give away your position to the enemy while you're aiming at them. So, if you can get away with using a 4x or lower, then I'd stick with them instead.
- Some things change in the storm. Striders become charged, and will drop Charged Spinal Bases during a storm. Brightcap Mushrooms become Glowy Brightcap Mushrooms. And possibly most useful of all, the footprints that lead you to the very well-hidden Blue Runner Eggs become glowing footprints, making it much easier to find the valuable eggs. So it can be useful to venture out during the storm, as long as you steer clear of large groups of creatures, and use your stamina efficiently so you always have enough to dodge lightning blasts.
- Sounds are partially occluded by walls, cliffs, and obstacles. If you're 50 metres away from another player who is shooting, then the shots will sound quieter or louder depending on whether there's a cliff wall or other large obstacle between you. Likewise, noises from caves don't tend to travel very far outside of the cave. It's not something to depend on if you're the one making the noise, but it's worth knowing - particularly because you might think those shots you're hearing are quiet because the shooter is far away, when actually they're quite nearby and the noise is simply being occluded by the nearby terrain.
- Run into evac ships at the last moment. Evac ship landings and takeoffs are very loud and attention-grabbing affairs. It's not uncommon for players who are just about to extract to be killed inside the ship before it leaves. To minimise the risk to yourself, hide near the ship and only run to it at the last moment. Pay attention to the progress bar at the top of your screen when the ship is taking off, and time your run accordingly.
- Some evac ships are more open than others. Every evac ship has four doors, one on each edge, to allow entry or exit. But depending on the evac location, sometimes only one or two of these doors will open. Most of the time this is a good thing for prospectors attempting to extract; fewer open doors means fewer directions from which you can get shot at the last moment.
- Check the map before you've even dropped into the match. Each match begins with a cutscene of you in your droppod landing upon the map, and usually during this time you're unable to look at the map. But you can: just hit ESC to bring up the in-game menu, then close it again. Now you can open your map despite still being in the droppod. Useful for planning out your path through the map as early as possible.
- Green Stims are well worth using. An Uncommon Stim heals 25 HP in the same time it takes a Common Stim to heal 15 HP. They're certainly not as cheap as white Stims, but they're hardly expensive, and they can save your life in a crisis.
- Put old currency straight into your safe pockets. Usually you have to be quite careful with what you decide to put in your safe pockets, because they can only carry a tiny amount. But any old currency you find weighs absolutely nothing, so the moment you find any, you should put them straight into your safe pockets to ensure that you leave with the extra money even if you're killed.
- Aim for coloured parts of rocks while mining. Mining is loud, and if you're just using a pickaxe, it's also fairly slow unless you mine efficiently. To mine efficiently, aim for the gem-like coloured parts of the rock first, because these parts of the rock are where the ores can be found.
- Stand next to the blue flowers in Jungle to heal. The glowing blue flowers act as health regeneration stations: stand next to one and you'll slowly heal. If you take too much healing from the flower, it'll become "empty" and will no longer heal you.
- Open locked doors with keycards. As you explore and loot your way across Fortuna III, you'll start to find keycards that you can use to open specific locked doors dotted across both maps. These locked doors are worth opening whenever possible, because those rooms are always treated by the game as one tier higher than the region the rooms are in. That means they often contain rarer and more valuable loot than you'd otherwise find in those points of interest. Just bear in mind that keycards all have a certain number of uses before they're lost forever.
- Keep your stash from filling up. There's a finite slot limit to your stash back in Prospect Station. It can be upgraded in your quarters, but there are other ways to keep your stash from filling up. I've already talked about selling excess materials, but you can also keep super-lightweight things like key cards in your safe pockets at all times. If you have spare attachments taking up room in your stash, pop them on a gun in your stash instead. You'll still have access to them; they just won't take up extra stash space.
- Follow wires to find batteries in certain areas. Some points of interest, such as Water Facility in the south of Bright Sands, are home to specific rooms that are locked until you either connect or disconnect the appropriate batteries nearby. Just like keycard-accessible rooms, these battery-locked rooms often have more valuable loot than you'd usually find, so it's a good idea to spend time finding the correct battery(ies) and interacting with them to get inside. If you're having trouble finding the batteries, look for wires leading from the place you want to enter. Those wires will often lead you straight to the batteries.
- Stop and listen. Hearing the world around you is unbelievably important in games like this. With a good set of headphones and a good ear, you can track the exact positions of multiple nearby players at once, while also pinpointing the areas you should avoid because they contain Rattlers, Striders, and other threats. Different weapons also make distinctive gunfire noises, so you can start to learn the loadouts of the enemies you're hearing before they ever get a chance to use those weapons on you. Don't always sprint everywhere - not only is it very loud, it also makes it harder for you yourself to listen. Slow down. Be patient. Look and listen, and then act.
- Suppressors are excellent, particularly in solos. You've just heard that listening is one of your most powerful tools, and noise one of your greatest weaknesses. With a suppressor, not only do you make it easier to move around and shoot without enemies pinpointing your location, but you also make it harder for an enemy to figure out your loadout ahead of time.
- Don't get too attached - you will die often, and that's okay. Just because a shiny new piece of gear cost you a lot of time and effort to obtain, doesn't mean it'll stick around. Purple shields and weapons can be ripped from your grasp as easily as white gear can. If you find yourself getting frustrated after a bad game where you've lost a lot of your equipment, take a breath, and remember that everything you lost can be reclaimed again with some work. That's what The Cycle is. You gain gear, you lose gear. Even the best players die, and their belongings get ransacked. Try not to take it personally; you'll end up enjoying the game a lot more.
You've reached the end. Goodness, that was a longer guide than I usually write. I hope it was worthwhile, and that you managed to cherry-pick a few useful things from the above tips. If you have any thoughts on any of the above points, be sure to sound off in the comments section below. See you on Fortuna III, prospector.