Risk of Rain 2 characters guide - skills, builds, stats & tips for all Risk of Rain characters
Going Commando isn't the only way


Your initial choice out of the Risk of Rain 2 characters roster plays a very important role in the length and flavour of your run. From the Mercenary to the Commando, from the Huntress to the Engineer, each character comes equipped with a different series of attacks, skills, stats, and viable builds and strategies - all of which we'll go over in our Risk of Rain 2 characters guide. Below you'll find detailed information on each of the six survivors currently in the game, along with practical tips on how to get the most out of each character.
This characters and survivors guide is just one part of our larger series of Risk of Rain 2 guides, all of which you can peruse by heading over to our main Risk of Rain 2 guide page. You'll find everything from beginner-friendly explanations to useful tips and links to other areas of our guides, from Risk of Rain 2 challenges to Risk of Rain 2 enemies, and much more.

Risk of Rain 2 characters guide - skills, builds, tips
Risk of Rain 2 already features six fully fleshed out characters, each with their own unique talents and playstyles, and there's doubtless more to come as the game continues to push through early access. So there's a fair amount to get through with this characters guide. Click on any of the links below to skip ahead to a section or survivor of your choice.
| Risk of Rain 2 characters & skills overview | ||
| Commando | MUL-T | Huntress |
| Engineer | Artificer | Mercenary |
Risk of Rain 2 characters & skills overview
Each time you begin a new run in Risk of Rain 2, you'll be prompted to select your character, or "survivor". If you've just started playing, then you'll only have access to the first character: the Commando. The other characters are unlocked by completing a specific challenge in-game for each of them. For full details on how to unlock all of the characters (and items) in the game, check out our Risk of Rain 2 challenges guide.
Each character operates in a very different manner, thanks to their unique sets of skills. Each character has a primary skill (your main attack); a secondary skill (your secondary attack, usually on a short cooldown); a utility skill (another activatable ability on cooldown, usually mobility-based); and a special skill (a more powerful ability on a larger cooldown, usually offensive in nature). A couple of characters (MUL-T and Mercenary) have extra traits and/or skills besides these main four, but these core skill sets are what give each character a unique playstyle.
Aside from the skills, there are certain other stats assigned to each character, such as your maximum Health and Damage; the rate at which your Health regenerates; whether you have any damage-reducing Armor; and so on. Each character also has a movement speed stat, which I've neglected to include in the tables below for the simple reason that every character has exactly the same movement speed: 7 metres per second, which increases to 10.15 while sprinting (a 45% increase).
Below you can view both the stats and skills for each character, alongside our own tips and thoughts on good strategies and item builds. We'll be talking a lot about specific items in the below sections, so if you'd like some more information on the items in question be sure to check out our Risk of Rain 2 items guide.
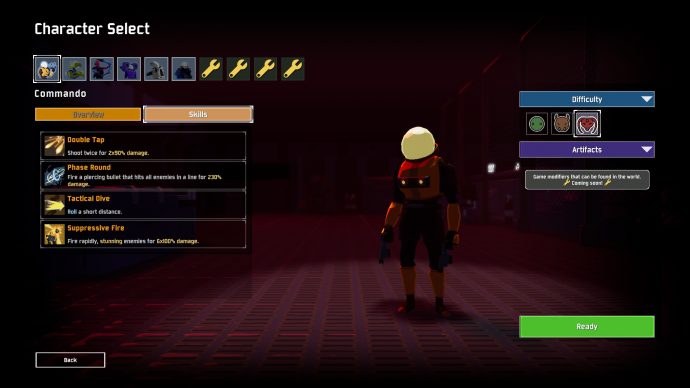
Commando tips, stats & skills
| Health | 110 (+33 per level) |
| Damage | 12 (+2.4 per level) |
| Primary Skill (Default: Left-Click) | Double Tap Shoot twice for 2x90% damage. |
| Secondary Skill (Default: Right-Click) | Phase Round Fire a piercing bullet that hits all enemies in a line for 230% damage. Cooldown: 3s |
| Utility Skill (Default: Shift) | Tactical Dive Roll a short distance. Cooldown: 4s |
| Special Skill (Default: R) | Suppressive Fire Fire rapidly, stunning enemies for 6x100% damage. Cooldown: 9s |
Commando is the first playable character in Risk of Rain 2, and it's easy to see why. Their skillset is impressively beginner-friendly, with three easy-to-use offensive skills on short cooldown, alongside the ever-useful Tactical Dive skill, which sounds like something footballers do a lot, but in this case allows you to roll out of the way of attacks or cross distances even faster than just sprinting.
The low cooldowns of all Commando's abilities allows you to chain together your attacks very easily. In particular, you should intersperse your Double Taps with Phase Rounds, because each use of Phase Round will reset the bloom (read: accuracy) of your primary attacks. Suppressive Fire should be used as often as possible for that extra boost in DPS, but its true power comes with the stun effect, which allows you to reliably interrupt dangerous attacks such as the Stone Golem's laser or the Beetle Guard's long-range strikes (for tonnes more info on all the different monsters in the game, have a read of our Risk of Rain 2 enemies when you get the chance).
As far as item builds are concerned, Commando's versatility allows you to go in many different directions without too much trouble. There are no bad choices here, but if you're just starting out, you should always focus on items that give you greater DPS over items that increase your survivability. Attack speed, critical hit chance, and on-hit items such as the Ukulele or Kjaro's Band should always be top priority. Stun Grenade is another great pickup for any character, and combined with Commando's Suppressive Fire you can very easily keep the majority of threats stunned and passive until you kill them.
A couple more useful tidbits: Phase Rounds can travel through terrain, allowing you to deal damage while behind cover. Your main attack has some significant damage drop-off over longer distances, so use Phase Rounds to deal good damage at long range. Suppressive Fire also has damage drop-off, but it also has a slight auto-aim about it, allowing you to hit targets even if you're not quite aiming on them.

MUL-T tips, stats & skills
| Health | 200 (+60 per level) |
| Armor | 20 (16.67% damage reduction) |
| Damage | 11 (+2.2 per level) |
| Primary Skill (Default: Left-Click) | Auto-Nailgun Rapidly fire nails for 60% damage. Fires six nails when initially pressed. |
| Secondary Skill (Default: Right-Click) | Blast Canister Launch a stun canister for 220% damage. Drops stun bomblets for 5x44% damage. Cooldown: 6s |
| Utility Skill (Default: Shift) | Transport Mode Zoom forward, gaining 200 Armor, and additional speed. Deals 250% damage to enemies in the way. Deals more damage at higher speeds. Cooldown: 8s |
| Special Skill (Default: R) | Retool Switches his primary fire between the rapid Auto-Nailgun and a piercing heavy-damage Rebar Puncher that deals 600% damage. |
| Additional Skills | Multifunctional MUL-T can hold two equipment at once. The active equipment is swapped by using Retool. Cooldown: 0.5s |
MUL-T takes quite a bit more getting used to than Commando does, but repays this extra dedication with great survivability and damage potential over any distance. First thing you should notice is that your Retool skill allows you not only to switch between two different Equipment slots but between your two different primary attacks: the Auto-Nailgun, an exceptionally fast-firing but inaccurate attack; and the Rebar Puncher, which charges up to unleash a devastating piercing blast for 600% of your normal damage.
The Rebar Puncher is amazingly accurate over any distance, making it your ideal long- and mid-range option. the Nailgun is so inaccurate that it should only be used at close-range, but it can melt away enemies with its excellent DPS. Aside from this, just like with Commando you have a reliable stun in your Blast Canister that you should use whenever it's not on cooldown; and your Transport Mode, while it may not seem like much at first, gives you a whopping 200 Armor while you're using it. Adding on MUL-T's initial 20 Armor, this makes for nearly a 70% damage reduction with Transport Mode in effect. So this is basically your good old "get me the hell out of this situation" button.
One thing to bear in mind is that Hopoo have added a hidden value called the "proc coefficient", which basically means how often on-hit effects actually come into effect. With MUL-T this modifier is very low, because if it weren't, their Nailgun's insane rate of fire would mean the on-hit effects proc all the time, making them utterly overpowered. However, some items are still exceptionally powerful with the Nailgun, such as the Ocular HUD, which will double your already considerable damage while it is in effect.
Crowbars are more useful with high-damage single-shot abilities, which makes them a perfect match for MUL-T's Rebar Puncher. Movement bonuses are a must-have for MUL-T as well, because even though their Transport Mode is very useful, it isn't as quick for dodging and getting out of situations as Commando's roll or Huntress's teleport. I'd also say that MUL-T is perhaps the character best suited for a Shaped Glass run due to their already high damage, Health, and Armor values - but of course, it's still a risk that may or may not pay off.
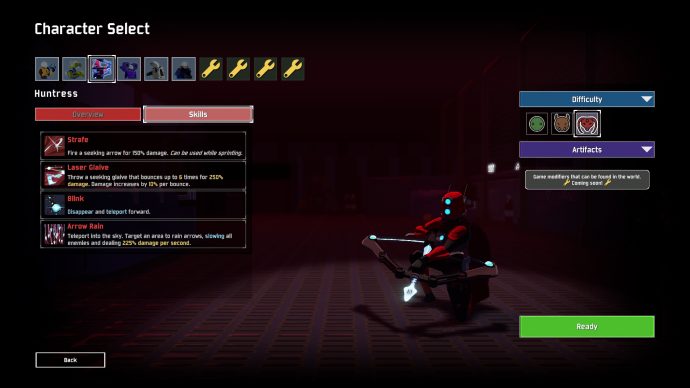
Huntress tips, stats & skills
| Health | 90 (+27 per level) |
| Damage | 12 (+2.4 per level) |
| Primary Skill (Default: Left-Click) | Strafe Fire a seeking arrow for 150% damage. Can be used while sprinting. |
| Secondary Skill (Default: Right-Click) | Laser Glaive Throw a seeking glaive that bounces up to 6 times for 250% damage. Damage increases by 10% per bounce. Cooldown: 7s |
| Utility Skill (Default: Shift) | Blink Disappear and teleport forward. Cooldown: 7s |
| Special Skill (Default: R) | Arrow Rain Teleport into the sky. Target an area to rain arrows, slowing all enemies and dealing 225% damage per second. Cooldown: 17s |
Huntress is the favourite of many Risk of Rain 2 players due to her ease of use, her excellent mobility, and her late game potential. I say late game potential mainly because, as you'll likely have realised if you've reached far enough in a Risk of Rain 2 run, eventually you'll get to a point where even the slightest hit from a regular enemy will one- or two-shot you. Huntress excels here due to her manoeuvrability and dodging capabilities.
Huntress's Strafe locks onto a target, allowing her to deal decent consistent damage even while sprinting in a different direction. Her Laser Glaive provides excellent crowd control in a variety of situations, allowing you to effectively deal with a sky filled with Lesser Wisps, or a pair of more powerful creatures in close proximity to one another. Try not to use the Glaive against just one enemy, because it obviously won't deal anywhere near its maximum potential damage without the ability to bounce between targets.
Blink is probably the best mobility skill in Risk of Rain 2, and using the Hardlight Afterburner item with Huntress feels absolutely incredible as a result. If you need to dodge and your Blink is on cooldown, you can use your Arrow Rain skill, which teleports you high into the air and allows you to rain hell down on a small area of effect for several seconds. Oh, and by the way, Arrow Rain has a simply ludicrous range on it, meaning you can place that area of effect down upon the ground from across the map if you wanted to.
Where Huntress excels is in crowd control, and where she falls short is her ability to burst down single high-threat targets. Your item build should work to counteract this as much as possible with heavy DPS buffs, using items like Soldier's Syringe, Harvester's Scythe, Ukulele, and so on. Berzerker's Pauldron is another good shout, because you're likely to be killing 3+ enemies in 1 second quite a lot with your Glaive and Arrow Rain skills. Besides this, make sure you pick up a handful of survival-based items to help her not be quite so squishy (Leeching Seed, Tougher Times, Medkit, Foreign Fruit, etc.).

Engineer tips, stats & skills
| Health | 130 (+39 per level) |
| Damage | 14 (+2.8 per level) |
| Primary Skill (Default: Left-Click) | Bouncing Grenades Charge up to 8 grenades that deal 100% damage each. |
| Secondary Skill (Default: Right-Click) | Pressure Mines Place a mine that deals 300% damage when an enemy walks nearby. Can place up to 10. Cooldown: 8s |
| Utility Skill (Default: Shift) | Bubble Shield Create an impenetrable shield that blocks all incoming damage. Cooldown: 25s |
| Special Skill (Default: R) | TR12 Gauss Auto-Turret Place a turret that inherits all your items. Fires a cannon for 100% damage. Can place up to 2. Cooldown: 30s |
Don't let the Engineer's strange skillset dissuade you from playing as this character. In the right hands, with the right build, they are absolutely magnificent at any stage of a run, thanks mainly to the synergy of their Turrets and Bubble Shield skill. If you're playing as Engineer, prepare for a more thoughtful and defence-oriented game, because your main move is always going to be the following:
1) Place Turrets
2) Place Shield atop Turrets
3) Fire Grenades/Mines at enemies while your Turrets take care of everything else
Your Bouncing Grenades primary attack serves to help your Turrets with larger, closer threats, and the Pressure Mines add an extra layer of defence against enemies looking to pass through your Shield and melee you (and they're useful in a pinch if you're caught with most of your skills on cooldown, thanks to their high number of charges). But the real meat of the Engineer's skillset is with those two placable Turrets which persist until they are destroyed or replaced elsewhere, and which oh-so crucially inherit all of your items once placed. That means the already massive damage potential obtainable through the other characters is tripled with the Engineer and their dual Turrets of Death.
When it comes to item builds, you'll want to go crazy with the on-hit items. Ukulele, Gasoline, Stun Grenade, Sticky Bomb, and so on. All these will buff both your attacks and your Turrets' attacks, meaning each of these items is potentially thrice as effective as usual with Engineer. Soldier's Syringe is also useful for speeding up the charge-up time of your Bouncing Grenades, allowing you to deal baffling damage in a tiny amount of time; and you'll also want Alien Head to reduce all your skill cooldowns if possible, because the only real downside to Engineer is that you do have some very high cooldowns on your abilities.
But two items in particular I'd like to highlight to help you with your turtling "turrets/shield/mines" strategy: Warbanner and Bustling Fungus. If you get a Warbanner placed down by the Teleporter before a fight, place your Turrets in the area of effect to give them a fantastic attack speed boost. And Bustling Fungus turns your Turrets into veritable field hospitals, providing healing to each other and to nearby players (as well as you providing healing to them in return), giving all of you much more survivability.
Oh, and by the way, if you're playing with a friend... Try coating them in your mines. Those mines stick, and they'll detach when enemies approach. Works particularly well with close-range characters like Mercenary. You're welcome.
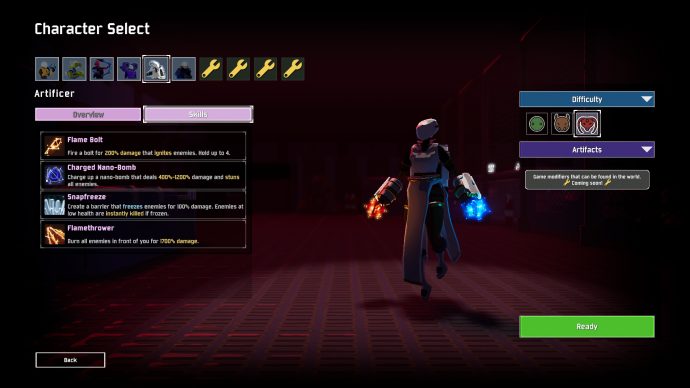
Artificer tips, stats & skills
| Health | 110 (+33 per level) |
| Damage | 12 (+2.4 per level) |
| Primary Skill (Default: Left-Click) | Flame Bolt Fire a bolt for 200% damage that ignites enemies. Hold up to 4. Cooldown: 1.3s |
| Secondary Skill (Default: Right-Click) | Charged Nano-Bomb Charge up a nano-bomb that deals 400%-1200% damage and stuns all enemies. Cooldown: 5s |
| Utility Skill (Default: Shift) | Snapfreeze Create a barrier that freezes enemies for 100% damage. Enemies at low health are instantly killed if frozen. Cooldown: 12s |
| Special Skill (Default: R) | Flamethrower Burn all enemies in front of you for 1700% damage. Cooldown: 5s |
The nukiest nuker that ever nuked, Artificer is unmatched at bursting down enemies, whether groups of smaller ones or big chunky Elites (for more info on Elites, check out our Risk of Rain 2 enemies guide). First thing I'll say is that your primary attack, while very good at delivering high damage for enemies, should not be used as a primary attack. Because of its limited number of charges, it's not an effective source of sustained damage - which is what you'd usually expect from your primary skill.
This is the drawback of playing as Artificer, and what counteracts their stupendous damage potential: you need to be very careful to use your skills efficiently, and make sure you always have something in reserve ready to deal with the next threat. It's easy to just shoot all your high-damage skills at every nearby target, but then you'll have nothing left to deal with the next threat (and as time goes on in Risk of Rain 2, the delay between current threat and next threat gets ever-shorter).
The good news is that these abilities are all really, really powerful. Flame Bolt is great for anti-air and that extra bit of damage potential; your Charged Nano-Bomb is your real bread-and-butter, delivering ridiculous damage in a large area - and you can simply tap it rather than holding it down to trade damage for a speedy stun. Likewise, your Flamethrower deals massive damage at a short range, and is incredibly good at proccing on-hit effects - but bear in mind that you can't cancel out of Flamethrower by firing a Flame Bolt, so instead sprint or use another skill to halt it. Snapfreeze is tricky to get to grips with, but fantastic against larger, already-damaged enemies, as it will instantly kill any enemy at less than 30% Health that it comes into contact with.
Much like Huntress, Artificer is very squishy; so you'll need some survival-focused items such as Tougher Times, Medkit, Leeching Seed, Foreign Fruit, and so on so you can actually live long enough to deal your massive amounts of damage. Speaking of which, you'll also want to focus on tonnes of on-hit items, as always, to boost your overall DPS. Soldier's Syringe is pretty pointless for your primary attack as it doesn't do anything to reduce Flame Bolt's cooldown, but it's very nice at reducing the charge-up period of your real primary attack, which is the Charged Nano-Bomb. Other excellent picks are Crowbar, Berzerker's Pauldron, and especially Bandolier (more ability usage!) and Primordial Cube (clump together enemies so you can burst them down all at once!).

Mercenary tips, stats & skills
| Health | 140 (+42 per level) |
| Armor | 20 (16.67% damage reduction) |
| Damage | 12 (+2.4 per level) |
| Primary Skill (Default: Left-Click) | Laser Sword Slice in front for 130% damage. Every 3rd hit strikes in a greater area for 300% damage. |
| Secondary Skill (Default: Right-Click) | Whirlwind Quickly slice horizontally twice, dealing 2x200% damage. If airborne, slice vertically instead. Cooldown: 2.5s |
| Utility Skill (Default: Shift) | Blinding Assault Dash forward, stunning enemies for 200% damage. If you hit an enemy, you can dash again, up to 3 total. Cooldown: 7s |
| Special Skill (Default: R) | Eviscerate Target the nearest enemy, attacking them for 110% damage repeatedly. You cannot be hit for the duration. Cooldown: 6s |
| Additional Skills | Cybernetic Enhancements The Mercenary can jump twice. Increased Health Regeneration While all other characters have a Health Regen of 1.5/s (+0.3 per level), the Mercenary's is 3.75/s (+0.75 per level). |
Mercenary is described as a high-skill-ceiling character by the game, which is true to an extent, but I think it's more suitable to say there's a bit of a barrier for entry with Mercenary, after which it becomes fairly plain sailing (with the right items, of course). That barrier for entry is that Mercenary is a melee-oriented character, and there's a tendency to get a bit confused and scared when you're surrounded by Lesser Wisps and other enemies. But once it starts to click, Mercenary become possibly the most fun survivor to play with.
This flighty melee acrobat is all about combos and synergies. Similar to Artificer, your secondary skill is the real bread-and-butter damage dealer, rather than your primary attack. Whirlwind allows you to close gaps quickly or stay in the air for much longer (a big thing with Mercenary, who spends pretty much all their time in the air). This, combined with the second jump you receive right off the bat as Mercenary, gives you some fantastic aerial and vertical prowess that none of the other characters (not even Huntress) could hope to achieve.
And that's not even talking about Blinding Assault, which can act as an escape, an initiate, or simply to reposition yourself for a good combo - and it stuns, and deals enough damage to one-shot a Lesser Wisp. And it stacks up to 3 if you hit enemies each time. AND you don't even have to be that accurate with it, because the damage and stun is dealt in an a small area of effect around you. It's an amazing ability; as is your special skill, Eviscerate, which teleports you towards the nearest enemy, dealing stupid damage to them and granting you complete invulnerability for the duration. You can also hit multiple targets with this ability, just like all your other skills.
Mercenary loves clumped together enemies. For this reason, Primordial Cube is an ideal pick for your equipment slot. You'll also want at least one Backup Magazine to give you some extra Whirlwind charges to keep you in the air for even longer (basically forever, if you want to). The rest of your build should be designed to get you past the early game (when you're at your weakest relative to the other characters - that barrier for entry rearing its head again) and to maximise your damage and on-hit effects. Brainstalks and Hardlight Afterburner allow you to go absolutely crazy with your skills, while Leeching Seed gives you some much needed survivability befitting an aggressive all-in character such as yourself. To help with bosses (another weak point for Mercenary) you'll want to take as many Armor Piercing Rounds as possible too, and hopefully end those Teleporter fights in as short a time as possible, ideally while spending the majority of the fight invincible.
And with that, we conclude (for now) our Risk of Rain 2 characters guide. I've tried to provide a fair amount of practical information for each of the survivors currently in the game, regarding both their skills and the direction you'll want to take your item build for each character. Hopefully you've learnt a thing or two about these characters and how they should best be used under all manner of perilous circumstances.