Monster Hunter Rise: 10 things I wish I'd known before playing
Useful tips for beginners just getting started in Monster Hunter Rise
What are some of the top tips for beginners in Monster Hunter Rise? Monster Hunter Rise has its quirks, and whether you're a complete newbie to the Monster Hunter series or you've played every single other title in the franchise, there's bound to be a few things that take you by surprise. That's likely to be doubly true if you've just jumped in with the release of the Sunbreak DLC, either after a few months' downtime following the launch of the base game on PC, or as a brand-new player starting the whole production from the very beginning.
To compound the issue, the game's tutorials aren't always delivered at the best moments, and you may well find that you've clicked through several pop-up text boxes without really taking in some information you later wish you'd paid more attention to. There are plenty of things I wish I'd understood before embarking on my first few quests, so on this page, I'll pass on to you the most important things I've learned about starting out in Monster Hunter Rise.
1. You don't need to reach for the biggest weapon right away
I'm a sucker for a big sword, so I made the mistake of equipping the Great Sword on my first trip out. While this wasn't a fatal error, it didn't exactly allow me to experience the best of what MHR's combat has to offer. Those first few hunts see you going up against groups of small, fast enemies, and at times I was struggling to even land a hit on them with the Great Sword. Turns out almost any other sword would have been a better choice.
By default, your character begins the game equipped with the Long Sword, which is the most balanced sword in the game and probably the one Capcom intended to recommend. If you're new to melee combat in games, or your skills are rusty, the Sword and Shield is the best training weapon. Meanwhile, if you want fast combat, the Dual Blades are where it's at (this is where I eventually landed for my go-to weapon). That's without even going in to the other types of weapon on offer, so check out our Monster Hunter Rise best weapons guide for a full run-down of the best starter weapon choices.
2. Some weapons are best saved for multiplayer
Related to the last point: Monster Hunter Rise is a game built around multiplayer, and bigger, slower weapons like the Great Sword or the Hammer are much more effective if you wield them alongside teammates who have smaller, faster weapons. The Hunting Horn is extremely powerful in multiplayer but next to useless if you're going it alone, and this is probably the only one I wouldn't ever recommend taking along on single player hunts (unless you want a really specific challenge).
3. Raid the supply box at the start of a quest
Just opposite your base camp tent at the entrance to every area is a supply box. Investigating its contents reveals that it contains a handful of useful items, including First Aid Kits and Rations. The contents of the box refresh at the start of every new quest, so there's no downside to filling your pockets with health- and stamina-boosting goodies every time you set out. Don't forget to pick up everything!

4. Eat a meal before heading out on a hunt
Entering your tent at the entrance to every quest area gives you a number of options. For starters, this is where you choose your weapon and armor loadouts, as well as whatever handy inventory items you plan to take along with you. Another thing you can do here is order a serving of Bunny Dango.
You can assemble your own selection of three Dango flavours, each of which has a status effect that persists throughout the hunt in question. Your Palico and Palamute companions will get their own serving and enjoy the benefits as well. You'll start out with a modest selection to choose from, and unlock more flavours as you progress through the game. You can eat another meal every 10 minutes, so if you have a number of camps set up in an area, it's worth popping in a few times per hunt to apply a few more Dango benefits to your party.
5. Quests are timed (but it's a generous timer)
As a Monster Hunter newbie, MHR's timed quests came as something of a surprise. However, you shouldn't let the timer put you off. Every quest in the game has a fixed 50 minute allowance, but I found that if I made a beeline for the objective I never took more than 15-20 minutes to complete a quest (even allowing for time to get a bit lost, fall off a cliff edge and have to backtrack the long way, etc.). For comparison, if you mount your Palamute and just ride around for a bit, you can uncover an entire area's map in about 10-15 minutes.
Basically, if you're hoping to combine a quest with a more leisurely scavenge for resources, you'll almost certainly have time to do both. Just be aware that once you tick off the final objective you get teleported back to Kamura Village after 60 seconds, so do your gathering before your hunting. You should also be sure to harvest the quest target immediately after downing it, since the 60 seconds will start ticking down as soon as the quest objective is met.
6. Wirebugs can take you to hidden resources
Wirebugs are a new piece of equipment in Monster Hunter Rise. They are effectively a next-generation grappling hook. Great Wirebugs can only be used in set locations around the map, but will get you to higher places than you could with a regular Wirebug. However, you can aim your regular Wirebug at any elevated area to test if you can reach it. Sometimes it'll be too high, but sometimes you'll find a handy shortcut. At yet other times, you'll find yourself in a secluded location you couldn't have reached on foot, and often there'll be some useful resources lying about just waiting for you to gather them up.
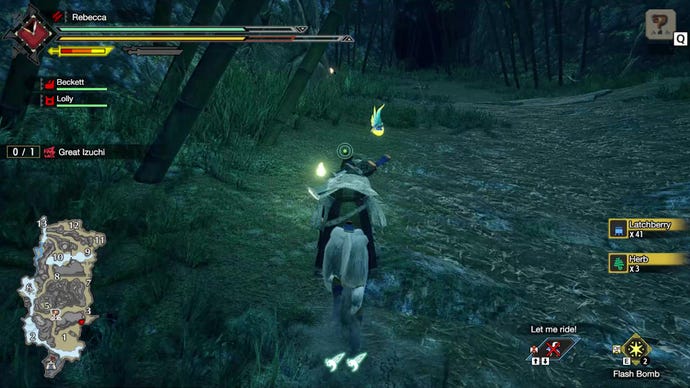
7. Pick up Spiribirds to buff your stats
While wandering the biomes of Monster Hunter Rise, you'll likely notice glowing, winged creatures floating about the place. These are Spiribirds, and you collect them automatically when you walk or ride close to them. It's an extremely good idea to pick up every Spiribird you see, since they grant you permanent buffs that increase your stats throughout the remainder of the current quest.
There are five colours of Spiribirds in Monster Hunter Rise, each buffing a different stat: Green for Health, Yellow for Stamina, Orange for Defense, and Red for Attack. Rainbow-coloured Prism Spiribirds are exceedingly rare, but if you're lucky enough to catch one, it'll max out your abilities.
When you collect a Spiribird, have a look around to see if you can spot any others nearby. Spiribirds often spawn on paths or other thoroughfares through an area, and if several of them form a rough line it's definitely worth following to see if they're guiding you towards a cache of interesting resources.
8. Yellow numbers mean you're hitting a weakspot
Whatever weapon you've chosen to equip, just be sure to keep an eye on the numbers you're knocking out of your prey. Monsters in this game have no health bars, so the numbers are a good indicator of the damage you're dealing in real-time, but the numbers' colours are something to pay attention to as well. Ordinarily they're grey, but if you're hitting that particular species' weakspot, they'll be yellow instead.
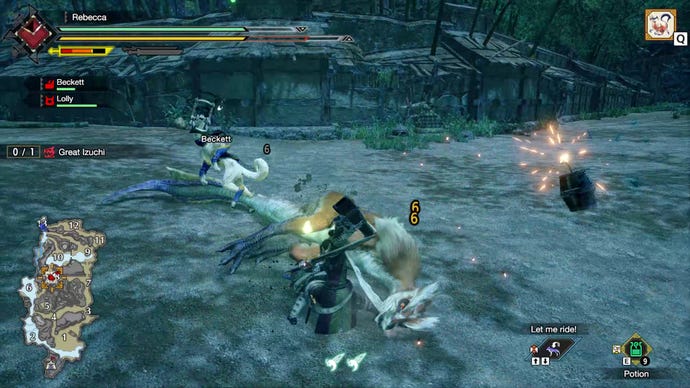
9. Keep an eye on your weapon's sharpness meter
Monster Hunter Rise doesn't technically have weapon durability, but there's still a good reason to keep your equipment in tip-top condition. All melee weapons in the game have a sharpness meter (viewable under your health and stamina bars in the upper left of the screen) that gradually reduces every time you land a hit. While a blunt weapon will never become unusable, a weapon with its sharpness in the red deals only 50% of its full potential damage. Luckily, you can perform a spot of field maintenance at any time using the Whetstone. This is an infinitely reusable item that's stocked in your inventory by default, and you can begin sharpening your weapon simply by selecting it and pressing E to use it.
Be warned though: if your weapon blunts in the heat of battle, aggroed monsters can still seek you out and attack you while you're sharpening. Being interrupted in this way stops your character before they can fully refill the sharpness meter, and leaves them open to taking damage. If you're fighting a large monster, my advice is to take the opportunity when they run away to perform a quick spruce-up on your weapon. As long as you've got your prey target locked, you can afford to let them get away for a few seconds while you do this.
10. Don't hoard your resources (that includes your Armor Spheres)
Most of the resources you gather from around the world or pick up from the bodies of your prey can be used to craft armor (as well as a few other items, like equipment for your Buddies). By my count there are 142 named armor sets in the game for your character alone, meaning that only the most dedicated players are going to see them all. Early game armor in particular will become obsolete by the time you reach the endgame, along with the crafting resources used to make them. So don't be shy about crafting any armor you like the look of and just experimenting with which pieces and sets work best for you. Remember: nothing you collect from the Shrine Ruins is going to help much once you reach the final areas, so you might as well make the most of it while it's actually useful.
The same goes for your Armor Spheres. While you probably don't want to waste them on armor that you don't particularly like, it's well worth using them to upgrade any armor that you find yourself using time and again. Yes, the goal of Monster Hunter Rise might ultimately be seen as the attainment of the best armor sets in the game, but the way to get there is by crafting lots of low- and mid-tier armor to help you on your way. Don't be shy about investing in anything you like using.
Those are the top 10 things we wish we'd known before we started playing Monster Hunter Rise! If you're on the look-out for more technical advice, we've also got a guide to the system requirements and best performance settings for Monster Hunter Rise on PC.
