How to install mods in Starfield
Here's how to get started modding Starfield
Want to learn how to install mods in Starfield? Being a Bethesda RPG, it was a foregone conclusion that Starfield would have an absolutely massive modding community. Within a few days of Starfield's release there were already hundreds of mods gaining popularity on NexusMods, and more than enough material for us to compile our list of the best Starfield mods so far.
If you're interested in the idea of modding but you don't know much about how to get started, this guide is here to make those first steps as easy as possible. Below we'll walk you through how to install mods in Starfield, either using the official Vortex Mod Manager (recommended!), or by installing the files manually.
How to install mods in Starfield
The easiest way to install mods in Starfield is by using Vortex Mod Manager. This is the official mod manager for NexusMods, which is where all Starfield mods can be found and downloaded. We have a section below on how to set up Vortex Mod Manager for the first time.
Once you have Vortex Mod Manager downloaded, follow these steps to install new Starfield mods:
- Find the mod you want to download on NexusMods.
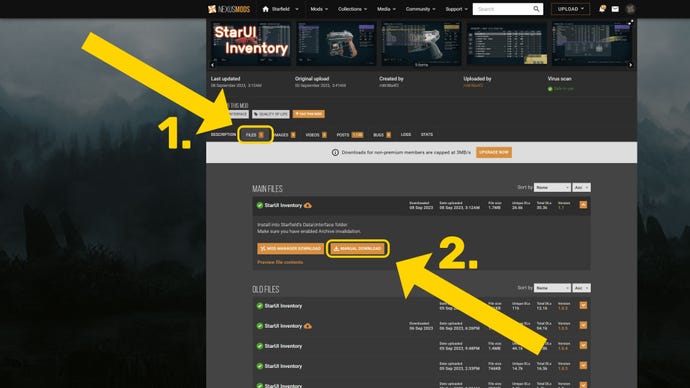
- Click on the "Files" tab.
- Select the desired mod version and click "Mod Manager Download".
- Click "Open Vortex" when your browser prompts you.
- Complete the on-screen instructions in Vortex to install the mod.
- Once the mod is installed, click on "Mods" on the left-side.
- Click "Deploy Mods".
- Follow the on-screen instructions to resolve any conflicts.
- Launch Starfield.


Different mods may have slightly different installation processes when it comes to Step 4, but you can't really go wrong as long as you follow the on-screen instructions presented by Vortex. You can leave Vortex running in the background or close it down while playing Starfield.
If Vortex asks you to help resolve two or more conflicting mods, don't just give it your best guess as to which mod should take precedence. Go back to both the mod pages on NexusMods and read the Description tab to see what the mod makers have said on the topic.
How to set up Vortex Mod Manager for Starfield mods
To get Vortex Mod Manager ready for downloading Starfield mods, first you should download Vortex Mod Manager from NexusMods. Click "Download the latest version now", then click "Manual Download". Click past any "Additional files required" popups you get, and then select "Slow Download". Within a few seconds, the download will begin.
Once Vortex Mod Manager is downloaded, launch it and follow the on-screen instructions to install it onto your PC. When you launch it for the first time, you'll be asked to login using your NexusMods account. If you don't have one, create one now.
Once you're logged in, click on "Games" on the left-hand side, search for "Starfield", and click "Manage" on the Starfield icon. Download the prompted extension, and wait for Vortex to complete the installation. After that, follow the on-screen instructions to help Vortex find the game folder location (if it didn't automatically find it for you).
Next, go to "Settings" and then "Mods", and ensure that the folder location under "Mod Staging Folder (Starfield)" is located on the same drive that Starfield itself is installed on.
After that, Vortex Mod Manager is ready to start working its magic, and you can go back to the top of this page and follow the instructions we've laid out on how to install mods in Starfield!

How to install Starfield mods manually
If you don't want to use a mod manager like Vortex, you can still download and install Starfield mods manually. It's only slightly slower than using a mod manager, although there is a greater risk of human error, so make sure you read the instructions carefully!
To install a Starfield mod manually, find the mod page on NexusMods, then click on the "Files" tab. Click the "Manual Download" button next to your desired version of the mod, and follow the on-screen instructions to download the mod.
Once the mod file is downloaded, unzip it by right-clicking it in Windows Explorer and selecting Extract All, or use an unzipping tool like 7Zip.
Next, head back to the mod page on NexusMods and click on the "Description" tab. Carefully read the instructions provided by the mod maker, because every mod is different. Many mods will require you to simply copy the contents of the unzipped folder into your Starfield game directory at:
Program Files (x86) \ Steam \ steamapps \ common \ Starfield
But some mods may require extra steps, or for you to add the files to a different location altogether. So always read the individual mod instructions when manually downloading Starfield mods!
Once the mods are in the correct locations, close Windows Explorer and launch Starfield to play with your newly installed mods!
That's all there is to downloading and installing a wide variety of Starfield mods in no time. If you want to change your game without resorting to modding, there's an awful lot you can do with the right Starfield console commands and Starfield Item IDs. Or, if you're not into cheating, check out our guides on the best Starfield skills to get first, and the best Starfield builds you can create.


