Doom Eternal upgrades: which perks to unlock first
Tips for Praetor Suit, Runes, and Sentinel Crystals
It's not just your guns that can be upgraded in Doom Eternal. Praetor Suit points, runes, and Sentinel Crystals can all be used to buff up the Doomguy so that he's not just a mass of muscles under an ill-fitting space marine suit. Well, he still is, but now he can potentially last longer while swimming in radioactive ponds.
Doom Eternal upgrades guide
You need not worry too much about the suit-based upgrades in Doom Eternal, as you'll likely be unlocking them relatively quickly if you're collecting everything there is hidden in every level. In fact, you'll likely have unlocked every perk in all tiers before the end of the game. The main question left then is what to spend your accumulated points on first, and that's the question we aim to answer in this Doom Eternal upgrades guide.
Contents
Runes
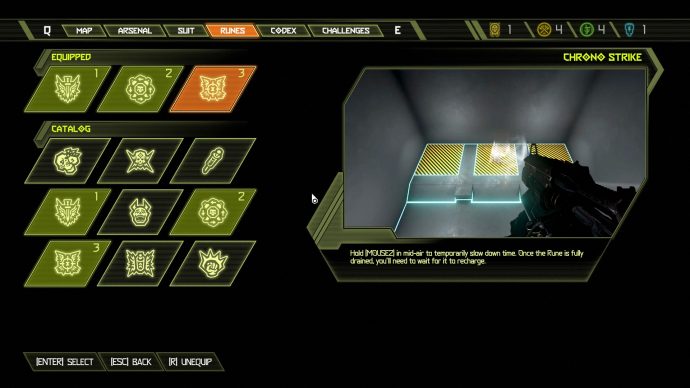
There are nine Runes that can be unlocked through the course of Doom Eternal. Each one provides a bonus that can be swapped at any time. Runes aren't too hard to spot and unlike the previous Doom, they don't require that you complete a challenge to unlock them. Here is the full list of Runes:
- Savagery: Perform Glory Kills faster.
- Seek and Destroy: Launch into a Glory Kill from much further away.
- Blood Fuelled: Gain a speed boost after performing a Glory Kill.
- Air Control: Greatly increase movement control while in mid-air.
- Dazed and Confused: Increases how long enemies remain in a staggered state.
- Saving Throw: Survive one death blow and briefly slows down time, giving you a chance to recover. This rune recharges upon death.
- Chrono Strike: Hold right-mouse button in mid-air to temporarily slow down time. Once the rune is drained, you need to wait for it to recharge.
- Equipment Fiend: Enemies killed by equipment or while under the influence of equipment will decrease the recharge time.
- Punch and Reave: Enemies killed by a Blood Punch shockwave drop health.
For maximum mobility, your first two Rune unlocks should be Chrono Strike and Air Control. Chrono Strike slows down time while holding the button to use the weapon mod equipped in mid-air, while Air Control makes it easier to move around while in mid-air. Beginners should also consider Saving Throw for a chance to save themselves should they lose their last life.
Those used to the speed of the previous Doom may wish to consider one of the others, depending on your play style. If you like darting around enemies, then Blood Fuelled might be a decent option, whereas Punch and Reave gives you another avenue for health recovery.
Praetor Suit
Praetor Suit points are found on ghostly knights that take the knee as soon as you grab their coin. It's almost as if they know their place.
These upgrades range from resisting environmental damage, buffing your grenades, and even making reloading or dashing quicker. While you only need a certain amount of them, there are surplus Praetor Suit points when you factor in mission challenges, rewards for using Sentinel Batteries in the Fortress Of Doom, and finding the knights in each level. Here are all of the Praetor Suit perks:
| Praetor Suit upgrade | Upgrade type | Description |
|---|---|---|
| Hazard Protection | Environmental | RAD Suit takes less damage from Toxic Sludge and Toxic Water. |
| Thicker Skin | Environmental | Immune to damage from barrel explosions. |
| Regenerating Barrels | Environmental | Barrels that have exploded will respawn once after a short duration. |
| Explosive Piñatas | Environmental | Barrels will leave behind some ammo when destroyed. |
| Slayer Atlas | Exploration | Reveals the automap station location on the automap. |
| Item Classifier | Exploration | Reveals all progression items on the Dossier. |
| Bigger Fog Lights | Exploration | Larger automap reveal radius. |
| Item Finder | Exploration | Reveals the position of all progression items on the automap |
| Hit and Run | Fundamentals | Dash refilled on Glory Kills. |
| Faster Dasher | Fundamentals | Dash refills more quickly. |
| Hot Swapper | Fundamentals | Faster weapon switching and mod swapping. |
| Grappler | Fundamentals | Faster ledge grab and monkey bars. |
| Frost Bite | Ice Bomb | Damage dealt against a frozen demon is increased. |
| Ice Drops | Ice Bomb | Damaging and killing frozen enemies will drop health. |
| Permafrost | Ice Bomb | Demons remain frozen for longer. |
| Faster Ice Cooldown | Ice Bomb | Takes less time to cooldown after firing. |
| Faster Frag Cooldown | Frag Grenade | Takes less time to cooldown after firing. |
| Combustion Concussion | Frag Grenade | The grenade emits a second, larger, non-damaging explosion that falters demons. |
| Scatter Bombs | Frag Grenade | Each demon killed by the grenade explosion spawns scatter bombs. |
| Frag Stock Up | Frag Grenade | Fire twice before requiring a recharge. |
My recommendation here is to spend your first seven Praetor Suit points on Exploration perks, particularly Slayer Atlas and Item Finder. They'll all help a lot with finding secrets in levels, but these two are practically essential for finding collectables. I'm also a fan of the Thicker Skin perk as it can make taking damage from exploding barrels ancient history. The Hot Swapper perk is also fantastic for insanely quick-paced fights.
Sentinel Crystals
Another collectable hidden in most levels is the Sentinel Crystal. These are pedestals that the Doomguy breaks, rather than the batteries rewarded for completing mission challenges or found lying there in most missions.
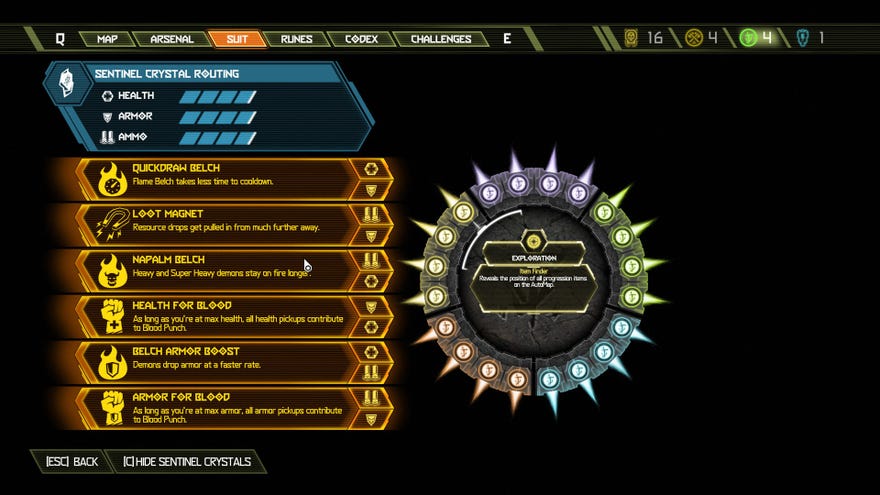
There are 12 Sentinel Crystals that can be found in the game. Redeem each one to increase one out of your overall health, maximum armor, and total ammunition that you can carry. You can increase each stat four times. Unlocking two Sentinel Crystals on the same Sentinel Crystal route will give you a permanent perk. Here is a list of all the Sentinel Crystal perks available in the game:
- Quickdraw Belch: Flame Belch takes less time to cooldown. (Health & Armor)
- Loot Magnet: Resource drops get pulled in from much further away. (Ammo & Armor)
- Napalm Belch: Heavy and Super Heavy demons stay on fire for longer. (Ammo & Health)
- Health For Blood: As long as you are at max health, all health pickups contribute to Blood Punch. (Armor & Health)
- Belch Armor Boost: Demons drop armor at a faster rate. (Health & Ammo)
- Armor For Blood: As long as you are at max armor, all armour pickups contribute to Blood Punch. (Ammo & Armor)
I recommend starting with Quickdraw Belch and Loot Magnet routes first as increasing the range at which resources are pulled in is vital for survival, and having more armour is always a good thing.
Doom Eternal guide series
With that, you should have everything you need to know in order to work out which Doom Eternal upgrades to pick first. However, don't stress too much about it, as by collecting items hidden in each level, you'll amass enough resources to spend on all of the unlockable perks.
Doom Eternal guides series
- Doom Eternal guide - Return to our main guide for the top 20 tips and tricks.
- Doom Eternal weapons - All the upgrade costs and weapon mastery challenges for every weapon.
- How to unlock Doom Eternal secrets - Doom Eternal has a lot of hidden stuff, here's how to get it.
- Doom Eternal PC performance - How to get the best settings.
Collectables - All of the collectables that can be found in each of the game's missions.


