Risk of Rain 2 bosses guide - attack patterns and tips for Wandering Vagrant, Magma Worm, Aurelionite, and more
Overloading Worm - horrific monster or questionable euphemism? You decide.


Every roguelite needs bosses aplenty to test your newly formed character to the max, and the Risk of Rain 2 bosses do not disappoint in this regard. There are currently 8 different Bosses that can spawn in Risk of Rain 2 (not counting Elite variants), each of which has different attack patterns and viable strategies for countering them - all of which we'll go over in our Risk of Rain 2 bosses guide. By the end of this guide, you'll know all the best tips and tactics for countering the Wandering Vagrant, the Magma Worm, the Clay Dunestrider, and any other boss you might come across during your runs.
This bosses guide is just one part of our larger series of Risk of Rain 2 guides, all of which you can peruse by heading over to our main Risk of Rain 2 guide page. You'll find everything from beginner-friendly explanations to useful tips and links to other areas of our guides, from Risk of Rain 2 challenges to the regular (non-boss) Risk of Rain 2 enemies, and much more.
Risk of Rain 2 boss guide - tips and tricks, attack patterns, strategies for all Risk of Rain 2 bosses
The Bosses in Risk of Rain 2 are no joke, particularly as time goes on and the difficulty continues to scale upwards. It's important to know what to expect with each boss you encounter; feel free to use any of the below links to skip ahead to a particular boss and find out how to take it down without worry.
| How bosses work in Risk of Rain 2 | |||
| Beetle Queen | Stone Titan | Wandering Vagrant | Clay Dunestrider |
| Imp Overlord | Magma Worm | Overloading Worm | Aurelionite |
How bosses work in Risk of Rain 2
Bosses, in many ways, are not so different from the regular Risk of Rain 2 enemies you can come across. Their attack patterns can be learnt just like regular enemies; their Health and Damage stats scale up with difficulty; they can appear as Elite variants of themselves.
Where they differ is simply in the scale of the threat. Bosses have the most Health and the highest potential to end your run of anything you can come across in Risk of Rain 2, and where regular enemies have just the one (or sometimes 2) attacks, most bosses have 3 different "moves" to take into account when fighting them.
You'll first encounter Bosses when you activate the Teleporter on each stage. This starts what's called the Teleporter Event, where you must stay near the Teleporter in order for it to charge so you can leave the level. To hinder you in this regard, the game will spawn many regular enemies around you, and (usually) one or more bosses that you must defeat before you can proceed. Sometimes, the "boss" will actually appear in the form of numerous Elite variants of powerful regular enemies, such as Elder Lemurians or Greater Wisps - but this rarely happens, and most of the time you'll be fighting at least one major boss per Teleporter.
As time goes on and the difficulty increases, you may come across multiple of the same boss with each Teleporter Event, as well as Elite variants, which have much higher Health and Damage stats. It's important to bear in mind, however, that in later stages bosses will start to spawn not as part of Teleporter Events but just as regular enemies. You don't have to kill these non-Teleporter bosses in order to proceed, but of course it'll doubtless give you lots of gold as a reward for your troubles.

Beetle Queen - tips and strategies
- Health: 2100 (+630 per level)
- Damage: 25 (+5 per level)
- Speed: 6 m/s
- Armor: 20
- Attacks/Moves:
- Acid Spray (shoots 6 balls of acid in a line towards the player)
- Wasps (when below 50% health, will spawn wasps near the player which explode after a time, damaging players inside its area of effect)
The lowly Beetle Queen is possibly the easiest of all the bosses to deal with, but she can still one-shot you with an unfortunately placed Acid Spray if you're not careful. She's still a relative pushover, simply because she spends most of her time standing still and doing nothing in particular, and her attacks are very lethargic and easy to dodge - particularly her Wasps.
I wouldn't even advise targeting those Wasps, by the way. It's a waste of time. Just move away from them and continue to focus fire on the Queen until she's down. Avoid the puddles of Acid that her attacks leave behind, because if you get covered in Acid then you become more vulnerable to damage for a while.
And if you need to get close (if you're playing as Mercenary, for example), watch for when she telegraphs her Acid Spray - green particles appear around her mouth for about a second before she releases the Spray - and dodge out of the way or evade it in some other manner so you don't take enormous damage.
There is a low chance for a defeated Beetle Queen to drop a rare Queen's Gland item instead of a usual green item. This Queen's Gland is unique and can only be found by killing a Beetle Queen. For more information, check out our Risk of Rain 2 items guide.
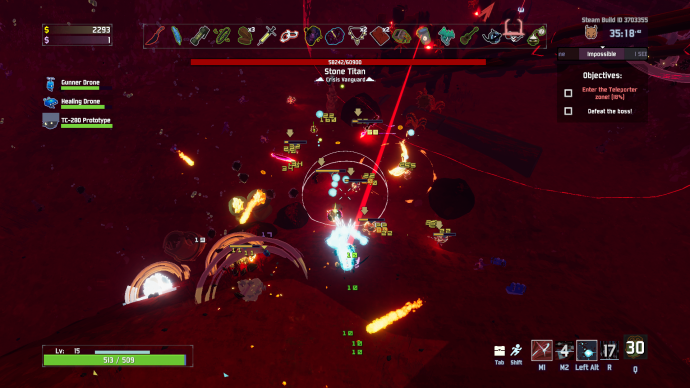
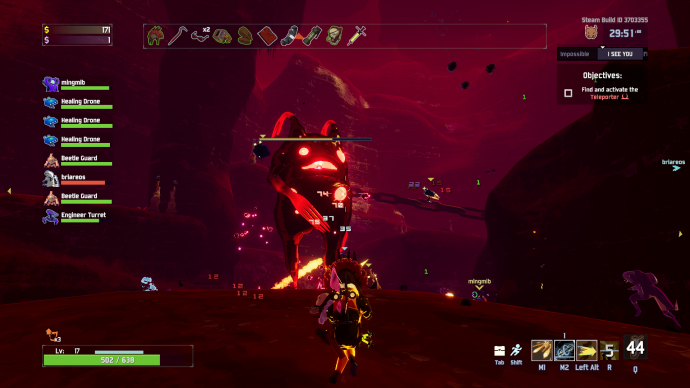
Stone Titan - tips and strategies
- Health: 2100 (+630 per level)
- Damage: 40 (+8 per level)
- Speed: 5 m/s
- Armor: 20
- Attacks/Moves:
- Ground Punch (punches the ground, forcing rocks to appear out of the ground near the player. Damages in an area of effect and sends the player soaring into the air upon impact)
- Floating Rocks (summons a cluster of floating rocks above the Titan that periodically fires laser blasts that home towards the player)
- Laser Beam (charges up and fires a massive laser beam from its eye, which locks onto the player and deals immense damage over time)
The Stone Titan is deadly at any stage of a run, almost entirely thanks to its Laser Beam. The Titan's other attacks are fairly unremarkable - simply stay on the move to avoid the Floating Rocks' lasers, and watch out for the circles on the ground that indicate a Ground Punch attack.
But that Laser Beam is no joke. As far as I can tell, it deals 40 (+8 per level) damage per second to the player, which will kill you in a matter of seconds if you don't get out of its way. It also does a very admirable job of keeping the beam locked precisely upon you no matter how you much you dodge and weave, so your only defence is really to break line of sight as quickly as possible once you see it begin to charge up this attack.
Just like the Beetle Queen, a felled Stone Titan has a chance of dropping a unique boss-specific item: in this case, the Titanic Knurl, which boosts your max Health and your rate of regeneration. Again, for more information look no further than our Risk of Rain 2 items guide.
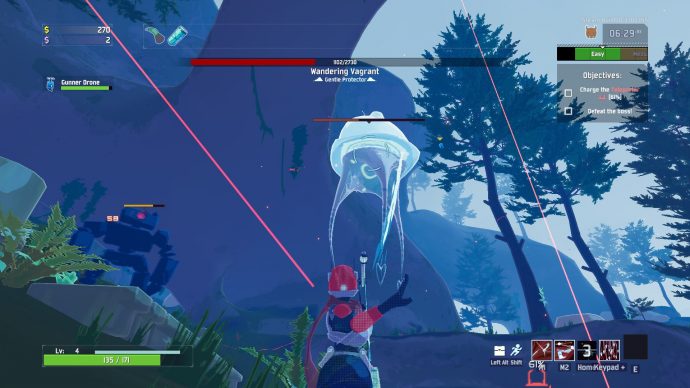
Wandering Vagrant - tips and strategies
- Health: 2100 (+630 per level)
- Damage: 6.5 (+1.3 per level)
- Speed: 6 m/s
- Armor: 15
- Attacks/Moves:
- Orb Barrage (launches 6 small, fast-moving balls of energy towards the player)
- Explosive Orb (summons a larger, slow-moving, targetable orb which homes in on the player and explodes for much greater damage)
- Nova (charges up an explosive attack with an enormous area of effect around the Vagrant, which deals massive damage upon detonation)
Another boss that's all about one attack in particular: the Nova. This is what people think of when they think of the Wandering Vagrant fight, and, just like the Stone Titan's Laser Beam, the only way to reliably avoid its damage is to break line of sight with the boss. But this isn't always easy considering the Vagrant is airborne and more mobile than the Stone Titan.
Otherwise, you'll need to stay on the move in order to avoid its Orb Barrage (which deals significant damage if they all hit you), and pay attention to when the Vagrant releases its Explosive Orb, because you'll need to take that down as soon as it appears to be safe. But both these attacks are quite easy to deal with - in fact, the Explosive Orb is very useful if you're playing as Huntress, whose Laser Glaive can bounce between Vagrant and Orb multiple times for easy damage.
Oh, and if you're Mercenary (or you have some fantastic air mobility items) you can get on top of the Wandering Vagrant's head and attack it from above. From this vantage point you're safe from everything except the Vagrant's Nova, which will eviscerate you if you burnt through all your mobility skills getting up there in the first place.

Clay Dunestrider - tips and strategies
- Health: 2100 (+630 per level)
- Damage: 20 (+4 per level)
- Speed: 9 m/s
- Armor: 20
- Attacks/Moves:
- Small Bombs (from an opening in its pot, the Dunestrider hurls a number of small explosive bombs in quick succession towards the player)
- Big Bombs (raises itself to its full height, and drops large bombs which roll towards the player and explode on impact)
- Regenerate (connects via tendrils to all nearby targets - players and enemies - and drags them into its pot. Each target inside the pot has its Health sapped in order to heal the Dunestrider. +200 Armor to the Dunestrider while this is happening)
The Clay Dunestrider is most formidable when it's surrounded by other enemies - or better yet, other bosses. On its own, you don't really have to worry about its Regenerate effect except to prevent yourself from being pulled in; but at later levels, with multiple Dunestriders and hundreds of regular enemies clustered about the Teleporter, it can become very difficult indeed to stop that boss bar from filling right back up to full. FYI - while Regenerating the Dunstrider has an Armor value of 220, giving it nearly 70% damage reduction. That's why it feels so much tankier during these moments: because it becomes a goddamn tank.
Aside from this, the Dunestrider relies on two damage-dealing attacks. Both are pretty hard to avoid in their entirety due to the sheer quantity of bombs sent your way one after the other; but as long as you stay on the move in a circular motion around the Dunestrider, you shouldn't have too much trouble avoiding these bombs - which is good, because they do deal a lot of damage if you let them hit you (believe me, I know. The things I've done for science!).
Imp Overlord - tips and strategies
- Health: 2800 (+840 per level)
- Damage: 16 (+3.2 per level)
- Speed: 13 m/s
- Armor: 20
- Attacks/Moves:
- Teleport (disappears and reappears near the player, dealing large damage to players caught in an area of effect around the reappearing point)
- Melee Swipe (swipes at players in melee range, dealing massive damage)
- Spikes (throws a row of fast-moving, damage-dealing spikes towards the player. Spikes that don't hit will stay stuck in the ground for a time, dealing damage to players that come into contact with them)
The Imp Overlord has an unfortunately distracting and derpy expression, which is probably why it's so angry all the time. Don't get distracted; this is a powerful boss that only spawns from Stage 3 onwards, and despite its size it's fast and mobile enough to stay hot on your heels throughout the entire fight. Those throwable Spikes are its only form of ranged attack, and as such you'll find it using this attack quite a lot. Just avoid them as they're thrown and keep your eye out for them while they're in the ground, and you're golden.
It's the other two moves that are more frightening, particularly when used in tandem. Teleport allows the Imp to quickly close the gap between itself and the player, which itself deals damage in an area around where it reappears; after which it can quickly follow up with one of its devastating Melee Swipes, which can really knock the breath (and life) right out of you. If you're lacking in mobility items and skills then this will be a more challenging fight than it needs to be, because a big part of defeating the Imp Overlord is dodging or keeping out of range of those Swipes.

Magma Worm - tips and strategies
- Health: 2400 (+720 per level)
- Damage: 10 (+2 per level)
- Speed: 20 m/s
- Armor: 15
- Attacks/Moves:
- Leap (a constantly looping move where the Magma Worm dives below the ground, then reemerges and soars into the sky, then dives back down, etc. Each entry/exit spawns fireballs that explode nearby, dealing significant damage)
- Grounded (homes towards the player, diving in and out of the ground but staying more or less on ground level the whole time)
The fearsome Magma Worm is probably the most intimidating of the usual bosses you can come across. Another Stage 3 and onwards boss, it's big, it's fast, it's glowing, and it's hard to get a bead on it at the best of times. The number one rule to follow when fighting a Magma Worm is to lead it out into the open, because you don't want to tangle with these snaky bastards in a confined location (like the cave in Rallypoint Delta, for example - for more details take a look at our Risk of Rain 2 stages/levels guide).
The Magma Worm doesn't really have attacks per se. Damage is dealt in the form of igniting players that come into contact with it, and via the fireballs that erupt all around the Worm whenever it touches the ground. So basically, either keep your distance from it, or, if you have to get close (i.e. if you're Mercenary) make sure you're tanky and/or invulnerable enough to deal damage without dying in seconds.
The recent Risk of Rain 2 patch gave the Magma Worm a more grounded move set to make it so it's not always hurling itself into the air and down again. During this grounded phase, it just follows you around while snaking in and out of the ground. Really, there isn't much difference between the two move sets, but at least the grounded phase makes it easier to hit. Plus you don't have to worry about fireballs during the grounded phase. In either case, it's a straightforward albeit dangerous fight that can be boiled down to one essential point: attack it whenever it won't cost you oodles of health to do so.
Overloading Worm - tips and strategies
- Health: 12000 (+3600 per level)
- Damage: 50 (+10 per level)
- Speed: 20 m/s
- Armor: 15
- Attacks/Moves:
- Leap (a constantly looping move where the Overloading Worm dives below the ground, then reemerges and soars into the sky, then dives back down, etc. Each entry/exit spawns balls of lightning that explode nearby, dealing significant damage)
- Grounded (homes towards the player, diving in and out of the ground but staying more or less on ground level the whole time)
The Overloading Worm is a much rarer and more powerful variant of the Magma Worm. Not an Elite, but an entirely different boss altogether - despite the fact that their behaviours and move sets are entirely identical.
Aside from its name and appearance, the Overloading Worm differs from the Magma Worm in just two ways: its Health and Damage stats, which are vastly upgraded; and the fact that it emits lightning bolts all around it instead of fireballs when diving in and out of the ground. These lightning bolts hit for truck-loads of damage each time, so you really don't want to be caught out by this glowstick of death.
Otherwise, the fight is identical to the Magma Worm. Don't get eaten, slowly whittle it down while it's safe to do so, and don't engage it in confined spaces. If the Teleporter isn't out in the open, lure the beast away first so you can deal with it while keeping an eye on it at all times.

Aurelionite - tips and strategies
- Health: ??? (+??? per level)
- Damage: 40 (+8 per level)
- Speed: 5 m/s
- Armor: 20
- Attacks/Moves:
- Ground Punch (punches the ground, forcing a row of spiked rocks to appear out of the ground near the player. Damages in an area of effect around each rock and sends the player soaring into the air upon impact)
- Floating Rocks (summons a cluster of floating rocks above the Aurelionite that periodically fires laser blasts that home towards the player)
- Laser Beam (charges up and fires a massive laser beam from its eye, which locks onto the player and deals immense damage over time)
The Aurelionite is a special boss that only appears in the Gilded Coast Environment (for everything you need to know about the Gilded Coast, check out our Risk of Rain 2 stages/levels guide). This phenomenally powerful boss is a variant of the Stone Titan, with a move set to match; but where it proves truly unique is that once spawned by donating to the various Halcyon Beacons scattered across the map, the Aurelionite is completely invulnerable - and will remain so until you once again donate gold to all of the Halcyon Beacons. So beware - a great deal of gold is required in order to first summon and then defeat this titanic boss.
As for the actual fight, it's very much the same as an ordinary (if super-tanky) Stone Titan, with just one major difference: the Ground Punch move, where the Aurelionite smacks the ground with its fist/sword, will force up a whole row of spiked rocks instead of just the one, each of which deals large damage in an area of effect around it. Thankfully, it's quite clearly telegraphed when this move is about to take place, so if you've got some decent vertical mobility or speed then avoiding this attack won't be a problem.
As with the Stone Titan, the main threat here is the Laser Beam, which will utterly destroy you if you don't manage to break line of sight in time. This is made harder by the fact that you need to go around to all the Halcyon Beacons to defeat the Aurelionite, preventing you from camping near a certain obstacle or rock face. But the principle is unchanged: never take your eyes off the Aurelionite, watch out for the Laser Beam charging up, and find cover immediately once you see it.
And with that, we conclude our Risk of Rain 2 bosses guide. By now you ought to have learnt a thing or two about the main threats you'll be facing during your runs, and how to deal with each boss as and when they arrive. Time to put your newfound knowledge to the test! Go on, we'll still be here when you get back.