Risk of Rain 2 levels/stages - Environment types, Newt Altar locations, secret areas
To the Abyssal Depths and beyond

Call them what you want - Environments, stages, levels - but it'd be doing a disservice to all these stages of Risk of Rain 2 to say they're simply the backdrop to your journey of survival and inevitable demise. Each of these Environments plays an important role in shaping your run, but to use them to your advantage you'll need to learn everything about them; their layout, their passageways, their variants, their secrets. Our Risk of Rain 2 levels and stages guide will walk you through each Environment in turn and explore all their hidden depths, leaving no stone, tree root, or pile of snow unturned.
If you're after a more general overview or beginner's guide to Risk of Rain 2, then you should head over to our Risk of Rain 2 guide. We've got tonnes of beginner-friendly explanations and practical tips, along with links to other areas of our Risk of Rain 2 guides series, from completing the various Risk of Rain 2 challenges to stats and behaviours of all the different Risk of Rain 2 enemies - and much more besides.
Risk of Rain 2 stages/levels guide - all Environments & map secrets explained
There is a grand total of nine different Environments and levels to talk about with Risk of Rain 2 (including the three hidden realms), which means we've a fair amount to get through in this levels and stages guide. Click on any of the links below to skip ahead to a particular section and Environment.
Risk of Rain 2 stages & Environments overview
A run in Risk of Rain 2 has no end, per se - apart from getting killed, that is. The structure of a run is made up of "Loops" of four different sets. You start in the First Set, which means you'll be in one of the two First Set Environments (Distant Roost or Titanic Plains). From there you'll progress to the Second Set of Environments (either Abandoned Aqueduct or Wetland Aspect), then the Third Set (Rallypoint Delta), and finally the Fourth Set (Abyssal Depths).
When you pass through the Teleporter at Abyssal Depths, you'll loop back to the First Set again, and begin another "Loop" through the different sets of Environments. This will continue until either you're killed by the ever-increasing tide of enemies, or you willingly obliterate yourself in A Moment, Fractured to end your run - but more on that later.
Each of these stages gives you a completely different map to explore, along with a specific selection of enemies and bosses native to that level (though once you complete a "Loop", any enemy can spawn in any Environment). The maps themselves never change except for minor adjustments such as doors to extra areas opening or closing. The actual layout of each Environment will always remain familiar.
But what spawns inside these maps does change - that is, Chests, Terminals, the Teleporter, Enemies, Newt Altars, and so on. The most important thing in each stage is to find the Teleporter, which is sometimes very well hidden. So you'll need to spend time learning each stage so that you know where you haven't yet checked.
Let's take a look at each of the Environments in turn. Note that all of the below information is taken either from our own findings or from the Risk of Rain 2 wiki.

Distant Roost (First Set)
- Native Enemies: Beetle, Jellyfish, Lemurian, Lesser Wisp, Stone Golem
- Native Bosses: Beetle Queen, Stone Titan, Wandering Vagrant
- Newt Altar Locations:
- Under land bridge gap on a rock ledge.
- Next to mossy rock by pillar outcropping.
- Next to mossy rock on lower ledge by pillar outcropping.
Distant Roost is one of the first and simplest stages in Risk of Rain 2; awash in a dismal blue and covered in a variety of trees, rocks, and debris, you can often traverse this map very quickly compared to the other areas. The Wandering Vagrant seems to spawn as the Teleporter boss here a lot, but not always.
Pay particular attention to whether the big stone door beneath the land bridge is open or not, because if it's open you can follow the path down to an additional area of the map which will often contain chests and/or the Teleporter if it's available - as well as a potential Newt Altar location.

Titanic Plains (First Set)
- Native Enemies: Beetle, Greater Wisp, Jellyfish, Lemurian, Lesser Wisp, Stone Golem
- Native Bosses: Beetle Queen, Stone Titan, Wandering Vagrant
- Newt Altar Locations:
- On top of the center arch in the middle of the map.
- On top of the spire overlooking the stone steps at the entrance to the canyon.
- Behind the furthest arch on both sides of the map.
- At the tip of the map beyond the stone circular arch embedded in the ground.
- Behind the stone steps next to the canyon jump point.
The Titanic Plains is a stage dominated by greenery, cliffs, and enormous traversable stone arches. The other side of the First Set of Environments opposite the Distant Roost, the native enemies are the usual bunch, plus a chance of seeing a Greater Wisp every so often - a much tougher cousin of the Lesser Wisp which fires two large green fireballs at players. For much more information on all the different types of enemies, check out our Risk of Rain 2 enemies guide.
It's fairly easy to get anywhere you want in the Titanic Plains despite the emphasis on verticality, because of the various vents/boosters dotted about the level. When against a great many enemies or bosses where it's important to break line of sight (such as the Wandering Vagrant or the Stone Titan), try to play around the bases of arches or large rocks for some extra cover from the more dangerous attacks.

Abandoned Aqueduct (Second Set)
- Native Enemies: Beetle, Beetle Guard, Greater Wisp, Lemurian, Lesser Wisp
- Native Bosses: Beetle Queen, Clay Dunestrider, Stone Titan, Wandering Vagrant
- Newt Altar Locations:
- High ledge across from Ancient Gate and sand pit.
- On top of ridged pillar ledge (same wall as the Ancient Gate).
- In fossil head skull.
- Secrets/Easter Eggs: Ancient Gate
The one desert Environment currently in Risk of Rain 2, the Abandoned Aqueduct is part of the Second Set of stages, and the first time you'll come across enemies such as the Beetle Guard (a larger and more dangerous version of the Beetle), and the Clay Dunestrider boss. The map is divided into two areas by a massive cliff face, through which there is a single large entrance between the two sections. You'll also have the potential to find several bridges which stick out and lead you to additional smaller areas around the edge of the map - though each of these bridges has a chance to spawn or not spawn.
The Abandoned Aqueduct is also home to the Ancient Gate - a massive circular doorway which can be opened by finding and simultaneously pressing the two buttons hidden about the Environment. The Gate will then open, leading you to a fight against two unique Elder Lemurians, whose death will bequeath you with two rare and powerful items and an Achievement. For full details on this and other challenges, check out our Risk of Rain 2 challenges guide.
Wetland Aspect (Second Set)
- Native Enemies: Beetle, Brass Contraption, Greater Wisp, Jellyfish, Lemurian, Lesser Wisp, Stone Golem
- Native Bosses: Beetle Queen, Stone Titan, Wandering Vagrant
- Newt Altar Locations:
- Top of pillar at center of map.
- In deep water hole behind large wall.
- High outer ledge (opposite tunnel cliff).
- Secrets/Easter Eggs: Altar to N'kuhana
Let me dig deep into my lexicon of terms to find what best describes Wetland Aspect... Yes, moist is the word. This watery mire of an Environment is another area dominated by fallen stone pillars and other long-demolished ruins. You'll find the Brass Contraption spawns here quite often, but the real danger is the increased presence of those pesky floating Jellyfish that look to silently sneak up on you and relieve you of half your health.
You'll also find another secret area in the Wetland Aspect - that of the Altar to N'kuhana. Those creepy easter egg area allows you to complete the challenge Her Aspects, which gives you the item N'kuhana's Opinion for future runs. Again, for full details. look no further than our Risk of Rain 2 challenges guide.

Rallypoint Delta (Third Set)
- Native Enemies: Beetle, Beetle Guard, Bighorn Bison, Brass Contraption, Greater Wisp, Imp, Lemurian, Lesser Wisp, Stone Golem
- Native Bosses: Beetle Queen, Clay Dunestrider, Imp Overlord, Magma Worm, Stone Titan, Wandering Vagrant
- Newt Altar Locations:
- Top area of map next to vertical containers [Consistent spawn].
- Behind tree around coast side of map.
- Behind large rocks near container stack wall.
- Secrets/Easter Eggs: Timed Security Chest
Currently the only Environment in the Third Set of stages in Risk of Rain 2, Rallypoint Delta is an icy map centred around a sprawl of industrial containers and man-made structures. As a map it's fairly similar to the rest in terms of layout, with passages that wrap around the edges and a fair few vertical drops.
Two things to note about Rallypoint Delta in particular. First: it's where you'll find the Timed Security Chest which you'll have to get to before 10 minutes have elapsed in your run if you want to open it and complete the [REDACTED] challenge. Second, it's where you'll find some tough new enemies, including the teleporting Imps and the roaring charging Bighorn Bison. Neither should be underestimated, particularly when they spawn in groups. Learn why over at our Risk of Rain 2 enemies guide.
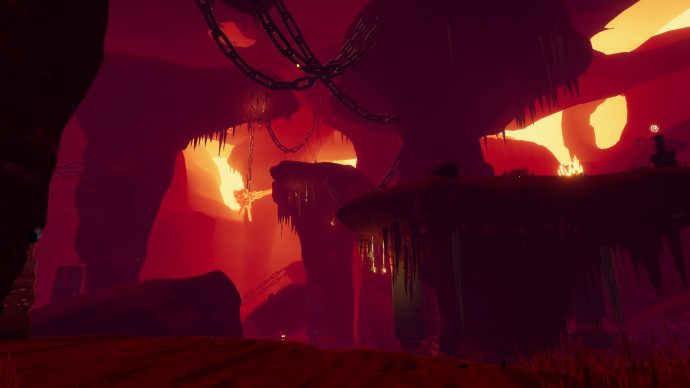
Abyssal Depths (Fourth Set)
- Native Enemies: Beetle, Beetle Guard, Bighorn Bison, Brass Contraption, Elder Lemurian, Greater Wisp, Hermit Crab, Imp, Lemurian, Lesser Wisp, Stone Golem
- Native Bosses: Beetle Queen, Clay Dunestrider, Imp Overlord, Magma Worm, Stone Titan, Wandering Vagrant
- Newt Altar Locations:
- Top of hanging orange crystal in the center of the Environment.
- Corner of the third elevation level near the chain impalement.
- Behind a map variable door leading to a room full of magma crystals. Can be accessed even if the door is closed on both ends by going following the drop-down path to the door and simply leaping over its edge with any movement abilities.
Just like the Third Set, the Abyssal Depths is the only Environment currently spawnable in the Fourth Set of stages. A hellish biome of fire and massive (traversable) chains, this is the toughest Environment regarding the enemies that spawn here natively, introducing both the Hermit Crab (a burrowing crustacean that hurls boulders at the player) and the Elder Lemurian (a powerful dragon-like enemy with powerful flame and fireball attacks that can kill a player in seconds).
Notably, a Legendary Chest will always spawn in the Abyssal Depths, near the centre of the map. These large chests cost an awful lot of gold, but will always contain one of the 16 Legendary Items currently in Risk of Rain 2 - rare items with particularly powerful effects. For more information, take a look at our Risk of Rain 2 items guide.

Secret/hidden stages & Environments
Aside from the above regular Environments that you would find in a single "Loop" of all the sets, there are three more hidden levels in Risk of Rain 2, each of which have different criteria for becoming accessible, and which each play a different role throughout the game.
The Bazaar Between Time is essentially the "shop" area of Risk of Rain 2. It is quite a bit less accessible than most shops in most games, as it can only be accessed via the Blue Portal which very rarely appears next to the Teleporter for a stage once it's fully charged. However, you can pay a Lunar Coin into a Newt Altar in order to guarantee the Blue Portal spawning on that level.
Once you're in the Bazaar, you can purchase items and other notable interesting things using Lunar Coins - which, incidentally, persist between runs, so it might be an idea to save up for a good shopping spree for a particular run. It's also worth noting that the time and difficulty metres for the game still progress while you spend time in the Bazaar, so speed is still important in this area.
The Gilded Coast is another hard-to-reach area accessible via portal - this time, the Gold Portal. This Environment houses a number of Halcyon Beacons which you must pay gold into in order to activate them. Four activated Halcyon Beacons will spawn Aurelionite - a unique boss found only in Gilded Coast.
Aurelionite is invulnerable until all the Halycon Beacons are once again filled with gold by the player - which means you'll need an awful lot of gold saved up in order to first spawn and then defeat this boss.
This curious Environment is only accessible via the Celestial Portal, which is guaranteed to spawn every three levels after each Loop next to the Teleporter once it's charged. The floating islands of A Moment, Fractured hold the Obelisk, upon which the player can choose to obliterate themselves in order to end their run on their own terms (and unlock a new survivor in the process - see our Risk of Rain 2 challenges guide for further details).
If you don't wish to end your run at this point, you can simply proceed through the portal near thee Obelisk and you'll be brought back into the Abyssal Depths.
It's also worth noting that there are a couple of far-off floating islands which you can get to with the right combination of items and equipment (Milky Chrysalis combined with Fuel Cells for multiple charges, and Wax Quails for horizontal jump distance). There is no reason to get to these islands except to say you've got there, and to see the hidden easter eggs there. No, really. Literal easter eggs.

And that's all we've got for now on the various Risk of Rain 2 levels and stages - at least, the ones currently in the game at this time. As with all the other guides in this series, we'll continue to update this page as further updates and content are added to this chaotic roguelite.